1987 Searay Seville Cuddy Restoration - stringer and engine mounts

Broaters

Petty Officer 2nd Class
Joined
Jul 31, 2017
Messages
139
NatedoggAZ here is the link to a google drive with pictures we took with my brother while working on the hull... hope you'll find what you want ? I may have some more pictures on my smartphone
 

NatedoggAZ

Petty Officer 2nd Class
Joined
Mar 7, 2018
Messages
182
Thanks Broaters!! that definitely helps!

P.S. looks like you have Burberry cushions in your cuddy... =)
 

kcassells

Fleet Admiral
Joined
Oct 16, 2012
Messages
8,599
Been trying to respond several times but keeps getting thrown back...oh well.
 

Broaters

Petty Officer 2nd Class
Joined
Jul 31, 2017
Messages
139
Broaters - do you have any more pics of the inside of your boat with the decking wood taken out? I have almost the same boat (mine is bow rider) and I'm a little confused on how the seat risers work. I don't plan on taking them out - just need to replace my own decking and I think the decking is cut and just goes around the seat risers?

Thanks!

on our boat the seats bases were glued and glassed over the floor.
I can't see how you would replace the decking and not the seat bases unless you put a new floor over the existing one.
Not sure it is a good idea if the existing one is rotten tough.

on this photo you can see the floor with the seat base removed, the remaining structure is the link between the side of the seat base and the hull. It was foamed too.IMG_1105_r.JPG
 

NatedoggAZ

Petty Officer 2nd Class
Joined
Mar 7, 2018
Messages
182
Thanks Broaters! I still have to pull up the carpet on mine to check it out. My boat has been in Arizona all of its life - so COUNTLESS days of temperatures between 100 - 120 degrees over the past 30 years has made these floors kinda dry... It looks like a big project and I may not tackle it until the season is over late this year.

If its not that bad, I may just cut the decking around the boxes and replace the decking and put some new glass resin all around it...but just wont know until I dig a little deeper.

ND
 

Woodonglass

Supreme Mariner
Joined
Dec 29, 2009
Messages
25,924
Yup, you'll need to remove the boxes too! I'd use PB to bed the stringers and NOT PL. PL and resin don't play well together at times and it takes for EVER to cure. Hard PB is actually softer than wood and more flexible. The Fillets and Glass tabbings in conjunction with the wood core carry the stress and load.Check out the Middle link below
 

Broaters

Petty Officer 2nd Class
Joined
Jul 31, 2017
Messages
139
ok thanks for the advice.

our local supplier offers an epoxy based glue to laminate the wood pieces together and a second product poly based glue (kind of premixed PB) to glue the wood components to the hull (transom, stringer, deck...)
I will soon get some samples and test it.

also about the type of glass to be used,1708 is not very common around here. 2 different suppliers recommend me to use only multiple layers of CSM to do that job. what do you think of it? should I keep looking for 1708 like glass or go with the CSM? I know most people go with biax but has it already been done the CSM way?
 

Broaters

Petty Officer 2nd Class
Joined
Jul 31, 2017
Messages
139
Google US Composits in florida for the 1708

Thanks for the tips Chevymaher. this shop looks very good. Unfortunately we are in Belgium so I'm looking to a closer supplier.
Aniway I'll ask them if they ship overseas and compare the pricing.
 

JASinIL2006

Vice Admiral
Joined
Feb 10, 2012
Messages
5,545
also about the type of glass to be used,1708 is not very common around here. 2 different suppliers recommend me to use only multiple layers of CSM to do that job. what do you think of it? should I keep looking for 1708 like glass or go with the CSM? I know most people go with biax but has it already been done the CSM way?

CSM by itself won't add much strength. If you need some structural strength, you will have to lay some sort of cloth over the CSM. (1708 is just a double bias cloth with a layer of CSM stitched to it; the CSM helps with bonding to the material beneath the 1708, while the double bias cloth provides strength).

You could get essentially the same thing as 1708 by laying 3/4 oz CSM under a layer of a 17 oz. double bias cloth. (You could use 1.5 oz. CSM, too, rather than the 3/4.Your plies would just be a bit thicker.)

I'm guessing you will want to find a supplier over in the Euro zone. Shipping to Belgium from the States is really pricy (our son is over there this year on an exchange program). Shipping even a small package is quite expensive; I can't imagine what it would cost to ship glassing supplies...
 

Broaters

Petty Officer 2nd Class
Joined
Jul 31, 2017
Messages
139
ok, time for an update, we have been working on the boat for 2 afternoon and 2 evening since the last post.

at first we tought about saving the starboard side of the boat stringer and deck + seat box. this was where we stoped

Click image for larger version  Name:	IMG_1118_r.JPG Views:	1 Size:	254.0 KB ID:	10549256

after some rest, readings and brainstorming we decided to remove the starboard side of the deck and stringer altough it was not rotted.
the idea is mainly to rebuild the boat in a symetrical way on port and stdb side so off it go

Click image for larger version  Name:	IMG_1126_r.JPG Views:	2 Size:	298.2 KB ID:	10549257

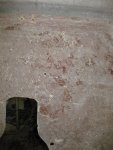
after investigation on the cabin bulkhead we found that the very poor sealing of the cabin drain allowed water under the cabin floor.
this is the "drain collector" , it was not very glassed and even not glued to the hull, i could almost pass my finger between the wood and the poly of the hull.

Click image for larger version  Name:	IMG_1104_r.JPG Views:	2 Size:	376.8 KB ID:	10549265

plus the drain pipe was not connected properly to this cavity, it was about 10 inches too short

Click image for larger version  Name:	IMG_1124_r.JPG Views:	2 Size:	306.3 KB ID:	10549266

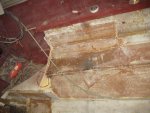
so in the end we completely removed the cabin floor. fwd section was dry, rear one started to rott. black water traces clearly visible on the hull.

Click image for larger version  Name:	IMG_1127_r.JPG Views:	2 Size:	319.4 KB ID:	10549267

The undertank floor was removed too. although it felt really solid it was a total mess under the glass. again very poor sealing from factory

IMG_1129_r.JPG

It is where we where after about 10 hours of work
 

Attachments

  • IMG_1129_r.JPG
    IMG_1129_r.JPG
    315.3 KB · Views: 1
Last edited:

Broaters

Petty Officer 2nd Class
Joined
Jul 31, 2017
Messages
139
Next afternoon was spent with the grinding of the old glass and lips.

we had prettty decent success in removing the major glass buildup with a wood chisel and a hammer. you can see the big chunk that we removed this way.

it appears that some previous repair were done by glassing over gelcoat... not good, but easier to remove :) IMG_1244_r.JPG

after that the real deal began GRINDING.
we found this type of disc at the local abrasive supplyer

disque.png

It is a semi flexible that must be used with a support on a small grinder (125mm diam) and it is super effective. It cuts a lot, does not gets clogged and wear very slowly for about 5 Euro per unit.

we finished the job with a clasical flap disc with abrasive paper pads 40 grit.

This is where we are now

IMG_1249_r.JPG


IMG_1251_r.JPG

We are going to keep the existing cabin arrangment as everything in there is dry and very solid.
We will be joining the new stringer and the existing one upfront of the tank compartment so we will be able to put some reinforcement pieces on both sides without getting into the way of the fuel tank.

to be continued
 

Broaters

Petty Officer 2nd Class
Joined
Jul 31, 2017
Messages
139
some questions for the experienced rebuilders and even the beginners :)

on the transom, we grinded off all the remaining wood and remaining of fiber, at some palces we can still see some CSM like fibers, the surface is not perfectly flat but I guess it will be cerrected with the PB used to glue the transom wood.

Click image for larger version  Name:	IMG_1253_r.JPG Views:	1 Size:	330.0 KB ID:	10549287

on the bottom of the hull in the engine compartment we grinded a very thick layer of old glass / gelcoat.
in many place we can see the "bare hull" with woven fiber style but in some place are still remaining of solid CSM . do we need to remove them all or can we glass directly on this.
in this picture you see the difference between the 2 areas:

Click image for larger version  Name:	IMG_1254_r.JPG Views:	1 Size:	357.7 KB ID:	10549288

last one (for now :) )

the original deck was not going all the way to the side wall of the hull but was rather sitting on the beginning of the flat area of the side of the hull. it was glassed on the horizontal part but nearly not to the wall.
should we rebuild this way or do we go all the way across these flat areas tup to the side??

IMG_1255_r.JPG

thanks a lot for your comments, as always any help is very much appreciated.
 

Attachments

  • IMG_1253_r.JPG
    IMG_1253_r.JPG
    330 KB · Views: 0
Last edited:

chevymaher

Commander
Joined
Mar 29, 2017
Messages
2,915
I am new but on the transom main concern is. Is it all flat. If you continue you may make a wavy surface prone to voids when transom is clamped in. The sanded roughed up is what your looking for. If they are just small low spots in a overall flat plane the PB will fill them. Hand scuff in there for better adhesion. Get the shine gone.

The swim deck issue with wood. I would put a couple layers of 1708 for strength and to seal it in.

Hull. Looks fine as long as it is flat and the new material will lay down with out bubbling.
 

JASinIL2006

Vice Admiral
Joined
Feb 10, 2012
Messages
5,545
Nice work! You don’t have to grind out all the pink glass nor do you have to make it smooth and even. You are correct that PB will fill voids. The big concern is that your transom is the correct thickness when all is said and done. Make sure you use plenty of PB and drill relief holes in the ttansom core so excess PB has a place to escape when you clamp.
 

BlueBeard70

Cadet
Joined
Feb 22, 2018
Messages
17
Wow, great work. I'm so inspired by all of you guys. Weather is warming up here and so I'm basking in the amazing work you're doing for now. It's amazing the progress you've made in such a short time!
 

Woodonglass

Supreme Mariner
Joined
Dec 29, 2009
Messages
25,924
Yup main concern with I/O transoms is that they are the correct thickness +- 1/4" and that both inside and outside surfaces are parallel. The PB used for installation will take care of small to medium variances in the surface.
 

Broaters

Petty Officer 2nd Class
Joined
Jul 31, 2017
Messages
139
Question about the fuel tank:
everyone seals the fuel tank compartment in the deck and glassing over the entire flooring. Our construction was with a removable panel over the fuel tank that was screwed into some cleats. This is way more convenient to acces the tank but how often do me need to do this? On the opposite this is not very good for sealing and would allow more water to drain down the fuel tank compartment.
what are the pro and cons?
 
Last edited:

chevymaher

Commander
Joined
Mar 29, 2017
Messages
2,915
Just my opinion. Mine is the same as yours removable section above the tank. My boat had zero care and was full of water from day one. Wood at the top was unsealed and was perfect. The bottom where the skii locker drains through is the only concern. Make sure the lowest points are sealed. Anything at the top seems to drip dry well.
 
Top