96 Bayliner 2050 - The Dirty Rotten Baystard

Mad Props

Lieutenant Commander
Joined
Jul 8, 2016
Messages
1,766
So with the cold weather finally here, I've been making a list of things to do over the winter, and one of those things is to inspect, clean, service, and overall fixup the outdrive. I muscled it into the basement the other night and gave it a quick wipedown with some degreaser/cleaner and pulled the prop. Overall looks to be in pretty good condition, but I'm going to do a video series on servicing/etc the outdrive.

I'm planning to drain the oil, then do a pressure test. Pending the pressure test results, I will either be replacing seals or moving on to replacing the U-joints. Also going to put in a new impeller and some other odds and ends. I'm going to try to video everything so theres a decent quality series out there on how to do all this stuff.

Stay tuned!
:mad-new:
 

Mad Props

Lieutenant Commander
Joined
Jul 8, 2016
Messages
1,766
just ordered some u-joints... Trying to gather everything I need to do the outdrive work. Hopefully the pressure test goes well or I'll be giving chevymaher a call to inquire about his mercruiser loan-a-tool program :laugh:

I decided to go with the MOOG 315G u-joints cuz I found them on amazon prime for $13 bucks a piece... slow progress but still progress...

Side note, still working on the bed for my daughter, had my old benchtop planer crap out on me part way thru so that threw a wrench in things, then i got a metal lathe which I've been messing around with, now back on the bed since I picked up a new benchtop planer... pretty much everything but boat work seems like lately.
:mad-new:
 

Chris51280

Ensign
Joined
Jan 24, 2018
Messages
907
Oh.dont I know it. Fall cleanup, window installation. List is never ending.
I straightened ny propshaft this summer from .05" to .002 on a 20 ton press. Replaced lower and upper seals. The only one I did not change was the yoke seal since I did not want to take the bearing pack apart. After I took everything apart again I saw oil in the bellows. Pressure test was good though at 9psi.
the 7/8 nut on the lower unit is b@$!. I hope I never have to open it ever again.
 

Mad Props

Lieutenant Commander
Joined
Jul 8, 2016
Messages
1,766
Got an intro video out today for the series on inspecting/cleaning/servicing the outdrive unit. I go over my plan and it will be followed up with individual videos on each item... Right now the plan is:
Video 1: Intro
Video 2: Drain oil, pressure test drive
Video 3: Change U-joints
Video 4: Change Impeller
Video 5: Re-seal trim cylinders
Video 6: *Tentative* Replace seals pending pressure test (hopefully not doing this)

Don't know if I'm forgetting anything there but that sounds like plenty of work to me lol.
Check it out!


Mad Props

Lieutenant Commander
Joined
Jul 8, 2016
Messages
1,766
Xmas comes early! got the new u-joints in the mail yesterday. Should be getting new drive belt for my metal lathe today, so I plan to turn me a fancy pressure tester fitting. Once done with that, I should be able to get underway with the drive servicing.
:mad-new:
 

chevymaher

Commander
Joined
Mar 29, 2017
Messages
2,915
I am going to use the filler from the lube bottle. And reduce the air pressure with the Paint filter. For pressure testing if i ever get that far.

I got till may I am doing the Uncle Joe he moving kinda slow thing.
 

Grub54891

Vice Admiral
Joined
Jun 17, 2012
Messages
5,911
I am going to use the filler from the lube bottle. And reduce the air pressure with the Paint filter. For pressure testing if i ever get that far.

I got till may I am doing the Uncle Joe he moving kinda slow thing.

How can you reduce pressure with a paint filter??
 

chevymaher

Commander
Joined
Mar 29, 2017
Messages
2,915
It is the pressure regulator filter for the paint gun. I wasn't really clear I reckon. I talk like you hang out here and know WTF I am talking about.
 

Grub54891

Vice Admiral
Joined
Jun 17, 2012
Messages
5,911
It is the pressure regulator filter for the paint gun. I wasn't really clear I reckon. I talk like you hang out here and know WTF I am talking about.

Yeah when I asked, I was thinking of a cone filter, I have the regulated filters myself. lol
 

Mad Props

Lieutenant Commander
Joined
Jul 8, 2016
Messages
1,766
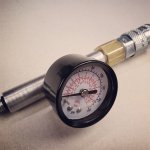
Slight delay after "learning" how to use my little new lathe... was learning to thread and lets just say it didn't go so well... So after learning to turn down the spindle speed when threading, I ordered a new drive belt :facepalm: and they just came in yesterday, so back on the lathe, i finished turning the fitting. If I had bigger bar stock, I coulda make it so there were no adapters, but I was forced to use 1/8" NPT fittings for the gauge and airline, so I had do use an adapter to the air line fitting...

This is entirely unnecessary as you can use the fill bottle fitting or drill out a 3/8-16 bolt and make it work, but hey, smoke 'em if ya got 'em lol.

So to summarize the part, its a 3/8-16 thread with o-ring on one end, a 1/8" npt pressure gauge in the middle, and a air quick-connect on the other end, drilled the whole way thru. Hopefully it works!

Heres the finished product, hope to drain the drive and pressure test tonight. I also noticed the gauge is floating above 0 so hopefully when i test the fitting it will drop back down (thats what i get for a cheap harbor freight pressure gauge lol)...

:mad-new:
 

Attachments

  • photo304720.jpg
    photo304720.jpg
    147.7 KB · Views: 1

oldrem

Commander
Joined
Nov 7, 2013
Messages
2,002
Nice. I miss my 4" Atlas metal lathe, but didn't have room to set it up at my current house. Gave it to my son-in-law who has it at his nephews. Great little lathe I got many hours of enjoyment from.
 

Chris51280

Ensign
Joined
Jan 24, 2018
Messages
907
Can you read less than 10psi with it? Should not put more pressure than that to it or you might blow a seal
 

Mad Props

Lieutenant Commander
Joined
Jul 8, 2016
Messages
1,766
Can you read less than 10psi with it? Should not put more pressure than that to it or you might blow a seal

Yea, there isn't much resolution down that low, but each minor indication line is 5psi, so I can at least make sure its below 10.
 

chevymaher

Commander
Joined
Mar 29, 2017
Messages
2,915
Video I watched 20 lbs is what they said to use. 680 locktight on the seals to keep them from blowing out.
 

Chris51280

Ensign
Joined
Jan 24, 2018
Messages
907
I followed friscoboater how he did it. Used a tire valve with a few hoses and a gauge. Not sure if there is a manual from mercruiser for this
 
Top