96 Bayliner 2050 - The Dirty Rotten Baystard

Mad Props

Lieutenant Commander
Joined
Jul 8, 2016
Messages
1,766
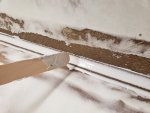
So from my previous testing, I was convinced that PVA was going to be the way to go for getting the fairing compound to set up... Now I'm second guessing that decision... the PVA is much harder to remove than I thought it would be. I spend about an hour last night just removing the PVA before sanding....

I'm thinking now I might just go back to using wax and see if that goes well...
 

Chris51280

Ensign
Joined
Jan 24, 2018
Messages
904
yup. made the same conclusion. I may even redo the deck again with some awlgrip or similar deck paint
 

Mad Props

Lieutenant Commander
Joined
Jul 8, 2016
Messages
1,766
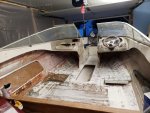
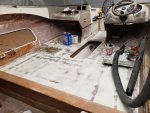
Beautiful weather and a very productive day today... I got all the fairing compound down and sanded... I need to touch up a few small spots still but the major smoothing is done. I also cut the hole in the floor (yes, hole in the floor) for the ski locker cover... was kinda like opening a time capsule lol... a part of the hull I haven't seen in a year. Glad to report nothing surprising, just some dried up fiberglass dust from the drain... plywood is still dry as a mummy fart.

Away thus weekend but I'm hoping next week I can do the gelcoat/nonskid

I just need to convince myself to stop trying to smooth out every little thing in the hull and just gelcoat it.
20190724_203326-800x600.jpg
 

Mad Props

Lieutenant Commander
Joined
Jul 8, 2016
Messages
1,766
Okay I am game more info. ID of hose and ID of hull hole. I will look.

So, hole in the side of the hull is 1/2"... Hose is 1/4" but not as concerned about the hose size, I can adapt if need be, I just don't wanna open up the hull more if I don't need to.
 

chevymaher

Commander
Joined
Mar 29, 2017
Messages
2,915
So, hole in the side of the hull is 1/2"... Hose is 1/4" but not as concerned about the hose size, I can adapt if need be, I just don't wanna open up the hull more if I don't need to.

I am looking. It is a clown show the guys selling these. What is the most critical measurement read my lips. Hull hole size. That is the only dimension not ever listed, hose size. OD of the flange who cares literally. Is it bigger than the hole you don't want to mention. If it is then it don't matter it is gold. depth of hole in the hull. I can see that as being a critical measurement. They do list that.

If the hose is this size roll the dice will this fitting work. It works with your hose but will it let thousands of gallons thru the hull. Only time will tell.
 

Mad Props

Lieutenant Commander
Joined
Jul 8, 2016
Messages
1,766
I am looking. It is a clown show the guys selling these. What is the most critical measurement read my lips. Hull hole size. That is the only dimension not ever listed, hose size. OD of the flange who cares literally. Is it bigger than the hole you don't want to mention. If it is then it don't matter it is gold. depth of hole in the hull. I can see that as being a critical measurement. They do list that.

If the hose is this size roll the dice will this fitting work. It works with your hose but will it let thousands of gallons thru the hull. Only time will tell.

Yup, I've basically given up on finding one... at this point, I assume I'm going to have to open up the hole.. yaaay...
 

Mad Props

Lieutenant Commander
Joined
Jul 8, 2016
Messages
1,766
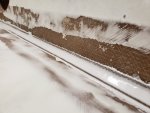
Was out for like an hour last night to do some more sanding/fairing.. I think I'm nearing the end, or at least what I'm gonna settle for... I think I'm getting to the point of diminishing returns.

I do have a question for the fiberglass experts tho...

I've been making my fairing compound with surfacing wax. It seems to be working in terms of giving a full cure, but when I sand, it seems like the top layer of the fairing compound is gumming up the sandpaper, and I'm wondering if its the wax on the surface thats getting into the sanding dust and causing it.... Can I remove the wax with acetone before sanding to help with the issue, or should I just continue as is? I'm also concerned that I might not be removing all the wax if I don't sand every square millimeter and worried the next layer might not adhere properly...

I'm wiping with acetone before additional layers, so I'm hoping this is enough to remove the wax.
 

Mad Props

Lieutenant Commander
Joined
Jul 8, 2016
Messages
1,766
I think tonight might have been the last application of fairing compound to the deck... I just needed to go back and clean up some fillets. Next step is gonna be a full blown hose down and acetone cleaning... then layout the non skid areas with tape before gel coating

20190803_221218-800x600.jpg20190803_221203-800x600.jpg
 

Attachments

  • 20190803_221338-800x600.jpg
    20190803_221338-800x600.jpg
    152.8 KB · Views: 6

steve_h7

Chief Petty Officer
Joined
Sep 16, 2018
Messages
401
Looks good :thumb:
I think it's going to be hard for me to take a hose to the interior knowing all I've replaced due to water. Hopefully I did a decent job sealing her up. :)
 

Chris51280

Ensign
Joined
Jan 24, 2018
Messages
904
I tapped it too but I can't see a difference now since the roller and thick gelcoat made it all even rough. The nap roller made the same anti slip surface.
 

Mad Props

Lieutenant Commander
Joined
Jul 8, 2016
Messages
1,766
I tapped it too but I can't see a difference now since the roller and thick gelcoat made it all even rough. The nap roller made the same anti slip surface.

Lol, that's been in the back of my mind, that it might be all for nothing... I'm gonna try and find some foam rollers that are solvent resistant in an attempt to minimize the roughness of the surrounding areas
 

Mad Props

Lieutenant Commander
Joined
Jul 8, 2016
Messages
1,766
Quick side note....

Next video is up on my youtube showing fairing the deck and cutting the ski locker hole... Enjoy!


steve_h7

Chief Petty Officer
Joined
Sep 16, 2018
Messages
401
:thumb: I was hoping you'd show how you made your fairing compound... I bought mine premade but wondered how others make theirs with resin. Cabosil? What makes it white?
 

Mad Props

Lieutenant Commander
Joined
Jul 8, 2016
Messages
1,766
My method I settled on was poly resin, mekp @ ~1.5%, 3M glass bubbles, and surfacing wax @ 2%. I just added glass bubbles until it started to have some viscosity to it, but wanted it still thin enough to still self level a bit... I'd say it was the consistency of cold maple syrup... Now if i was doing a vertical surface, I added some cabosil to give it some sag resistence. I would then go to like a ketchup consistency.

Sorry, thats the best I can do on analogies lol.
 

steve_h7

Chief Petty Officer
Joined
Sep 16, 2018
Messages
401
I can relate to food analogies... :) Do you just dye it white or do the glass bubbles make it that color?
 

Mad Props

Lieutenant Commander
Joined
Jul 8, 2016
Messages
1,766
Glass bubbles make it that color... its oddly a very similar color to bondo before you add the creme hardener.... also similar smell... made me wonder if it's the same thing
 

Mad Props

Lieutenant Commander
Joined
Jul 8, 2016
Messages
1,766
Getting ready to gelcoat the deck and in some research, its sounding like a I have a couple options and I wanted to maybe get some feedback.

I wan't to try to get the gelcoat to level out as much as possible to minimize brush/roller marks... I know it will never be perfect, even sprayed gel will orange peel.

I'm thinking my options are the following:
1. Roll/brush as is from the can, trying to wait for slightly higher temps to help reduce the viscosity and let it flow out as much as it can.

2. Thin with 5-10% acetone or styrene - I know this has the downside of reducing the strength of the gelcoat but 5-10% seems to be an acceptable level... This seems to be done typically for spraying reasons, but I imagine a thinned gel would also flow out better.

3. Buy a gelcoat additive like sea hawk patchaid or duratec hi gloss additive. These seem to have the benefit of lowering the viscosity of the gel, as well as providing a tack free cure without wax (not sure this is desireable because I will be doing more than 1 coat.). I've also read, they can tend to cause yellowing of the gelcoat prematurely.

I could just suck it up and do option 1 but with all the time I spent fairing the deck, I'd like to get the gelcoat to look as good as possible.

I also don't want to go the paint option, because I already bough 2 gallons of gelcoat and the pigments so I'm kinda invested at this point... I could always repaint the deck down the road if the gelcoat ever chips/gets damaged and it needs major repairs.
 

Chris51280

Ensign
Joined
Jan 24, 2018
Messages
904
Not sure if I can help much even though I did mine with gelcoat too. I made some mistakes. It was still sticky and did not cure completely right away. So I got some dirt into the gel since it was sticky. The gel needs to be fairly thick if that is even possible and dries really fast. So once you roll it on, it starts to kick and if you roll over again it gets a little rough and tacky.
so the sand and unsanded areas with 3 coats became the same texture.
I probably will do it over again with another coat or use some other product. I do like the clean look without the carpet.

Thinning I hear over and over again is not agood idea. I did not try but am curious of the outcome.

Even,if you mess it up, it can be sanded down smooth again and apply another layer of whatever you want. No harm done. You just added a little more thickness of resin to your floor.
 
Top