96 Bayliner 2050 - The Dirty Rotten Baystard

Mad Props

Lieutenant Commander
Joined
Jul 8, 2016
Messages
1,766
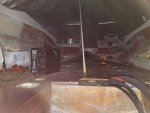
Yea, i used a decent bit of chop fibers as well... Its really my fault, i probably could have spent more time getting the deck to fit more snugly to the hull so I didn't need as much, but oh well... live and learn.

I was going to go back with a 2nd layer of PB since the first layer created kind of a low cove around the perimeter and I wanted to flush it up to the floor height, but now I'm thinking I might like the idea of keeping it, as it would act kind of like a gutter and help keep the floor dry. I dunno, probably doesn't matter either way, just looking for a reason to not use more resin lol.
 

Mad Props

Lieutenant Commander
Joined
Jul 8, 2016
Messages
1,766
Got to the upper 60s on Saturday so I got my butt out there and got the deck tabbed in and a coat of resin on the deck.. so now it's basically waterproof... thinking that was my last chance tho with the weather... thing that stinks tho is I don't think the resin I have left will still be good in the spring... so I may get out and try to csm the deck if I get near 60 again to get the most out of the resin..

Plenty of stuff left to do on this bad boy..
 

Old Ironmaker

Captain
Joined
Dec 28, 2015
Messages
3,050
Just read most of the 14 page thread. My fishing pals and myself started flipping older boats as a hobby out of Little Buddies 15,000 ftsq building with about 3000 ftsq heated, man that helps. I say a hobby because once you add up man hours It sure ain't easy or profitable or everyone would be doing it. You are doing an excellent job for the time you have to do it. I would buy that boat knowing the quality of workmanship you are doing in a NY minute. It will be better than coming out of the Bayliner factory for sure. Keep at her.
 

Mad Props

Lieutenant Commander
Joined
Jul 8, 2016
Messages
1,766
Thanks Old Ironmaker... Yea, the initial thought was to basically flip this thing, but I feel in love with the interior design of it compared to my stingray.. I know my stingray has a great hull design, but I was never a fan of the look of it, especially the interior, and the bayliner has a 5.7 that was completely rebuilt bottom up versus a 4.3 from an 89 chevy pickup in the stingray lol... So a lot of things were pointing towards me keeping the bayliner. Once that decision was made, things started getting expensive fast, because it went from a "flip the boat" project to a "do this as well as I can do" project so I can sleep at night knowing I'll have a boat with a solid foundation for another 15 years...
 

Mad Props

Lieutenant Commander
Joined
Jul 8, 2016
Messages
1,766
No Title

Some randomness tonight... I ordered a boost converter on eBay, an aluminum project enclosure, some little fans, and a connector... spent some time at the drill press making holes for the fans and airflow holes on the other end... probably overkill since the boost converter will only be running 1 amp through it, but heat kills electronics so figured it couldn't hurt...

I like how it turned out.. I plan to mount it underneath the cap so I wasn't concerned with water proofing but I did use stainless or aluminum everywhere...
 

Attachments

  • photo280097.jpg
    photo280097.jpg
    87.8 KB · Views: 3
  • photo280098.jpg
    photo280098.jpg
    116 KB · Views: 3
  • photo280099.jpg
    photo280099.jpg
    82.8 KB · Views: 3

Mad Props

Lieutenant Commander
Joined
Jul 8, 2016
Messages
1,766
I lied, apparently I can't do math, its more like 6 to 7 amps going through this converter, so now I'm glad I went with the heat mitigation approach lol.. OOPS :facepalm:
 

SHSU

Lieutenant Junior+Starmada Splash Of The Year 2019
Joined
Mar 8, 2017
Messages
1,665
Some randomness tonight... I ordered a boost converter on eBay, an aluminum project enclosure, some little fans, and a connector... spent some time at the drill press making holes for the fans and airflow holes on the other end... probably overkill since the boost converter will only be running 1 amp through it, but heat kills electronics so figured it couldn't hurt...

I like how it turned out.. I plan to mount it underneath the cap so I wasn't concerned with water proofing but I did use stainless or aluminum everywhere...


Like how it turned out, what are you planning on running off of that?
 

Baylinerchuck

Commander
Joined
Jul 29, 2016
Messages
2,726
Still trying to figure out what the DC to DC boost converter is doing. A boost converter raises DC voltage. Is it lowering voltage for the LEDs? I use converters in industrial trucks to drop voltage from a 36v power pack to 12v automotive type accessories. I?m just curious is all.
 

Mad Props

Lieutenant Commander
Joined
Jul 8, 2016
Messages
1,766
The boost converter is serving 2 purposes... the LEDs I'm using are actually COBs (chip on board). They are each comprised of 5 strings of 10 leds in series, all on a chip. The forward voltage of a blue led is about 3.2V so ten in series gives 32 volts.

So in order to drive them, I need 32 volts, plus the boost converter also has current limiting, so that makes sure the LEDs don't consume too much current if I ever get a voltage spike from the alternator, etc ...
 

Mad Props

Lieutenant Commander
Joined
Jul 8, 2016
Messages
1,766
No Title

A bit more progress tonight... I put a heater and a support pole under the tarp and got it nice and toasty.. got holes drilled in the floor and the foam is all done! Just gotta glue the pucks back in and a couple layers of csm and the floor is complete...

That will be my stopping point as far as fiberglass goes for the season.. once its waterproof, ill call it good.

Then it will be on to motor and outdrive stuff, and if I'm feeling ambitious, upholstery...

Only snapped one crappy picture tonight thru the keyhole cuz it was already buttoned up...
 

Attachments

  • photo280490.jpg
    photo280490.jpg
    114.6 KB · Views: 8

Mad Props

Lieutenant Commander
Joined
Jul 8, 2016
Messages
1,766
No Title

We had the first flakes of the season fly this afternoon so I celebrated with some cold weather tinkering... I removed the transom studs from the gimbal housing as the lower ones were barely there... also did some preliminary cleanup one the castings.. there are some corroded spots that will need some wire brushing and some paint but overall they look to be in pretty good shape.
 

Attachments

  • photo280596.jpg
    photo280596.jpg
    186.8 KB · Views: 7

Bayou Dave

Lieutenant Commander
Joined
Dec 13, 2012
Messages
1,780
At least you have a place to work on the mechanical parts during the winter.
 

Mad Props

Lieutenant Commander
Joined
Jul 8, 2016
Messages
1,766
Hey Everyone, just a little life update and to let everyone know I'm still alive.

Been quite a while since an update. I'm sure its pretty typical for people to drop off in activity over the winter as I have. That being said, I've still been doing a little bit here and there. Mostly just doing some maintenance on the transom plate and gimbal housing when I have time. Got everything pretty much disassembled and need to clean the housings and touch up some paint. Then I need to order a new bellows kit and shift cable (I don't need to, but might as well put everything back together with new stuff).

Its been very slow progress since it got cold out due to other priorities kicking in, and we unfortunately lost my father-in-law unexpectedly at the beginning of December.. That really threw a wrench in the gears, but the whole family is getting thru...

All that aside, I gotta be honest, just posting here again is getting me in the mood to get back at it. I can't wait to splash this thing!

Happy new year everyone!
 

Timr71

Petty Officer 1st Class
Joined
Jul 19, 2012
Messages
326
I'm sorry for your loss. Having something to work on can be a good distraction.
 

kcassells

Fleet Admiral
Joined
Oct 16, 2012
Messages
8,600
JR., Sorry to hear the news! Yes the weather got rough fast this year. Keep at it.
 

Mad Props

Lieutenant Commander
Joined
Jul 8, 2016
Messages
1,766
Hey all, back from my hiatus here... been getting some headway lately on the transom assembly, and now we have some warm weather coming. . Which leads me to my question, when I get back to glassing, do I need to sand down the glass and resin that's been sitting all winter before I apply new? Or is wiping with acetone enough? Next step is going to be csm on the deck then on to the seat boxes...
 
Top