1979 Starcraft Fishmaster 18 restoration

ybstuk

Seaman
Joined
Sep 29, 2008
Messages
57
Hey all - Been poking around here for answers quietly. Found a lot of good info so far.

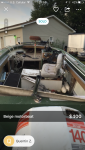
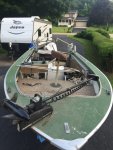
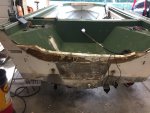
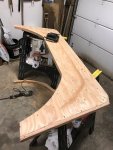
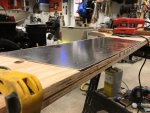
I thought I'd share my project. I picked it up last August, and I've been slowly getting into it. Obviously it's a '79 Starcraft Fishmaster 18 with a 140hp Johnson V4 on the back. I was daydreaming one day about my old fishing boat, not really in the market to buy one, and I just typed in "boat" into Letgo. Found this ad and pictures.

IMG_4512.PNG IMG_4511.PNG IMG_4510.PNG IMG_4509.PNG
 

Attachments

  • IMG_4510.PNG
    IMG_4510.PNG
    1.2 MB · Views: 9
  • IMG_4510.PNG
    IMG_4510.PNG
    1.2 MB · Views: 9
  • IMG_4510.PNG
    IMG_4510.PNG
    1.2 MB · Views: 8
  • IMG_4511.PNG
    IMG_4511.PNG
    1.7 MB · Views: 12

ybstuk

Seaman
Joined
Sep 29, 2008
Messages
57
For $400 I figured it was sure worth a trip to go look - It was nasty - been sitting outside for 10+ years obviously. I asked the guy if he was negotiable, he said yes... I left it there to go home and think about it. Wasn't sure how much work I wanted to get into, but I wanted a fishing boat that would fit my kids, along with my parents if they wanted to go along.. Half hour after I got home I texted him asking if he'd take $250 - sure enough he accepted! Brought her home and here's the before pics:
IMG_4504.jpg
IMG_4527.jpg
IMG_4530.jpg
IMG_4505.jpg
IMG_4543.jpg
IMG_4544.jpg
 

Attachments

  • IMG_4504.jpg
    IMG_4504.jpg
    134.4 KB · Views: 7
Last edited:

ybstuk

Seaman
Joined
Sep 29, 2008
Messages
57
It came with a lot of goodies. The Johnson 140, MinnKota trolling motor, Marine Radio, Bottom Line fish finder, etc... Wasn't sure if any of them worked. First I dove into the Johnson. Wiring was questionable at best, and the battery that came with was fried. I hooked up a good battery, and got the motor to turn over jumping the starter (previous owner lost the key). I quickly ordered another key, replaced it, put a little oil in the cylinders, and put some gas to the motor just to see if it would bump. It hit right away! I threw some ear muffs on the motor, and it fired right up and idled very smoothly. The water pump was working, so I let it warm up a bit. So far my investment is starting to look much better. I immediately ordered a water pump kit, as who knows how long it's been since it was changed. After replacing the water pump in the outboard, I got the trolling motor working (replaced a couple switches), and tested the marine radio & the fish finder - both powered up and seem to work fine.

Next task was to dive into the boat and start demo work. Everything was either waterlogged or rotten. Her'e's some pics of the demolition work. (yes that's a snake skin I found near the back of the boat, lol) IMG_4700.jpg IMG_4698.jpg IMG_4691.jpg IMG_4690.jpg IMG_4711.jpg IMG_4709.jpg IMG_4689.jpg
 

alldodge

Moderator
Staff member
Joined
Mar 8, 2009
Messages
40,717
Boat, trailer and a running motor for $250, that is a great deal no matter what else is there
 

ybstuk

Seaman
Joined
Sep 29, 2008
Messages
57
After getting the inside all cleaned out, I knew I wanted to start on the outside. Painting it a different color, patching some leaky rivets, etc. So the Johnson had to come off. I had no idea about the transom of the boat yet. It seemed solid when lifting up on the motor & such. After removing the motor, I discovered that the transom, while it was dry, had been wet before, and had warped due to the weight of the motor. It needed to be replaced. So next step was to remove the old one, and determine what I was going to do to fix the transom. Here's pics of the old transom coming out. It came out in 3 pieces, like other's on this forum.

IMG_5138.jpg IMG_5139.jpg IMG_5141.jpg IMG_5143.jpg IMG_5142.jpg IMG_5144.jpg
 

Attachments

  • IMG_5139.jpg
    IMG_5139.jpg
    147.5 KB · Views: 4
  • IMG_5139.jpg
    IMG_5139.jpg
    147.5 KB · Views: 4

ybstuk

Seaman
Joined
Sep 29, 2008
Messages
57
The old transom is 1.5" thick. I purchased 3/4" marine grade ply, traced out the old one, and cut the new pieces to fit. Next I bonded them together with Titebond 3. I screwed it together in a bunch of places, and set a ton of weight on it (sandbags & such) until it cured. I left the "top" of the transom long, so I could insert it into the boat, then trace exactly where i wanted it cut. With this new transom, I wanted it to be stronger. I have a friend who works with Stainless Steel. I drew up in Autocad exactly what I was looking for, and he cut it with a laser cutter. I'm planning on having the stainless steel on both sides of the transom, to help strengthen it with the 330lb Johnson motor hanging off the back. I'm also going to use a transom saver, as I don't believe anyone did at all during the life of the boat. Both of these combined, I'm hoping will preserve the transom for years to come. Here's some pics of the transom piece, routering it a bit to allow the stainless to fit on the inside, and pics of it set in the boat.

IMG_0034.jpg

IMG_0035.jpg IMG_0036.jpg IMG_0055.jpg IMG_0056.jpg IMG_0057.jpg IMG_0058.jpg IMG_0059.jpg
 

Attachments

  • IMG_0035.jpg
    IMG_0035.jpg
    123.2 KB · Views: 3
  • IMG_0057.jpg
    IMG_0057.jpg
    172.2 KB · Views: 2

ybstuk

Seaman
Joined
Sep 29, 2008
Messages
57
All this brings me to where I am now. This weekend I'm having some holes in the back welded, as there's about 20 excess holes in the back, from either old electronics, or just caulked up self tapping screws from someone's old "somethingorother" that was mounted to the back of the boat at some point" I've cleaned up the back of the boat so he can weld it up this Sunday. I've also got a small crack in the green skirting that I don't have any good pics of, that he's going to weld up for me as well. After it's welded, I'm going to flip it and start working on the paint. I'll come back and update as things progress. Thanks for looking! IMG_0060.jpg
 
Last edited:

ybstuk

Seaman
Joined
Sep 29, 2008
Messages
57
Uhmmm did you seal the transom wood with anything???


Great question. Not yet, but it's on my to-do list after the welding is done. This is the method I'm planning on using. I wanted to get all my holes pre-drilled before sealing.

Old Timers Wood Sealer_1.jpg
 

ybstuk

Seaman
Joined
Sep 29, 2008
Messages
57
Looking back where I found that image - it appears I have you to thank, Woodonglass for giving me that idea. Thank you.
 

Tnstratofam

Commander
Joined
Aug 18, 2013
Messages
2,679
Um yeah you flat stole that rig.:nod:

She should make a great fishing boat. Tagging along.
 

jbcurt00

Moderator
Staff member
Joined
Oct 25, 2011
Messages
24,863
There are other options rather then welding the holes closed.

Flat, against a 1.5in thick plywood transom, I wouldnt be overly concerned w stress cracking around any welds, but.........

How experienced is your welder on doing thin stock 5052 (right?) aluminum boat hulls?

Why did you decide on welding them up? So you can grind them smooth?

How big are the holes?

Some here have welded on rivetted boats, vast majority dont.
 

ybstuk

Seaman
Joined
Sep 29, 2008
Messages
57
He's very experienced. I have a lot of small holes. Like 1/8" diameter or smaller. Even if there's a small bump there it's better looking than all those screw heads IMO.
 

jbcurt00

Moderator
Staff member
Joined
Oct 25, 2011
Messages
24,863
I suspect most will agree, a few might not, but for 1/8 or less holes, I'd plug them w a closed end blind rivet or MarineTex/JB Weld rather then welding them. Numerous transoms have been filled this way.

classiccat (IIRC) used flush tapered rivets to fill even larger holes, and once set, are nearly invisible.

Hesitation to weld is because its a rivetted hull rather then a welded hull.

But in skilled hands, the risks associated w welding may not be as high.
 

Woodonglass

Supreme Mariner
Joined
Dec 29, 2009
Messages
25,924
Looking back where I found that image - it appears I have you to thank, Woodonglass for giving me that idea. Thank you.

The OT sealer works well IF you make sure to apply 2-3 full coats of full strength Poly after the initial soaking.
 

Watermann

Starmada Splash of the Year 2014
Joined
Jan 12, 2013
Messages
13,753
:welcome: to the Starmada ybstuk,

I think this is the first generation of the SC Fishmaster and I thought they debuted in 1980. I've not seen one here on iboats before and look forward to seeing it brought back from the brink. Good on ya for saving the old gal! :thumb:

The aversion to using a welder on these riveted boats is very deep rooted here, all you have to see is the results. Common issues are warping of the transom and if welded near the seam the sealer material will fry out making repairs very difficult. You'll have a bunch of holes in the tops of the gunnels that need attention too.

FYI the "green skirting" is called a splashwell and the cracking is very common when the boat is used with a compromised transom. I've seen the cracks welded on the SW quite a few times and it seems to work out. Those old mounting holes in your transom though 1/2" above the seam is a bit more of a worry. Make sure the welder is worried about the seam sealer material.
 

ybstuk

Seaman
Joined
Sep 29, 2008
Messages
57
Thank you everyone for the info. I'm going to talk to my welder tomorrow and we'll see where this goes.
 

ezmobee

Supreme Mariner
Joined
Mar 26, 2007
Messages
23,767
Great work so far! Can't believe the deal you got on that boat. Heck the lower unit on the motor woulda been worth $250!
 

ybstuk

Seaman
Joined
Sep 29, 2008
Messages
57
Welding the rear of the boat went great - He took his time near the riveted seams, so that it didnt heat up the sealer enough to compromise it. I have small bumps where the welds are, but I was expecting this, and after a full repaint, they'll blend right in. My next task is to fill the bottom of the boat with water enough to see how my repairs on the hull went - hopefully no drips. Then I'll drain it, get a couple friends over to help flip it, and start working on repainting the hull. At the same time, I'll be sealing the transom wood, so that when it's all painted, I can insert the transom wood and finish that all up before getting to work in the inside.

Question - has anyone ever replaced the "transom cap" (as I'm calling it)? It's the curved aluminum piece in the picture below. It needs to be approximately 1.625" wide, by 0.5" deep, and approximately 7' long before bending to fit the curve of the transom. I'm not sure where to start looking for something like this. My welder said it's possibly 5356 aluminum - soft enough to bend. I may hit google and see if i can find some channel stock, then figure out a way to "roller" it into the curved shape I need. I just don't want to split or crack a new piece of aluminum trying to make it fit the curve I need. Any advice on this would be greatly appreciated. Thanks! IMG_5138.jpg
 

ybstuk

Seaman
Joined
Sep 29, 2008
Messages
57
Last week I stumbled on a steal on Craigslist. (A nearby shop was selling them) 2 sets of these "Flip down deck seats". On new trackers, they have these along the rear of the boat, to either allow for seating, or they flip down to allow a large open fishing deck. I've got to narrow one of these up, but it's going to work perfectly along the back of the boat. Picked up both for $200! The one I don't use, I'll surely find a place for the seats. IMG_0101.jpg
 
Last edited by a moderator:
Top