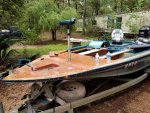
Avenger Bass Boat Restoration

Woodonglass

Supreme Mariner
Joined
Dec 29, 2009
Messages
25,924
If you feather both sides of of the edges 5-6 inches, On the boat and on the new glass, and then use mulitiple layers of resin and glass, then yes it will be strong.
 

reekhavuk

Petty Officer 3rd Class
Joined
Jun 22, 2013
Messages
92
Thanks ole buddy. I figured it would.

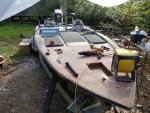
Today I ripped out all the deck and framing and every piece of it was rotten. Everything else is rock solid and good, just the deck was a giant FAIL.

Im getting 24" width pieces at a time off the shrimp boat and cut and fitted them. I need 2 more 24" wide pieces and that will put me back at the console. Then I will start cutting smaller pieces that will make up the frame for the boxes like i had before.

I want to get all the pieces rough fitted tomorrow, and then i can start prepping (grinding) everything for the feather connection tabs. Theres nothing to take pictures of yet, but when I have it all ready for fiberglass i will start posting pics of that progress. I called my supplier and he is still selling at $22 a gallon. Sometime this weekend I will put in an order of 1.5 CSM and 1708.

Its a bummer I have to redo this but I learned, and, when im done, there will be no wood to rot and should last me as long as i can fish =)
 

reekhavuk

Petty Officer 3rd Class
Joined
Jun 22, 2013
Messages
92
WOG, I am going to have a ton of "tabbing" to do on this, you have any input as to whether its worth it to buy the roll of CSM tape for this or do you just cut your own as you go?
 

Woodonglass

Supreme Mariner
Joined
Dec 29, 2009
Messages
25,924
I generally cut my own.. Roll out the length you want and cut it off the roll. Then fold in half, then half again. Cut it with a razor knife using a straight edge. Really easy to do.
 

reekhavuk

Petty Officer 3rd Class
Joined
Jun 22, 2013
Messages
92
So motor is ready to roll, new waterpump kit, new bearing carrier seals, new starter, fires right up always runs great. Not sure if I posted a pic since its on the new transom


c motor.jpg

Here is some rough fitting of the new front deck fiberglass panels im cutting to fit.

deck panel.jpg
 

reekhavuk

Petty Officer 3rd Class
Joined
Jun 22, 2013
Messages
92
I have been working on the boat consistantly, but it is going very slow. Grinding the old gelcoat and etc off those used pieces of fiberglass is a major pita and very very slow. I am taking it in about 24" sections working towards the helm. Building the structure underneath to stiffen the panels is slow work. Using 6" wide pieces like floor joists. The way I am doing it is dropping each completed section into place and then tabbing / pb them in the top, and tabbing them in underneath into the hull.

WOG (or anyone) can you give me an eyeballed guesstimate at how many cubic feet of foam I will need to fill under those 3 sections? Im going to put 6 or 8 LB foam in when im done also. Its solid as sits i wanna make sure it stays that way from long use of twisting and flexing when im hitting big chop.

Click image for larger version  Name:	dexk_9-5-18.jpg Views:	1 Size:	365.7 KB ID:	10649288

Click image for larger version  Name:	pedestal_2.jpg Views:	1 Size:	784.5 KB ID:	10649289
 

reekhavuk

Petty Officer 3rd Class
Joined
Jun 22, 2013
Messages
92
I got the main frame installed for the center rod locker, i am very happy with how it is looking with the lids mocked in place. Every time I start working it rains, so I have been moving slow. I am very motivated to finish the boat as it is turning out like I want and I know this time it will be right.

I ordered 2, 16LB kits (2 2 gallon kits) of 4 LB foam, they should be in mid week. I am going to be putting rod tubes in the end of the rod box and then pour the foam in. I hope that the foam will encompass the rod tubes without too many voids in there. Im not sure if i should pour it in several lifts or 1 so that it fills around them better.

deck.jpg
 

reekhavuk

Petty Officer 3rd Class
Joined
Jun 22, 2013
Messages
92
Center rod box frame roughed in. Laying out side storage boxes for rough in.

20180910_190342.jpg
 

reekhavuk

Petty Officer 3rd Class
Joined
Jun 22, 2013
Messages
92
Anyone have advice as how to pour the foam under the deck that contains the rod tubes? Just estimate and pour it all at once, or smaller batches? The result I want is total encapsulation of the pvc tubes without voids, or as minimum as possible
 

gm280

Supreme Mariner
Joined
Jun 26, 2011
Messages
14,591
Anyone have advice as how to pour the foam under the deck that contains the rod tubes? Just estimate and pour it all at once, or smaller batches? The result I want is total encapsulation of the pvc tubes without voids, or as minimum as possible

Well it has been a while since I poured mix n pour expanding foam, but I did sections because I sectioned the area off under neath. And you can tell how far the pour goes by the hear generated in the floor section. If it feels warm to the touch, it is under that portion. It generates a little heat but nothing to worry about.

If you scan through my boat building project, you will see how I did mine. Not to say that is the only way, but just the way I did it. I think after you pour a batch or two, you will quickly see how to go from there. I personally would not try to mix up a huge batch and pour. It kicks off fairly quickly. So do a few smaller batches until you see how it goes. JMHO
 

reekhavuk

Petty Officer 3rd Class
Joined
Jun 22, 2013
Messages
92
Little more progress on the framing. Getting close. Decided to mount the seats on pedestals. The 7" ones are the same height as the original bench seat. They are just sitting in there right now, need to mount the pedestal to a piece of treated ply or something and then glass that to the floor. I dont wanna screw into the floor and get a leak.


Click image for larger version  Name:	deck (2).jpg Views:	1 Size:	924.3 KB ID:	10654636
 

reekhavuk

Petty Officer 3rd Class
Joined
Jun 22, 2013
Messages
92
For anyone that was following this thread, i went through some serious personal life issues but im back on this project. Also, not long after the last post I made on this project, my trim unit stopped working. I recently found a brand new never used one and just got it installed and will be continuing on finishing her.
 

reekhavuk

Petty Officer 3rd Class
Joined
Jun 22, 2013
Messages
92
Ran engine on muffs a while did not want to engage reverse well, going to try adjusting the shift linkage this weekend. Had some metal shavings on oil plug magnet in lower unit, hope its just result of a few ratcheting reverse attempts and not larger problem. Also new led trailer light kit scheduled to be delivered tomorrow.
 

reekhavuk

Petty Officer 3rd Class
Joined
Jun 22, 2013
Messages
92
I would like to note here that there was some minor flex on the deck that i built when walking. When i filled it with foam it is rock solid now. I know you shouldnt rely on the foam for structural but if you got something with some very minor flex that you dont like, fill it with the good foam. It wont flex anymore! =)
 

reekhavuk

Petty Officer 3rd Class
Joined
Jun 22, 2013
Messages
92
Lower unit is shot. Ordered a new one from SEI. My '91 FS was the last year Johnson used the 'pin in place' method to connect the driveshaft upper to the driveshaft lower. in 92 and on they went to a 'snap in place' method which takes a different driveshaft with a 'bull nose' end on it that snaps in to a clip that holds the upper into the lower. I had to purchase a new style upper driveshaft in order to install the new SEI lower unit. LU, DS, and wp kit supposed to be shipped as of today.
 

reekhavuk

Petty Officer 3rd Class
Joined
Jun 22, 2013
Messages
92
Lower unit installed, boat splashed. Now time to make it look good. Im researching what color metal flake to paint trying to decide. What is the easiest body filler to use to do the fairing? Peanut butter? Ive seen some people mix bondo with resin for easier sanding.
 

Avenger91

Recruit
Joined
Jul 20, 2021
Messages
1
Lower unit installed, boat splashed. Now time to make it look good. Im researching what color metal flake to paint trying to decide. What is the easiest body filler to use to do the fairing? Peanut butter? Ive seen some people mix bondo with resin for easier sanding.
Really looking forward to seeing your finished boat!

Whatever you use, make sure to sand, sand, sand before you apply anything. By the looks of it, that is information that you already know.
 

ddrieck

Senior Chief Petty Officer
Joined
Jul 12, 2007
Messages
655
Got my resin today from a place that does boat repairs for $22 a gallon pretty excited about that. Ordered my fabric should be in by next Thursday so that gives me a week to prep, should get there.

Some updates, almost all out:

View attachment 247462


View attachment 247464


View attachment 247466
I see you were using the same tool I did when I installed a new transom on one of my old boats. Just can't beat what you have on hand. Who knew an old tire iron could be so handy... LOL
 
Top