Stringer repair

Scott Danforth

Grumpy Vintage Moderator still playing with boats
Staff member
Joined
Jul 23, 2011
Messages
47,499
I would fire up the die grinder with a few roll-loc discs and feather it, then sand and buff
 

mickyryan

Rear Admiral
Joined
Apr 18, 2016
Messages
4,210
looks like some one hit something, that would cause it to crack inside and out, grind down on inside and repair there , imho then on outside grind the crack and fill and re gel cote you could grind the outside with a dremel so its not a huge repair if you did all of the structural repair inside.
 

bjf66

Chief Petty Officer
Joined
Dec 6, 2016
Messages
406
the crack on outside is not really adjacent the crack on FLOOR up front
The chine of boat in front looks clean no marks

so grinding moreeeee

I think Ive done my apprenticeship in grinding so with this project
anyway chin up, nearly out of the hull

thanks for comments
 

mickyryan

Rear Admiral
Joined
Apr 18, 2016
Messages
4,210
wonder if there is wood in that chine, seems there is something weeping discolored, closer examination will tell you the story for sure:)
 

bjf66

Chief Petty Officer
Joined
Dec 6, 2016
Messages
406
I wonder whether the boat previous was left outside and filled under floor with water from rain, I took some pictures before cutting floor and you can see the water mark
Previously up front there was a ballast tank, which I cut out, so water could of being hanging around in the hull for sometime as boat may have been sitting on flat without cover
 

bjf66

Chief Petty Officer
Joined
Dec 6, 2016
Messages
406
attached are starboard and port (this is where gel coat is cracked) under floor pic
and have a photo of ballast tank removed and filling void with foam
 

Attachments

  • photo285716.jpg
    photo285716.jpg
    264.6 KB · Views: 2
  • photo285717.jpg
    photo285717.jpg
    69.7 KB · Views: 2
  • photo285718.jpg
    photo285718.jpg
    64.5 KB · Views: 2

bjf66

Chief Petty Officer
Joined
Dec 6, 2016
Messages
406
well been traveling for last 2 weeks so not boat repairs
Yesterday spent most of the day on back tucked up in bow grinding, lovely job!!!!

Turns out the floor is all Coosa board, and looks like there was some separation of the tabbing on to side, and this looks like what I was seeing
Then previous owner had put some PB over the joint which had more filler than resin as very chaulking when grinding it out
So kept digging with dremel and grinder, decided to take a wider area down to the floor and inner hull glass

So ground out area approx. 800x700mm, will lay some cloth this morning
1 layer 600 CSM
1 layer 937 grm multi axis
1 layer 600CSM
1 layer 937 grm Multi axis

then can tidy up the bow and finish the flocote
 

Attachments

  • photo286651.jpg
    photo286651.jpg
    73 KB · Views: 2
  • photo286652.jpg
    photo286652.jpg
    73.8 KB · Views: 2
  • photo286653.jpg
    photo286653.jpg
    54 KB · Views: 2
  • photo286654.jpg
    photo286654.jpg
    52.5 KB · Views: 2

bjf66

Chief Petty Officer
Joined
Dec 6, 2016
Messages
406
Fuel tanks
Picked up 2 side alum fuel tanks last week, approx. 100 litre capacity each, so interesting to see whether can fit these into boat
 

bjf66

Chief Petty Officer
Joined
Dec 6, 2016
Messages
406
finished just clean up and flocote tomorrow
 

Attachments

  • photo286672.jpg
    photo286672.jpg
    56.1 KB · Views: 1
  • photo286674.jpg
    photo286674.jpg
    72.3 KB · Views: 1

bjf66

Chief Petty Officer
Joined
Dec 6, 2016
Messages
406
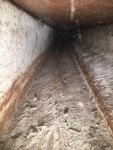
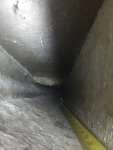
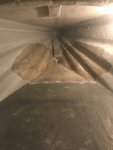
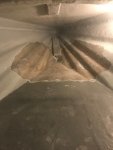
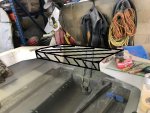
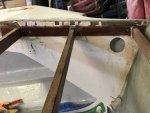
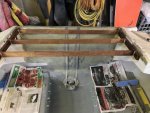
Need to modify back of boat as presently wash is likely to come over transom as originally boat was setup for outboard
So was thinking as engine sits forward of the transom as have gearbox and dropbox mounted between engine and transom, then need to cover in the rear
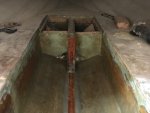
was thinking of using current deck lines, and then would construct engine hatch to cover engine

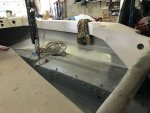
If this was closed in then would help to protect the trim tabs pumps, Arneson trim pump and bunch of other stuff

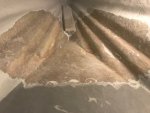
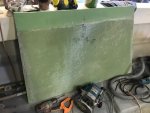
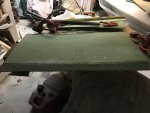
What material would one use to close of the back of the boat, was thinking along the lines of using the Coosa 1/2" board (or marine ply) reinforced, with ribbing/structure to support, as may want to walk across the back of the board and need plenty of strength
assuming would just fabricate the structure, as opposed to making mould to build a outer skin
Then laying the usual 2* layers 2 oz CSM, 17 oz Multi axial fabric, then would need to gelcoat

anyone can throw us some pointers would be good
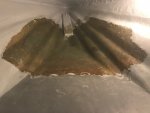
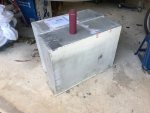
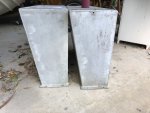
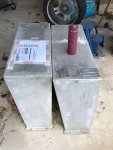
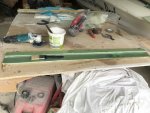
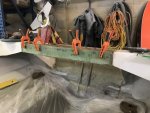
here are some pictures of what was thinking current and filled
 

Attachments

  • photo286812.jpg
    photo286812.jpg
    98.3 KB · Views: 1
  • photo286813.jpg
    photo286813.jpg
    79.7 KB · Views: 1
  • photo286814.jpg
    photo286814.jpg
    112.6 KB · Views: 1

Scott Danforth

Grumpy Vintage Moderator still playing with boats
Staff member
Joined
Jul 23, 2011
Messages
47,499
your strength is in the fiberglass, so I would probably use 1/4" or thinner to make the shape.
 

bjf66

Chief Petty Officer
Joined
Dec 6, 2016
Messages
406
Scott
would you fabricate this up as you went or make a mould and try and laminate the skin with gelcoat?
I have some coosa board left but not in one piece,
The total area Im looking to cover is 700mm x 1150mm
Im not to sure whether the coosa board would flex if made in 2*350x1150mm even if I strengthen underside with ribbing?

What do you think make in one piece or 2 piece?
 

Scott Danforth

Grumpy Vintage Moderator still playing with boats
Staff member
Joined
Jul 23, 2011
Messages
47,499
I would fab in place with 1/4" or thinner to get the shape and build up from there.
 

bjf66

Chief Petty Officer
Joined
Dec 6, 2016
Messages
406
had a close look the rest of the cap/deck area around back of boat seems to be 12mm thick
so have purchased 6mm Gurit H80 board and will use as core and laminated 600 CSM and 937 gram Biaxial to each side to build up the required thickness of total laminate
 

bjf66

Chief Petty Officer
Joined
Dec 6, 2016
Messages
406
picked up 2 * 100 litres fuel tanks which I hoping will fit towards stern, baffled and 4mm, need to have the floats and siphon pipe installed
 

Attachments

  • photo287064.jpg
    photo287064.jpg
    85.5 KB · Views: 1
  • photo287065.jpg
    photo287065.jpg
    87.9 KB · Views: 1
  • photo287066.jpg
    photo287066.jpg
    94.9 KB · Views: 1

bjf66

Chief Petty Officer
Joined
Dec 6, 2016
Messages
406
started on rear deck fill in
used hardwood 40x20mm, bolted 5/16: unc stainless steel, and glued 2 battens into rear cut out
used 3 side braces 40x20mm and rebated these into the side battens
Then epoxied the braces together

used 6mm Gurit board (43"x24")
bottom side: used 1*2oz CSM, and 1*25oz biaxial
2oz CSM
another 6mm Gurit board (43"x24")

Will build up 2 layers of
2oz CSM, and 25oz Biaxial
That should come close to +1mm below rear deck surface

Need to go away for few days for business, will give the epoxy time to set, and try and finish over Easter period
 

Attachments

  • photo286814.jpg
    photo286814.jpg
    112.6 KB · Views: 1
  • photo287067.jpg
    photo287067.jpg
    80.5 KB · Views: 1
  • photo287068.jpg
    photo287068.jpg
    105.9 KB · Views: 1
  • photo287069.jpg
    photo287069.jpg
    85.4 KB · Views: 1

bjf66

Chief Petty Officer
Joined
Dec 6, 2016
Messages
406
enjoying the long weekend to get back into the boat, and day light saving changed up at 5.20am into the boat
while I'm constructing the rear deck,have been thinking about its time to drill the bungs holes in transom

what size bung hole is fit for 22' boat????

Hopefully after the rebuild I don't plan on taking too much water on board, but one never knows
The guy at the boat chandler indicated plastic was better than stainless steel as know galling when installing the bung
 

bjf66

Chief Petty Officer
Joined
Dec 6, 2016
Messages
406
laminated the front section of the rear deck with Gurit board 6mm*3 and then incorporated a step in the lamination to glue on to front of the support board

managed to laminate the rear deck with approx. 15 degree angle to suit the top profile of original deck
used 2*6mm Gurit glued together with 600 CSM (2oz) in between

had a sit test on the board seemed sturdy enough

drilled the 2 rear drain hole for the bungs
used 25mm hole saw, and then 29mm dia drill
will glue in 25mm stainless tube along with bung

Good day working
should be in position to glue/screw the rear deck down tomorrow
 

Attachments

  • photo287069.jpg
    photo287069.jpg
    85.4 KB · Views: 0
  • photo287488.jpg
    photo287488.jpg
    78.1 KB · Views: 0
  • photo287489.jpg
    photo287489.jpg
    98.9 KB · Views: 0
  • photo287490.jpg
    photo287490.jpg
    95.9 KB · Views: 0
Top