Stringer repair

bjf66

Chief Petty Officer
Joined
Dec 6, 2016
Messages
406
built the sides of raised hatch today, glued them in place,

cut the scoop in two

looking to increase width of scoop

Options:
1. stretch the scoop 4"
2. stretch the scoop 6"


what looks best???
 

Attachments

  • photo320607.jpg
    photo320607.jpg
    121.1 KB · Views: 1
  • photo320608.jpg
    photo320608.jpg
    118.1 KB · Views: 2
  • photo320609.jpg
    photo320609.jpg
    85.1 KB · Views: 1
  • photo320610.jpg
    photo320610.jpg
    113.2 KB · Views: 1
  • photo320611.jpg
    photo320611.jpg
    97.1 KB · Views: 1
  • photo320612.jpg
    photo320612.jpg
    105 KB · Views: 1
Last edited:

Baylinerchuck

Commander
Joined
Jul 29, 2016
Messages
2,726
I like the 6” personally. I think it will look better as you blend those straight lines of the cover into the curves of the scoop.
 

bjf66

Chief Petty Officer
Joined
Dec 6, 2016
Messages
406
Chuck

thats what I was thinking
however decided on 125mm split the difference
laminated a section last night to get the 2 pieces of scoop as one
will carry on in in 2 weeks when I get back from overseas
 

bjf66

Chief Petty Officer
Joined
Dec 6, 2016
Messages
406
shopping list:
- 30 degree Imco water cooled risers on the way from USA, arrives around 20/10, so cant do too much to turbos untill they arrive
- purchased 4 * Eddie Marine billet alum engine hatch vents, they should be here tomorrow
- still looking for engine hatch hinges, was looking at either of these hinges
https://www.cpperformance.com/p-1264...re-hinges.aspx

https://www.cpperformance.com/p-1376...ch-hinges.aspx

carried on with engine hatch, working under lights outside as spring just started down under, and still dark at 19.00 hrs, daylight saving starts next weekend, which will give more time after dinner
mounted the scoop last night
however needs more grinding, more cloth to be laid, then more grinding
however starting to take shape
 

Attachments

  • photo321528.jpg
    photo321528.jpg
    81.3 KB · Views: 0
  • photo321529.jpg
    photo321529.jpg
    109.1 KB · Views: 0
  • photo321530.jpg
    photo321530.jpg
    112.6 KB · Views: 0
  • photo321531.jpg
    photo321531.jpg
    101.6 KB · Views: 0
  • photo321532.jpg
    photo321532.jpg
    87.3 KB · Views: 0

Scott Danforth

Grumpy Vintage Moderator still playing with boats
Staff member
Joined
Jul 23, 2011
Messages
47,542
Mcmaster.com has those hinges

Your local marina probably has them too
 

bjf66

Chief Petty Officer
Joined
Dec 6, 2016
Messages
406
hatch project continues...

decided to go with these hinges
didn't here back from CP Performance regarding postage
mcmaster found it difficult with the idea of shipping down under
so left with good old ebay, shipped from USA, should arrive next week

https://www.cpperformance.com/p-13764-polished-stainless-steel-long-reach-hinges.aspx

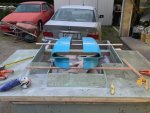
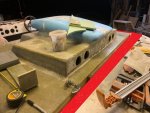
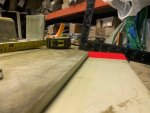
laminated the final gurit board+300grm CSM + 600 grm biaxle on to board, strength scoop inside started filling the 125mm extension, lots of grinding, glassing, grinding
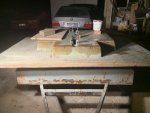
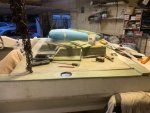
attached pictures of selection of sanders used, purchased pencil grinder from depot/bunnings and proved to be quite successful with getting into tight spacers

needs a little more filling in scoop...but getting there

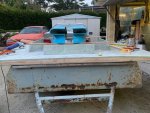
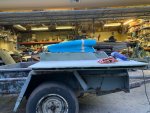
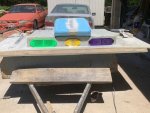
so now where to place engine hatch vents
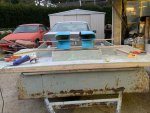
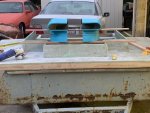
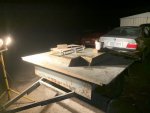
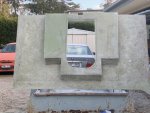
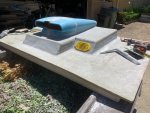
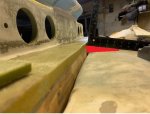
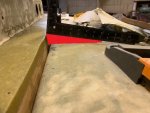
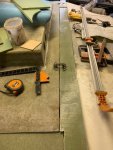
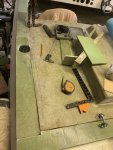
Have hole saw cut the yellow 2* 3" holes for front of hatch (I intend to powder coat the vents so dont look at the colours)
refer photo 1 and 2
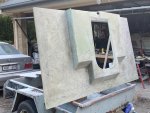
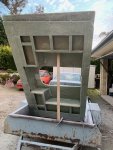
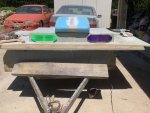
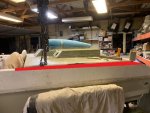
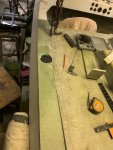
Not sure whether I should put the other twin hole vents down each side of the hatch, or alternatively place them at the back

looking for some help, ...is it best to place vents at rear or on side of hatch?
refer photos
Option 1: 2 rear vents with 2* 3" Dia holes, total: 4* 3" Dia holes
Option 2: no rear vents, use twin and single side hatch vents * 3" holes, in total 3* 3" holes
Option 3: 3 rear vents with 2 vents of 2* 3" Dia holes, and 1 vent * 3" holes, total: 5* 3" Dia holes
comments please

Picked up set of BBC Keith Eickert 2 piece valve covers with spring oils at weekend swap meet for budget price
nice
https://www.cpperformance.com/p-16736-big-block-chevy-2-piece-valve-covers-wvalve-spring-oilers.aspx
 

Attachments

  • photo322228.jpg
    photo322228.jpg
    133.3 KB · Views: 0
  • photo322229.jpg
    photo322229.jpg
    115.7 KB · Views: 0
  • photo322230.jpg
    photo322230.jpg
    103.7 KB · Views: 0
  • photo322231.jpg
    photo322231.jpg
    89.5 KB · Views: 0
  • photo322232.jpg
    photo322232.jpg
    99.5 KB · Views: 0

bjf66

Chief Petty Officer
Joined
Dec 6, 2016
Messages
406
Hatch continuation
put hatch on/off hull to trim the sides of the hatch to make allowance for fuel fills
a little more glassing to do but its coming together

Need now to think about attaching hatch to deck
originally the boat was setup with outboard, prior to filling the rear deck in

Therefore need some help with what to do with hatch
Options:
1. lower the hatch height so its level with the top of gunnel, the hatch as is on the sides some 16mm higher than the gunnel
However hatch has slight taper from centre out to edges, so there would have to some board Gurit board on rear deck to get the hinges level and to blend the hatch into deck

2. leave hatch as is sitting up
build a border on top of the gunnel and rear deck to blend in the hatch to deck
this would mean rear, and sides of the hatch
hopefully the pictures will get the point across

A. build the surface of deck up, it remains flat profile as the deck is at present
B. rear deck following the contour of the rear deck short angle#
C. rear deck following contour of rear deck, long angle

ALL SUGGESTIONS WELCOMED
more glassing !!!!
 

Attachments

  • photo322513.jpg
    photo322513.jpg
    108.6 KB · Views: 0
  • photo322514.jpg
    photo322514.jpg
    96.9 KB · Views: 0
  • photo322515.jpg
    photo322515.jpg
    83.7 KB · Views: 0
  • photo322516.jpg
    photo322516.jpg
    73.3 KB · Views: 0
  • photo322517.jpg
    photo322517.jpg
    86.2 KB · Views: 0
  • photo322518.jpg
    photo322518.jpg
    84.3 KB · Views: 0

Scott Danforth

Grumpy Vintage Moderator still playing with boats
Staff member
Joined
Jul 23, 2011
Messages
47,542
Carb fiber or teak treads on top the gunwale
 

bjf66

Chief Petty Officer
Joined
Dec 6, 2016
Messages
406
decided that would build the rear deck and side gunwale
used Gurit 12mm board with 300 grm CSM and 612 grm Biaxle cloth
Looking at the gunwale it seems fitting to run the board forward to blend into the raised section of the screen area, this will keep contour of gunale shape correct


Not sure whether I like these longer stainless steel hinges, as they is a lot of side ways movement in the hinge
I'm thinking I should have gone with these hinges as they seem more sturdier without the side ways movement, which should keep the hatch aligned correctly when lifted and closed

https://www.cpperformance.com/p-1264...re-hinges.aspx
 

Attachments

  • photo322547.jpg
    photo322547.jpg
    95.9 KB · Views: 0
  • photo322548.jpg
    photo322548.jpg
    112.1 KB · Views: 0
  • photo322549.jpg
    photo322549.jpg
    108.5 KB · Views: 0
  • photo322550.jpg
    photo322550.jpg
    106.4 KB · Views: 0

bjf66

Chief Petty Officer
Joined
Dec 6, 2016
Messages
406
fabricated up some 50mm x 3mm alum straps to go over the twin saddle tanks to hold them firmly in place as well as being bolted to floor in 3 location
Hopefully they wont move around at all

forgot to attach the photo of underside of hatch
I havent glassed the outer edges of the hatch, as will trim these if need to make the gap clearance between hatch and extended height gunale

managed to pick up some spare casale parallel drive gears with 1.40 and 1.35 ratio for US$100 delivered ...unbelievable
this is for the spare drive in case have trouble with the Hallcraft one that I'm using in boat

Out overseas for 12 days, unfortunately no playing with boat
 

Attachments

  • photo322572.jpg
    photo322572.jpg
    116.1 KB · Views: 0
  • photo322573.jpg
    photo322573.jpg
    115.2 KB · Views: 0

bjf66

Chief Petty Officer
Joined
Dec 6, 2016
Messages
406
Arch builder
72lbs
you can put your foot on the scoop and it doesn’t flex
the rest of hatch is solid
I tried walking on it
 

bjf66

Chief Petty Officer
Joined
Dec 6, 2016
Messages
406
when building up the edge of the gunwale is its possible to bond Gurit/fibreglass vinyl ester laminate to the original gelcoat on gunale
Or is advisable to grind all the gelcoat off before bonding the new gunale onto boat or we can get away by roughing the surface with 40 grit to add a good bonding surface
seems a lot of differences of opinion

need some help from someone who actually has done the job as only want to do this once
 

bjf66

Chief Petty Officer
Joined
Dec 6, 2016
Messages
406
scott

the glueing is to bond the new laminate to old gelcoat, then the new laminate would be encapsulated to more VE/CSM/multi weave cloth, then finished with gelcoat if I can spray it on

Therefore the glueing/bond between new laminate and gelcoat is important , however there would be layered with fibreglass once in place
 
Top