77 champion restoration

Status
Not open for further replies.

Cmac2008

Petty Officer 3rd Class
Joined
Oct 5, 2016
Messages
92
I will get pics tonight... i took some lastnight but i always have a tough time uploading them
 

Cmac2008

Petty Officer 3rd Class
Joined
Oct 5, 2016
Messages
92
Here a few pics... just figured out how to use photobucket
 

Attachments

  • 20170507_201913_zpsdtttdzc4.jpg
    20170507_201913_zpsdtttdzc4.jpg
    176.2 KB · Views: 0
  • 20170507_201843_zpsezodigpb.jpg
    20170507_201843_zpsezodigpb.jpg
    233.1 KB · Views: 0

Baylinerchuck

Commander
Joined
Jul 29, 2016
Messages
2,726
You can just copy the IMG link from Photobucket from the image you want and paste it directly to your post. It is by far the easiest method.
 

Cmac2008

Petty Officer 3rd Class
Joined
Oct 5, 2016
Messages
92
So did i not do it right?
Minus the second post with the highlighted link. That was a goof
 

gm280

Supreme Mariner
Joined
Jun 26, 2011
Messages
14,592
So did i not do it right?
Minus the second post with the highlighted link. That was a goof

When you copy the "IMG" code to the right of one of your pictures, and then paste it here, the picutres are already opened and the reader simply can see them without clicking on them and then having to return to the thread for the next picture. It makes it a ton easier to read and see your progress with your boat thread. JMHO
 

Cmac2008

Petty Officer 3rd Class
Joined
Oct 5, 2016
Messages
92


Got a little more done making sure to get lots of measurements befor i remove the stringers
 

Baylinerchuck

Commander
Joined
Jul 29, 2016
Messages
2,726
Great job on getting those pictures loaded, makes it a ton easier to read. Nice progress on your boat.
 

Cmac2008

Petty Officer 3rd Class
Joined
Oct 5, 2016
Messages
92
Ok i have a day off work but also a sick baby boy. Trying to get anything in the garage done may be impossible till nap time. Im using today to get my plans ready for the glassing process.

Few questions im running into. Currently there is a water hose that runs to the front live well in a 8" cavity that also acts as the drain. Is there anyway to confine this more using pvc and being able to control the water and adding foam to this area? Or should it be left the way it is ofcourse using heavy duty hose.
 

gm280

Supreme Mariner
Joined
Jun 26, 2011
Messages
14,592
Ok i have a day off work but also a sick baby boy. Trying to get anything in the garage done may be impossible till nap time. Im using today to get my plans ready for the glassing process.

Few questions im running into. Currently there is a water hose that runs to the front live well in a 8" cavity that also acts as the drain. Is there anyway to confine this more using pvc and being able to control the water and adding foam to this area? Or should it be left the way it is ofcourse using heavy duty hose.

Well of course the sick boy takes precedence, obviously. Hope he gets to feeling better soon.

I would not go with PVC but a good quality flexible hose for the front live well. And that is so if for any reason down the road it has to be replaced, you can without ripping any of the floor back out. I am using a good quality hose from Lowe's that is see through but also has some threads criss-cross in it for support. But most any quality hose would work.

I also see you have everything removed now in the hull. But I also see that your stringer and bulkheads don't really look rotted from the pictures. If they are solid, I would simply clean everything out of the hull and prep it for a floor system. Because the remaining wood looks good to me, unless I can't see them correctly. :noidea:

I would remove any and all the foam and clean everything up real nice and look seriously at the remaining structure first. JMHO
 

Cmac2008

Petty Officer 3rd Class
Joined
Oct 5, 2016
Messages
92
Well of course the sick boy takes precedence, obviously. Hope he gets to feeling better soon.

I would not go with PVC but a good quality flexible hose for the front live well. And that is so if for any reason down the road it has to be replaced, you can without ripping any of the floor back out. I am using a good quality hose from Lowe's that is see through but also has some threads criss-cross in it for support. But most any quality hose would work.

I also see you have everything removed now in the hull. But I also see that your stringer and bulkheads don't really look rotted from the pictures. If they are solid, I would simply clean everything out of the hull and prep it for a floor system. Because the remaining wood looks good to me, unless I can't see them correctly. :noidea:

I would remove any and all the foam and clean everything up real nice and look seriously at the remaining structure first. JMHO

I was thinking the same thing untill i cut some test spots... anywhere there was a compartment in the cap it was glassed to the deck which held water in those areas. 2 of the 4 stringers are completly mush.. the 2 stringers in the middle are except the ends so im going to just tear them out and put new in. But since the glass is still descent shap i plan to cut along the hull and keep it intact to have a reference along with my measurements
 

gm280

Supreme Mariner
Joined
Jun 26, 2011
Messages
14,592
I was thinking the same thing untill i cut some test spots... anywhere there was a compartment in the cap it was glassed to the deck which held water in those areas. 2 of the 4 stringers are completly mush.. the 2 stringers in the middle are except the ends so im going to just tear them out and put new in. But since the glass is still descent shap i plan to cut along the hull and keep it intact to have a reference along with my measurements

That is a good thing. Inspection holes were the best thing you could have done. Seeing the pictures and not being there is the difference. Hearing about the stringer sand bulkheads now, I would snap a lot of pictures from every angle you could, and take good measurement as well. Then rip all of it out, grind everything to fresh fiberglass and start fresh with good quality plywoods and rebuilt them. Good call on your part. :thumb:
 

Cmac2008

Petty Officer 3rd Class
Joined
Oct 5, 2016
Messages
92


So my question from earlier is about this middle empty space that runs all the way to the back of the boat... i will definatley use better hose my thought was to take a piece of pvc and cut it into a half moon shape to run my hose threw. Setting the pvc in a bead of sealent and then i can foam over the top of it... if hose ever needs changed i can pull threw the pvc
 

gm280

Supreme Mariner
Joined
Jun 26, 2011
Messages
14,592


So my question from earlier is about this middle empty space that runs all the way to the back of the boat... i will definatley use better hose my thought was to take a piece of pvc and cut it into a half moon shape to run my hose threw. Setting the pvc in a bead of sealent and then i can foam over the top of it... if hose ever needs changed i can pull threw the pvc

My fault. I misunderstood you. That sound good. I was thinking you were going to plumb your live well with straight PVC. That would cause issues later on. Installing PVC tubes to allow easier installation of live well hoses and even wiring is always a good idea. I did that myself. Make them large enough for hoses and wires to slide through. You will thank yourself over and over. :thumb:
 

Cmac2008

Petty Officer 3rd Class
Joined
Oct 5, 2016
Messages
92
My fault. I misunderstood you. That sound good. I was thinking you were going to plumb your live well with straight PVC. That would cause issues later on. Installing PVC tubes to allow easier installation of live well hoses and even wiring is always a good idea. I did that myself. Make them large enough for hoses and wires to slide through. You will thank yourself over and over. :thumb:

Sorry i didnt not ask the question in a very good manor. I have trouble relating thoughts threw words lol
 

Cmac2008

Petty Officer 3rd Class
Joined
Oct 5, 2016
Messages
92

Got all the stringers out and swept up. Next job is to cut out all of the extra fiberglass and then to start grinding everything smooth


This was some of the rot from the stringers... most of all the wood looked like this
 

gm280

Supreme Mariner
Joined
Jun 26, 2011
Messages
14,592
Oh yea, there is the rot. But you look like you have everything under control and doing great work. Keep up the effort and the pictures. :thumb:
 

Cmac2008

Petty Officer 3rd Class
Joined
Oct 5, 2016
Messages
92
Ok another question that has popped up in my head. Ive watched a couple videos on stringer installation and i seen people put little foam blocks under the stringer set in pb. Also i read a post about spacing between the hull and stringers but i cant find any reasoning for this. Thanks!
 

Baylinerchuck

Commander
Joined
Jul 29, 2016
Messages
2,726
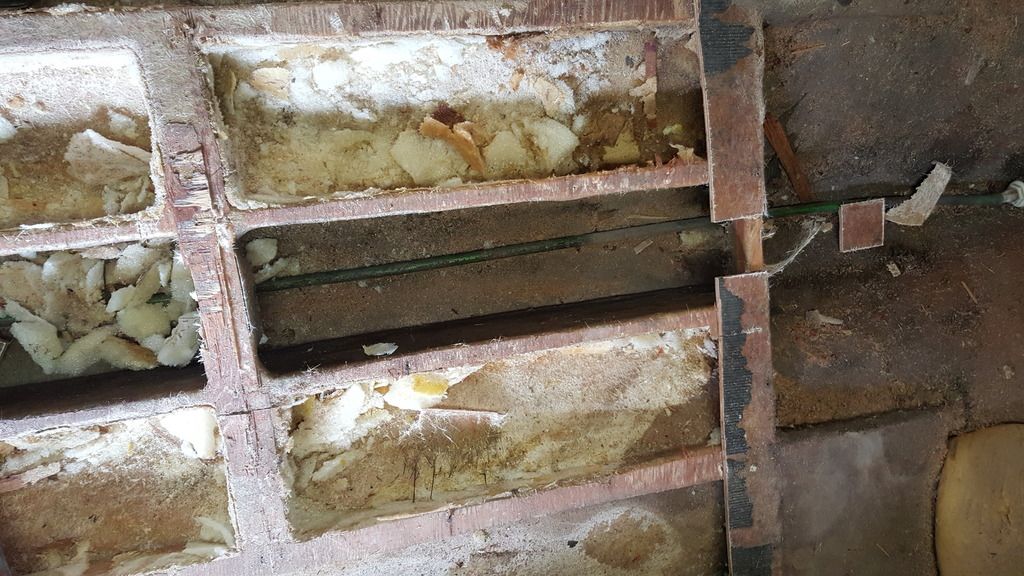
There is a couple reasons for this in my opinion. First: no matter how good you are, you'll never get the wood cut to perfectly match the hull. This can leave hard and soft spots along the line of the stringers that can reduce structural integrity. These spots are weak points that can cause flex and lead to tabbing delamination. If you plan for a gap, your cut doesn't have to be 100% perfect. Second: you want to ensure you properly glue these structural components in place. Leaving a 1/4" gap between the structure and the hull ensures a solid attachment of the structure as you push thickened resin under it. I like to add chop strand to my thickened resin for more strength and protection against shrinkage cracks as the resin kicks. Third, (and I have not heard anyone mention this): added protection against water intrusion. Boats rot from the bottom up. If the wood sits against the hull, any tiny bit of water will eventually get soaked into it. If you leave 1/4" gap and pack that gap with thickened resin, the water has to be atleast 1/4" deep before it touches the wood. You'll add fillets to the structure to properly tab it to the hull. If the wood is against the hull, the fillets will create a trap for the water, helping to channel it into the wood. Water in wood equals rot. Rot equals unhappy boaters.

Bottom line, bedding the stringers with atleast 1/4" of thickened resin is the right way to do it. Manufacturers do not take the time or extra effort to ensure this happens. Take your time and do it right, paying attention to all the little things. Ensuring structural integrity and water proofing wood components is really the most important things you can do in a restoration.
 
Last edited:
Status
Not open for further replies.
Top