1965 Duratech Comanche

Status
Not open for further replies.

ASub

Seaman Apprentice
Joined
Oct 27, 2016
Messages
33
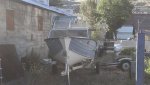
Hello All, I just bought up a 1965 Duratech Comanche off CL this week. It's currently on a trailer (probably original) that is sunk up to the axles meaning the first part of the project is the recovery. I will post photos of its current condition and location as soon as the forum allows me to post photos.

The boat is in very rough shape, but seems that most of the parts are there. I will be cleaning it up tomorrow to get ready to pull it out of its current spot.

I think this one had dual outboards on it from what I see. Does anyone have any info on this? I think it would be pretty wild to modern, dual power this boat. Thoughts on that are appreciated.

Is there any interest still out there on these boats? I saw it on CL and thought it was too cool of a project to pass up. Thanks in advance for any advice, photos and information about these boats.

ASub
 

ASub

Seaman Apprentice
Joined
Oct 27, 2016
Messages
33
I cleaned the transom up a bit better on my second trip. Changing my thoughts to this was a single outboard boat. Photos to come.
 

ASub

Seaman Apprentice
Joined
Oct 27, 2016
Messages
33
Post #3 so I can upload photos. Does anyone know if JoeMan is still around? I sent an email to the duratechboats.com website and received a mailer-daemon error.
 

ASub

Seaman Apprentice
Joined
Oct 27, 2016
Messages
33
On the original trailer., , Here is the interior of the cabin. I will be tearing all of this out and replacing. I removed all the old foam and decking.
I cut the old winch post off the old trailer, back the new trailer over the tongue and winched the boat onto the new trailer. Parked for now in its new home. I am going to demo the rest of the ply wood, pressure wash and start to find the holes.
 

ASub

Seaman Apprentice
Joined
Oct 27, 2016
Messages
33
I am not finding any info for these boats on the web, just what is here on the site. I hope that someone sees my project and can feed me as much info as possible on this beauty. I will keep posting to this thread as I go so that others can learn too.

Thanks in advance!
 

ASub

Seaman Apprentice
Joined
Oct 27, 2016
Messages
33
Ok, here's to bad parts. It looks like it hit the winch post too hard a few times. Can this be welded up and fixed? I also noticed some pin holes about 1/4 of the way back from the bow on the bottom, probably from beaching.


Notice where the bow meets the bumper on the winch post.


Up close shot.

Photos of the pin holes to come.

I think first things - first. Demo the rest of the interior, blast the paint with a pressure washer, fill it? and check for leaks before I get too far ahead of my self.
 

ASub

Seaman Apprentice
Joined
Oct 27, 2016
Messages
33
Mods, can you move my post to the hull repair and restoration area? I think that I will get more views/help from the aluminum fans out there if I was in a more public spot. Let me know. Thanks, Adam
 

jbcurt00

Moderator
Staff member
Joined
Oct 25, 2011
Messages
24,863
No Title

I dont think I'd try to weld that bow stop damage.

I'd patch over it w a heavy gauge of aluminum, big enough to cover the damage and give you plenty of room to drive solid rivets through good material.

Shaped and riveted in a similar pattern as the bow plate.

From your pix, your Duratech has a larger, bu similar style/shape (diamond) bow plate as a Starcraft:
 

Attachments

  • photo255310.jpg
    photo255310.jpg
    32.1 KB · Views: 2

ASub

Seaman Apprentice
Joined
Oct 27, 2016
Messages
33
Any thoughts appreciated here, should I strip the entire hull down to bare aluminum using aircraft stripper before fixing the spots I know about? Or should I tear out the interior, fill it will some water to find the leaks and then weld them up? After the leaks are then taken care of, start going back the other direction (paint). Note: I will be painting it back to the original white/blue. Seems to have a yellowish coating on the bottom.
 

jbcurt00

Moderator
Staff member
Joined
Oct 25, 2011
Messages
24,863
Again, I wouldnt weld it. It was built w rivets, fix it w rivets. A patch doesnt have to scream

look, here's a patch


Watermann classiccat and dozerII all fixed damaged riveted boats w patches that dont detract from the boat

Not knowing exactly how your boat was built, stripping it might reveal damage you were unaware of. Watermann and ClassicCat both had damage hidden behind paint on their Statcrafts. Mainly near riveted rib ends at the chine.
 

Watermann

Starmada Splash of the Year 2014
Joined
Jan 12, 2013
Messages
13,753
Oh man that's a real nice tinny cruiser you hauled out of the brush! Welcome to the forum and you've come to the right place to work on these old tin boats.

Strip the boat clean, personally I'm the sort that tears these old boats down to bare nothing, clean, make the hull repairs that are needed and then reassemble. This process can take the longest of the entire build depending on how many repairs are needed.

The impact damage to the bow where the trailers stop damaged the AL plate. I was looking for where the bow eye was located and can't see it in your pics. I would use a piece of .100 5150 AL that will cover the damage and bend it to the correct shape of the bow. Drill a stop crack hole at the ends of the cracks. Create a wooden V backer on the inside and put the bow eye in this location running it though the new patch piece so you can tighten it down sandwiching the damaged area. I would also back butter the patch with 5200 which would make it 100% water tight and add gluvit epoxy on the inside. Once painted it would blend right into the boat. I hope I explained that well enough.

If the keel plate has been rubbed down to where it's showing through I would like to see some pics of the damage before advising how to proceed.

Welding on a riveted boat is not a good idea, it will smoke out any seam sealer material nearby the weld and create more issues not to mention the heat will warp the AL and can make it brittle.
 

sphelps

Supreme Mariner
Joined
Nov 16, 2011
Messages
11,432
Very cool!! Tagging along to see her return to glory once again ! :cool:
 

ASub

Seaman Apprentice
Joined
Oct 27, 2016
Messages
33
More demo today on the interior so that I can see the leaks down low.

Message received - no welding.

I will upload photos from today with a series of questions, I'm sure. Thank you jbcurt00 and Watermann for your help. Thank you sphelps for the follow. This project is going to be fun.
 

ASub

Seaman Apprentice
Joined
Oct 27, 2016
Messages
33
Sunday was a demo day. I had pulled out the old decking and foam in the rear before I transported the boat a few weeks ago. Yesterday, I finished pulling the rest of the ply wood out along with the old foam under the cuddy cabin. Nasty job, but with some help from my dad we got it all.

Here's how it was before.

Before


During


And after

Bow under cuddie


Stern after that shop vac got a good workout

I need to dig into that transom next. I think it will involve removing most everything you see in the stern. Thoughts on that? Does anyone have experience removing all those aluminum pieces to get to the rotted transom wood?

Next post will have some photos of the holes I found. Thanks for looking. Let me know if anyone would like to see some additional photos.
 

ASub

Seaman Apprentice
Joined
Oct 27, 2016
Messages
33
Ok, here's where I start to get nervous. As I said before, I have some holes that I know about towards the bow. A couple of comments here.

#1 I have zero experience fixing aluminum hulls. I don't want this to be the point of the project that scares/frustrates me and therefore lose motivation to get it done, I feel happens to so many of us. Then this thing sits in the back of the warehouse for eternity.

#2 I want to make sure this thing is fixed well enough that my wife (along with my young son and another little one on the way) is comfortable getting on this thing and taking a ride over to the islands on Lake Erie. I don't know if 100% water tight is realistic? I know this thing isn't a new boat, but I feel I should be striving for perfection and accepting some percentage off of that? Safety is the most important thing to me here as it's not just my boat, but (hopefully) will be used by my entire family.

Ok, these two things being said - should I take this thing to a professional for some quotes? Maybe they will see something that my untrained eye will not? Or, should I start stripping the boat down to the aluminum and start the process on my own? Rhetorical questions here for me to think about, but I would appreciate your thoughts.

Here are some things to consider - I have access to a large assortment to tools (carpentry, mostly) as well as a CNC for the interior refit with the backing of knowledge from carpenters that I work with. So I will be doing a bulk of that on my own. The hull and the repower are the two items I will need the most help with. I also have time, there is no goal for this thing to be on the water any time soon. Young son (under 2) with another one on the way means that there isn't much time for me to work on this without interruption, so it's a hobby project to work on when I do find some un-allocated Sunday afternoon.

Ok, to the photos.

that's the keel (bow to the right in the photo) and the area of the holes, like I said before - about 1/4 of the way back from the bow. You can see the two (known) holes in the hull just north of the keel, under the larger patch of white residue.

Here they are

Another spot I am concerned about. It is above the two holes shown previously. Seems maybe a little soft in this area.

Ok, there they are. What are your thoughts? Can it be fixed?

Full disclosure - I have $350 into the boat, $40 to transfer the title and I traded an old tv for the trailer. So if it is honestly junk, I could probably scrap it and recoup a couple of bucks.
 

Watermann

Starmada Splash of the Year 2014
Joined
Jan 12, 2013
Messages
13,753
Looking good, you about have all the dirty work behind you now. Some good and not so good templates it looks like. What shapes the transom wood in?

After I posted the above I saw your new pics of the bow area. You will need to clean that area down to bare AL to find all the bad spots as there's too much crud to know for sure. Also clean the inside as well to where it's bare clean AL and take some pics there too.
 
Last edited:
Status
Not open for further replies.
Top