The Boat With No Name....

Nothingman

Cadet
Joined
Jul 27, 2016
Messages
16
A big thanks to everyone that has posted answers and lend-ed their helping hand of knowledge when others were in need. I am going to simply make a thread that shows/lists everything that has been done to our latest boat project with the hope that some of this can pass on the helping hand that I have used from here a few times...... I will try to get on here when I think of it to answer any questions or post additional photos if any are desired.

My brother and I purchased an 89 Wellcraft 170 classic a bit more than 1 year ago from some friends of ours. I had used the boat several times with them and having grown up with boats decided that it was a deal good enough to not pass up....

The day it came home:


Please do not rant about the jeep not being suitable as a towing vehicle ect.... I will get to that in a later post.
 

Nothingman

Cadet
Joined
Jul 27, 2016
Messages
16
The Good:

New(ish) with the boat was a battery and a starter, the alpha 1 out-drive was not original but had been replaced somewhat recently. There was only a tiny bit of water at the bottom of the lower unit and all of the shafts seemed to be fine. The tires held air, the boat floated, the floor and motor mounts were solid and it came with a canvas cover as well as a large rain cover.

The Bad:

That canvas cover was held together with hopes and dreams.
The boat did not sit right on that trailer, it was almost neutrally balanced to the point that one bag in the back of it would tip it right back.
The bellows were shot.
Some minor tweaking was needed on the engine to smooth it out a bit.
There were some general electrical repairs and add ons that were..... "iffy"
 

Nothingman

Cadet
Joined
Jul 27, 2016
Messages
16
First up I will discuss the trailer:

The first thing you should do with a trailer is make sure that any water capable of getting inside the frame has a way to get back out, the cross supports on this trailer are merely bent 2"x 4" channel. They were full of water, there were no drain holes at the middle to let the water back out. As a result of this, you guessed it, the centers of these were held together with hopes, dreams, and a very stubborn layer of some type of latex paint that kept all of the small holes from showing. We donned this a project for another day and simply welded some angle across to the good metal to keep it rigid.

The next issue was the ride location of the boat. With negative amounts of tongue weight at times it was downright dangerous. The axle was moved back to accommodate a better tongue weight and ensure that the back end of my jeep wasn't lifted off the ground anymore.

Suspension: I noticed while pulling the boat that there was a clunking noise and a jarring through the frame of the vehicle whenever i hit a bump. Further inspection showed that since the axle was mounted as spring under, there was about 0.75" of space between the bottom of the frame and and top the axle that would clunk together without much effort. The easiest solution was to simply switch the axle to spring over, lifting the entire boat up about 3 inches. If you do this make sure that your axle does not have a built in camber to it. While this isn't exactly desirable on a shallow launch ramp, at least the boat wont be jarred apart over the bumps anymore. When we make the new cross supports on the trailer we plan to lower them with the design so the boat sits a little lower on the trailer - the pictures show how much we had to lower the fenders to keep it from looking so goofy and the new ride height.


Another thing that we noticed was there were no drain holes on the axle itself, a few quick minutes with a drill and a small bit had water running out of the axle tube for a few minutes....
 

Nothingman

Cadet
Joined
Jul 27, 2016
Messages
16
Electrical:

There is no easy way to put it, water and electric just do not mix. If you are going to do it, do it right, get some dielectric grease and some shirk tubing and do your best to keep the moisture out of the connections. Copper does corrode and all it needs to do is get damp once to start the process. Trust me, even though you are laying on your back under the dash adding in a ground connection to the new lights that you just put on and you are thinking to yourself, there is no way water could ever get under here.... it will. Probably while you are going 75 down the thruway and its pouring rain and spraying all over your boat.... its the situations you dont want to be in that you have to prepare and design for.

There were several wire nuts wrapped in tape on this boat, and in some cases just tape. We spent an afternoon and replaced all of them and made sure that everything was working properly. There were several pieces of wire that had 3 or 4 points of connection that were just an extension of the wire... probably because it was too short at the time, or more likely the wrong wire was cut at some point and just spliced back together. We replaced those as well because who wants to have 3 additional places that might not have continuity. We added in some blue mood lighting, a power port for 12v and a dual USB charging port. The lights are great for all those late nights when you are trying to get everything together in the dark while approaching the dock. The 12v outlet works great for a spotlight and the air pump for those huge tubes...

This is the blue mood light, you can see the two power ports on the left side of the passenger dash next to the glove box:


We have been toying with the idea of mounting two LED flood lights somewhere on the boat pointing forward for those fun nights searching for the mystery rocks. So far we have decided against it because we can not find a good place to put them and the spotlight seems to work out just fine so far.... thought?
 

Nothingman

Cadet
Joined
Jul 27, 2016
Messages
16
The out-drive came off and the bellows were replaced, I wont go into too much detail since there are so many different threads on here about how to do it. We ended up using RTV gasket maker since the special adhesive you are supposed to use simply turned hard as a rock and didn't hold the rubber very well. I got the bellows from Amazon and saved a ton of money, best advise I will give for putting them on is to put the hose clamp on by itself first and tighten it down. This allows you to see where the screw head needs to end up to you can access it, and it pre- shapes the clamp around the oval. We used a piece of string wrapped around the rubber pulling towards the seat of the gasket and two plastic screwdrivers to wiggle everything together. Make sure you adjust your trim switches after the glue dries on your bellows, ours were WAY out of adjustment and would have easily pulled them right off had we left everything the way it was. Also check your gimble bearing while you are in there... it inst fun to get to so I would recommend changing it. make sure you get a grease-able one if you have the remote zerk on your out-drive.

Make sure you have a beer before attempting the re-assembly... it might help keep those nerves calm.


gm280

Supreme Mariner
Joined
Jun 26, 2011
Messages
14,592
Nothingman, :welcome: to iboats.

Just for some info, you can add more then one picture in one posting. Thereby negating more posts to show different things. I'll let other post their thoughts about your new-to-you boat. Does look nice though.
 

mickyryan

Rear Admiral
Joined
Apr 18, 2016
Messages
4,210
Hey hey take a picture of the capacity sticker for me if ya can thanks and nice looking boat , you can look at my post to see what i fid with my 1988 170 lol
 

Nothingman

Cadet
Joined
Jul 27, 2016
Messages
16
Nothingman, :welcome: to iboats.

Just for some info, you can add more then one picture in one posting. Thereby negating more posts to show different things. I'll let other post their thoughts about your new-to-you boat. Does look nice though.

Thank you for the welcome, my plan was to keep the posts separate for my own mental tracking...... and i have typed up more than one multi page post to have the internet die or the site clock out on me. Thanks for the compliment, we try.


Hey hey take a picture of the capacity sticker for me if ya can thanks and nice looking boat , you can look at my post to see what i fid with my 1988 170 lol

I will take a picture of the sticker for you when I get back home on Sunday, I must warn you though, ours is pretty rough and I do remember that it says 7 person on it if that helps. I'm not sure if anyone has said this yet, but you a crazy! That will truly be a one of a kind boat with some excellent craftmenship, You are more than welcome to take on any of our boat projects if you ever get bored :D
 

Nothingman

Cadet
Joined
Jul 27, 2016
Messages
16
This boat appears to have lived on a trailer and was stored indoors for the most part considering that the paint isn' t too faded and the floor is still solid... the seats are quite ugly from years of abuse and they seemed very unstable. We took them off to discover that they have been made from plain plywood and assembled with plain staples.... all of which were rotted quite a bit, new bolts we installed and some pressure treated reinforcements were added to stiffen everything up. We have plans to build new seats and make a different layout for the interior of the boat, something like a single captains chair, sun deck over the motor with storage below it on each side, and passenger seat that is more of a bench that wraps around the side and back, maybe over the winter.... The boat was very dirty when we first got it, first everything got scrubbed with dawn dish soap and rinsed, then a light blend of bleach water was scrubbed in and everything was at least made "clean" again.... 20+ years of suntan lotion and oil were soaked into parts of this boat... blaa. Then we gave it a slight buff and a wax job to really bring out the shine, we get several compliments that lean towards how well it looks for its age...


mickyryan

Rear Admiral
Joined
Apr 18, 2016
Messages
4,210
if my boat had been in as good of shape as yours id been tickled pink! lol even appears to be buffing out nice , its a great boat but I will warn you mine , the floor was a inch off from center, not sure why it was like that but I put it back exactly as it was worrying that if I didn't the boat wouldn't float right also the floor was not perfectly level from left to right the passenger side was about a inch lower now that got me thinking that when only a driver was in the boat the floor would be close to dead level from left to right? anyways mine had all the wood rotten even in the top so that was kinda my deciding factor to go this route :)
 

Nothingman

Cadet
Joined
Jul 27, 2016
Messages
16
After looking up aftermarket swim platforms and such (then gagging at the $ it would cost), we decided to tackle the project ourselves mainly for two reasons. 1. Its much cheaper. 2. We can. While this isnt the best that can be done, it was surely the fastest and for the trailer queen that this boat is, I am pretty sure it will hold up for the next 20 years just fine. We started off by marking a line all the way across the back for the floor level in the boat to ensure we could get to the bolts on the inside of the boat to tighten them. We used the water line on the side of the boat to determine the angle that the brackets needed to be at. A few helping hands and a giant protractor made quick work of that... After about 5 minutes of thought and cost comparison we decided to just look in the steel pile for bracket material. Should it be stainless steel? Yes, yes it should. Did we have enough stainless steel? No, no we did not... so an old bed frame was recycled and turned into 4 supports with 6 coats of paint on each. One day it will rust and we will have to unbolt everything and re-paint it, but I bet the pressure treated wood on the top will go bad before we need to do that. The brackets were spaced out to miss the turn of the out-drive and we opted to put the deck high enough to miss the entire thing. The motto of the project became keep it simple, stupid. We cut out some scraps of rubber to back the metal with to protect the fiberglass and we filled each of the bolt holes with RTV to prevent leakage. The deck is simply 5/4" board held on with 1/4" carriage bolts. We might give it a coat of paint at some point to make things match a little better, or at least stain it but untill the board cure themselves a bit more it will work just fine for the rest of the summer like this. We took an 86 mile round trip down the canal and back the next weekend and having a place for the cooler, grill, and gas cans that was completely out of the way was amazing. The grill is out in the photo because we were making a midnight snack...


Woodonglass

Supreme Mariner
Joined
Dec 29, 2009
Messages
25,924
The use of Steel for your brackets is a bit skeptical. If you prime it with anti-rust primer and then epoxy paint it and all fasteners it will prolly be ok. but it IS very succeptible to rust so maintain good maintenance on it.
 

Nothingman

Cadet
Joined
Jul 27, 2016
Messages
16
The use of Steel for your brackets is a bit skeptical. If you prime it with anti-rust primer and then epoxy paint it and all fasteners it will prolly be ok. but it IS very succeptible to rust so maintain good maintenance on it.

Yeah, we know. It has two coats of rustoleum rusty metal primer and four coats of rustoleum black. All of the hardware is stainless steel or galvanized. We will keep an eye on it, pretty easy to do so since it makes the water about 10 times per year and lives on the trailer. I have added stainless or aluminum angle to the list of things I keep an eye out for...
 

mickyryan

Rear Admiral
Joined
Apr 18, 2016
Messages
4,210
nice looking swim platform I will probably make one for mine down the line but I got other things to finish first:)
 

Nothingman

Cadet
Joined
Jul 27, 2016
Messages
16
Man does life get busy.... We have been enjoying the boat into the evenings after work. Having the swim platform and a grill on board has made us prime companions on the lake among our other friends with boats. Last week we spent a good hour getting the cables and throw levers adjusted for the out-drive engage/ throttle. Everything is working smoothly and almost clunk free now.

As luck would have it my fathers boat trailer had a mis hap on his way to the lake last week. Just as I stated in the post above, there was no drain hole in his axle tube.... so after 15 years of water filled corrosion it finally gave out. He lifted the trailer up with jacks and put a piece of C channel over the top of the broken tube and clamped it on with some pipe hangers, that got him limped home. We launched the boat in our pond, and fixed the trailer Sunday. As luck would have it he did have another axle laying around. I cut the spring perches off, spaced them properly, and welded them back on. A quick coat of paint and a few bolts later the boat was on new legs.... So please make sure you check out your cross members and axles on your trailers tonight, and you might want to bring a drill with you....


Nothingman

Cadet
Joined
Jul 27, 2016
Messages
16
Ok, here goes the towing post. All of this information will come with quite the disclaimer to it: Should a stock Jeep tow this boat? The answer is simply no. Can you move it around the yard, get it out of the barn, limp it down the street with the hazards on to your neighbors shop? Yes. I grew up on a semi-farm learning with tractors, four wheelers and farm trucks, and I have worked construction and landscaping for several years and there have been many times I was pulling well over the limitations of the tow vehicle. Just because it was done before does not mean that it is alright to do again.

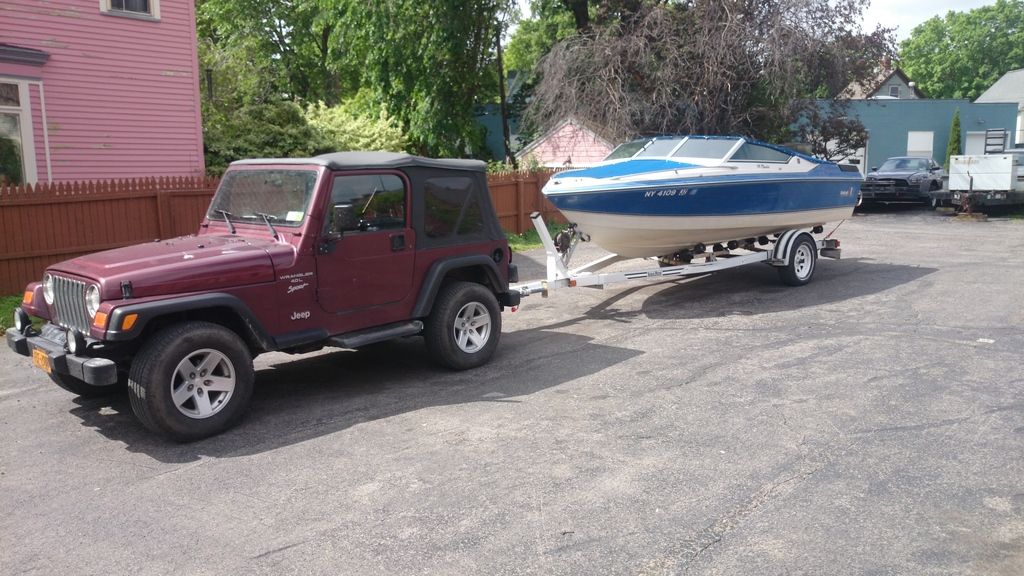
The recommended weight limit from the factory for my Jeep to tow is 2000lbs. This is a 2001 Jeep wrangler sport with the 4.0L and the NV3550 5 speed transmission. This Jeep has the highest tow rating of the TJ series Jeep simply because of the motor and 5 speed transmission. Any other combination of motor and transmission (and lift kits or larger tires) is rated for even less weight. These are the facts and they need not be ignored. I hear from everyone that gets their first vehicle with a hitch about how they can tow anything now... I will stop the rant there because I am sure all of us have at one point have been there.

Now that I have said all of the reasons I shouldn't tow with my jeep, here are the things I have done so that I feel a bit better doing just that. These are not things that make everything dreamy to tow with, nor do they fix the problem with the short wheel-base. I live in a pretty flat area of the country, the largest hill is about 50' in elevation change and the Jeep is only used to pull the boat around to local lakes and rivers so I am not a highway star, nor do I have to worry about flying down a hill out of control.

Jeep towing issues - Short wheel base, Brakes, and load capacity.

Short wheelbase - This is not an issue that can be changed, you can help the situation by having great tires and making sure you take wide turns to ensure the tongue push from the trailer is guided smoothly. To be honest the engine and transmission pull beautifully...

Brakes - Obviously make sure all of your brakes are adjusted properly to ensure you get the right distribution to the wheels, having your rear brakes adjusted properly does wonders when towing. We added electric brakes to the boat trailer itself. I got all of the pieces from amazon and simply installed them on the axle, make sure you get the correct ones for the hub shafts you have as well as the rim size and bolt pattern. Electric brakes are not very common on boat trailers with the simple thought that dunking the brakes in the water is not very good for them, however they are sold on marine sites and aren't completely shunned. Our thought was that trailer brakes get completely soaked every time it rains while they are in use so what is the difference? Personally I prefer electric brakes over there hydraulic counterparts for there simplicity and adjust-ability on the fly, not to mention they only work when you want them to in reverse. The other issue with hydraulic for my setup is that they are only mechanically actuated when the towing vehicle hits the brakes causing the trailer to push onto the vehicle and compress the brake cylinder. Since my Jeep is so stout and light, I can see the boat pushing right through its feeble attempt at locking up the tires and simply pushing the back end around. I already had a brake controller mounted in the jeep for a small trailer we have so at least that part was easy.

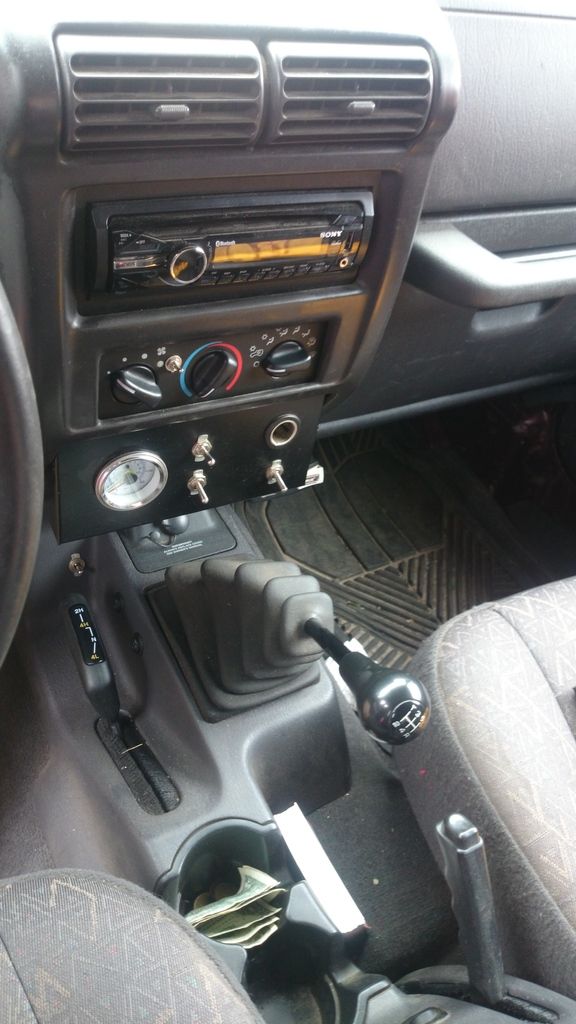
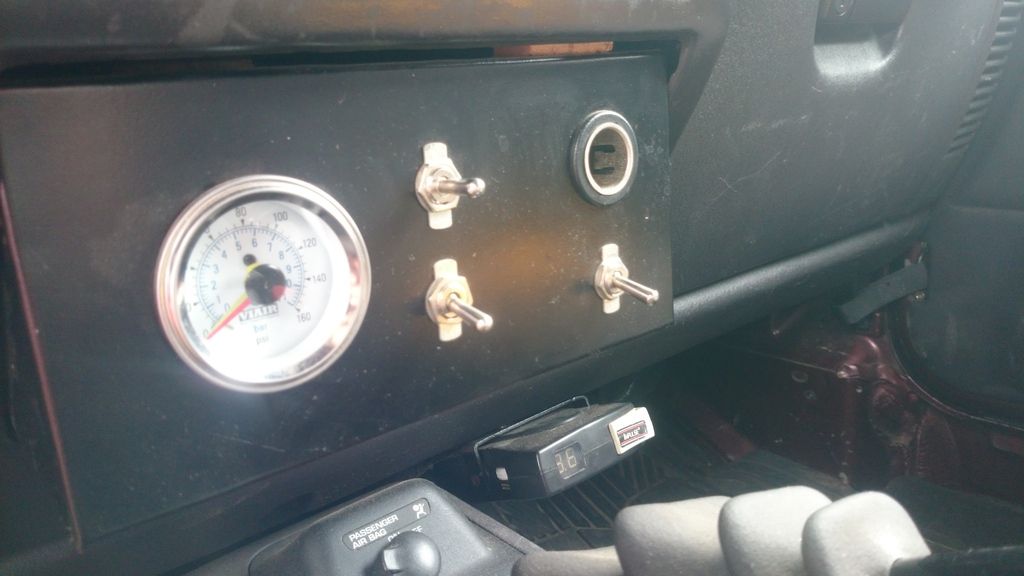
Load capacity - In addition to the boat and trailer being over the 2000lb limit (I believe it tipped in at 2600 unloaded) the rear suspension of Jeeps is not designed to have a lot of weight put onto it.... The first time I went out with the boat and trailer I went over a low spot on a back road and felt the weight of the boat bounce the back of the jeep into the bump stops with ease... and then bounce a few more times (yes the shocks are new). To solve this issue I installed an on-board air compressor from VIAIR and a 2 gallon tank I had from an old compressor. Air Lift sells several add a bag kits for vehicles, and if you have coils they sell simple bags that fit right in the coil springs, using the spring itself as a housing cage. I skipped the fancy control unit and bought two 12v air solenoids and a 3 way momentary switch to control the air pressure in the bags. The snapshot below shows the console set- up in the Jeep. The gauge is a dual needle that shows me the pressure in the tank as well as the pressure in the air bags. What a difference those bags make, even when I load up the jeep for a camping weekend its great to have them. And having an air supply wherever it is needed has been a godsend on several occasions. I highly recommend you exclusively use push lock fittings for everything, it just makes the world a simpler place to work in. If someone would like more information on this install just PM me and I can answer any questions.

With these modifications I have no issues with pulling the boat around locally. Would I let anyone else drive my Jeep pulling this boat? Absolutely not. It is still leaning on the dangerous side and unless you have a lot of experience towing I still do not recommend it. There have been two incidents where people have pulled out in front of me and both times I was able to lock up all 6 tires and downshift to avoid the collision, but that was giving it all the beans.

https://www.airliftcompany.com/vehicles/jeep/tj/2001/


Top