Popular Mechanics 1962 PM38 Build [SPLASHED 2017]

archbuilder

Vice Admiral
Joined
Sep 12, 2009
Messages
5,697
Mess, you haven't seen my shop! lol! That looks like a lot of fun, nice work! Thanks for sharing, this is a cool project!
 

Corjen1

Lieutenant Junior Grade
Joined
Aug 24, 2013
Messages
1,237
Wow, cool build!! Just read al 7 pages, mind if I tag along?
 

pekstrom

Chief Petty Officer
Joined
Dec 31, 2015
Messages
490
Ok, so lap joints are difficult. :D 
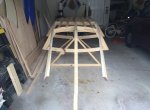
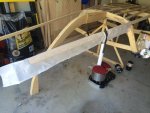
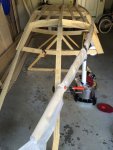
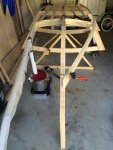
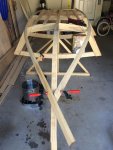
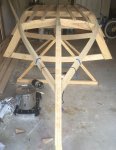
I don't have a dado attachment to my table saw, and I don't have a router table. So I opted for my jigsaw and belt sander. They came together and they do seem quite strong. But I'm glad they will be mostly hidden because they aren't all that purdy. :lol: Also, turns out figuring out the notches in the frames and transom for the chines was a bit more difficult than I had expected. That, or I was in a bit of a hurry. I'll need to cut a couple of small slivers of wood to fill in where I goofed. But all in all it is starting to take shape.
 

Woodonglass

Supreme Mariner
Joined
Dec 29, 2009
Messages
25,924
cheap Dado Blade for your table saw. Buy 3 Cheap 7 1/4" Rip blades from Harbor Freight. ($12 bucks) Use Shoe Box Cardboard "Washers" Between the blades and make sure to stagger the teeth so they're not touching. This will give you about a 7/16" dado blade. It'll leave a bit of a rough bottom but sanding or a sharp chisel will clean it up in a jiffy, How long are you making your lap joints.
 
Last edited:

pekstrom

Chief Petty Officer
Joined
Dec 31, 2015
Messages
490
Woodonglass your dado blade idea sounds neat. I didn't think of that but I may give it a try at some point. After all my fiddling, sanding and what-not they ended up at 6 inches. So that gives me about an 8:1 ratio. I am considering adding another section on the inside between frame 4 and the transom to make them thicker there once the bottom and side planking is on. That would also give me more of a support for the flooring I have in mind.
 

pekstrom

Chief Petty Officer
Joined
Dec 31, 2015
Messages
490
No Title

Yay! I have made it to the part where I need to steam bend those chines and create the bow of the boat. I'm going to do some test bends on some scrap lumber before I try on the actual chines though. I'd hate to break them after all this work.
 

Attachments

  • photo241491.jpg
    photo241491.jpg
    64.1 KB · Views: 0

Woodonglass

Supreme Mariner
Joined
Dec 29, 2009
Messages
25,924
Uhhmmm, don't want to rain on your parade but...It's my understanding that...Breakage during chine bending is a fairly common occurrence in wood boat building,soooo... if it occurs don't get to discouraged. It happens to the best of em!!!:eek::D;)

I learned this from the Glen-L site. If you have a LARGE pot boil some water and soak some towels in it and then wrap the chines in the hot towels and then continue to pour hot water on them as you continue to bend them in to place and leave the towels on for a while after they are in place. to relieve the woods tension for a while. Even doing that they still sometimes break!!!:blue: I've seen guys use nylon straps to pull the chines in place gradually just a little bit at a time. Sometimes takes a week or more just to get the wood to bend gradually with the water and heat allowing the grain to release it's tension.:noidea:
 

Ned L

Commander
Joined
Sep 17, 2008
Messages
2,266
Have you thought about how you will be steaming them? Steam bending is not difficult, but you do need a good amount of real steam.
The old guideline of one hour for every inch of thickness really is what is required.
By chance do you know if your wood (ash as I remember) is kiln dried or air dried? You will have an easier time of it if air dried. It may well also help if you soak the area to bent in water for a number of days before steaming.
 

pekstrom

Chief Petty Officer
Joined
Dec 31, 2015
Messages
490
Woodonglass yeah, I am hoping to avoid them breaking but time will tell. :)

Ned L, I have pondered this for some time now and the article talks about the use of wet towels and an iron, both for the chines and for the two bottom plywood pieces in the bow. Pretty much what Woodonglass described. But I came across the following video a while back and am thinking about giving it a try. I have a decent sized pot and also a propane camping stove so all I need to do is come up with some conduit to lead the steam into the bag.

https://www.youtube.com/watch?v=--iPQIwSEJM

It seems simple enough but I know it isn't always that simple once you get into it. We'll see how it goes...
 

pekstrom

Chief Petty Officer
Joined
Dec 31, 2015
Messages
490
Well, I'll give it a try and will post an update here once I'm done. Possibly this weekend if time permits.
 

Kitch

Petty Officer 2nd Class
Joined
Feb 19, 2016
Messages
123
Hey Pekstrom,I used a 6" pc of pvc pipe to steam all the parts on a Glen-L Ben-Hur Hydroplane I built
about 20 or so yrs ago and it worked perfect. and for the curved pcs of the hull I used hot bath towels.
 

pekstrom

Chief Petty Officer
Joined
Dec 31, 2015
Messages
490
Hi Kitch, I will probably use towels for the plywood pieces in the bow. Did you just soak them in hot water or did you soak them and then run an iron over them to steam/heat the plywood? I think the original article suggests to soak the towels and then run a hot iron so I may give that a try. I have been pondering using PVC pipes for the chines, sheer and spray rails but the method using 6mil plastic seems like it may be easier and allows me to bend the wood while the steam is still going. Same principle though. For the plywood, how long would I need to heat/steam it? It will only be 1/4" thick so I'm guessing only 10-15 minutes?
 

pekstrom

Chief Petty Officer
Joined
Dec 31, 2015
Messages
490
Ok, so that steam bending method using the plastic sleeve is officially awesome! In about 1.5 hours I went from two straight pieces of wood to two bent ones. I will attach some pictures in a bit. Stay tuned.
 

pekstrom

Chief Petty Officer
Joined
Dec 31, 2015
Messages
490
No Title

Attached are 4 pictures of my bending process. The steam generator was just a large pot of water on a camping stove. I used a PVC pipe (1 or 1.5") to direct the steam into the plastic sleeve and some aluminium foil as a makeshift lid for the pot. The plastic was just a piece of 6mil plastic from HomeDepot. Worked like a charm the first time I tried it. I'm going to leave it like this to let the wood cool and dry completely. Probably until next weekend. Then I need to trim the ends so they fit properly to the sides of the stem.
 

Attachments

  • photo241857.jpg
    photo241857.jpg
    353.1 KB · Views: 0
  • photo241858.jpg
    photo241858.jpg
    109.8 KB · Views: 0
  • photo241859.jpg
    photo241859.jpg
    107.7 KB · Views: 0
  • photo241860.jpg
    photo241860.jpg
    106.3 KB · Views: 0

archbuilder

Vice Admiral
Joined
Sep 12, 2009
Messages
5,697
Looks like it turned out well, thank you for sharing! I will file this away in the back of my mind and I'm sure use it one of these days! Keep up the great work!
 

pekstrom

Chief Petty Officer
Joined
Dec 31, 2015
Messages
490
No Title

I know I said I'd probably leave this until next weekend. Well... that didn't happen. I just need to sand those ends a tiny bit more and they will fit nice and flush against the stem. Then it is on to gluing and securing with screws.
 

Attachments

  • photo242056.jpg
    photo242056.jpg
    126 KB · Views: 0
Top