1990 Sea Nymph FM160B Restoration

Frey0357

Petty Officer 1st Class
Joined
Mar 13, 2014
Messages
313
No Title

Ok, tough weekend! Did not get as much done, as I would have liked this weekend.....family activities!

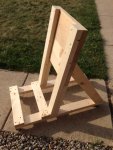
I did get some light woodworking completed though! Courtesy of iBoats, I found the plans here. I know that it doesnt call for 2x12" but hey I already had it so thought I would use it.

Late last night when the family was in bed, I did manage to get teh OB off and mounted on this new cart...pics coming in the next couple of days.

Too bad there isnt much money to make refabbing boats, casue it is really addicting! I actually like this stuff (this may be concerning!:faint2:).

Thanks all....

Frey
 

Attachments

  • photo230993.JPG
    photo230993.JPG
    135.2 KB · Views: 1

Frey0357

Petty Officer 1st Class
Joined
Mar 13, 2014
Messages
313
Oh I forgot to mention when I got the OB off the transom, I was bummed to find that my transom cap was cracked in half :eek:!!! No wonder the transom wood has failed and is soaked!

I guess I will be searching for good ideas on how to come up with a new transom cap (I'd kinda like to make my own, rather than even atttempt to find a replacement...)

Frey
 

jbcurt00

Moderator
Staff member
Joined
Oct 25, 2011
Messages
24,863
Take a look at the plan for the outboard stand again. I think you've got the outboard mount area flipped. I think the long legs in front of the 2X6s on your stand are supposed to be on the same side as the diagonal braces.

Rather then oushing against a 2X4 solid leg when the motors weight is on the 2X6s, your depending on the fastners to hold the weight.

May not make much difference depending on your OBs weight. But I wouldnt want to hang a heavy 115 TOP Merc on it that way. But I have 1 hanging on that stand built per the plan.

Since its trim, and under the motor, I'd suggest finding a TIG welder to fix the cap.

Several have made their own caps, but I dont recall off hand which builds, someone else will hopefully. You arent likely to find an SC transom cap. But if you find a donor boat, you might get lucky and it'll fit.....

Addicting, yep
 

Frey0357

Petty Officer 1st Class
Joined
Mar 13, 2014
Messages
313
jbcurt, thanks for the heads up on the mount. I did check this several times and the back portion where the motor mounts to the 2x6 (well I have (2) 2x12's in there) mimics the same angle of my transom. I did get my motor off last night and onto the mount and it is supported very well. Seems very stable. 60hp evinrude t/t...

I think I have it ritght.....

thanks,
Frey
 

Frey0357

Petty Officer 1st Class
Joined
Mar 13, 2014
Messages
313
Jbcurt, I do see what you are talking about. What you cant see from my pic is the way that I have peppered fasteners on the back side where the motor mount is. The weight from the motor completely presses down through the vertical posts into the base of the mount. I considered mounting either way (supporting boards facing forward or back) and decided there was no difference as long as the weight was fully supported! Seems rock solid right now!

If Im wrong and have suffered from an idiot attack, please chime in again.....;)

Frey
 

Watermann

Starmada Splash of the Year 2014
Joined
Jan 12, 2013
Messages
13,753
Transom caps, yeap almost always broken and for sure mangled. I made my own on my SS160.

IMAG0312.jpg
 

Frey0357

Petty Officer 1st Class
Joined
Mar 13, 2014
Messages
313
Thanks Watermann, your transom cap looks beautiful! I noticed that you placed fasteners through the top rather than the sides, any reason there...or just plain and simple easier that way? While I can make one, how did you round over the edges so nice, they look perfect in this photo?

Frey
 

Watermann

Starmada Splash of the Year 2014
Joined
Jan 12, 2013
Messages
13,753
Driving nails into a thin edge of the transom wood wasn't a very good idea to begin with on SN's part. One of the reasons anyway, the other was I used a piece of 1/16" AL which was heated with a torch and formed to the slopes of the transom and I secured the AL piece to the transom with the screws as I went to hold in in place. Then I heated and formed the AL over the sharp lip of the outer transom skin. I did this before there was any paint and I was able to use the old transom wood, there is some smoke involved but a guy could use new wood before it's sealed and painted. I It was an incredibly easy process that took only a half hour and if you ruin a short piece of 1/16" AL trying at first it isn't a big deal. You can then remove the piece and flip it around and repeat the process of heating and forming the other side over.
 

Frey0357

Petty Officer 1st Class
Joined
Mar 13, 2014
Messages
313
Driving nails into a thin edge of the transom wood wasn't a very good idea to begin with on SN's part. One of the reasons anyway, the other was I used a piece of 1/16" AL which was heated with a torch and formed to the slopes of the transom and I secured the AL piece to the transom with the screws as I went to hold in in place. Then I heated and formed the AL over the sharp lip of the outer transom skin. I did this before there was any paint and I was able to use the old transom wood, there is some smoke involved but a guy could use new wood before it's sealed and painted. I It was an incredibly easy process that took only a half hour and if you ruin a short piece of 1/16" AL trying at first it isn't a big deal. You can then remove the piece and flip it around and repeat the process of heating and forming the other side over.

Ok great, it seems heating the AL is the trick! Once I get my new transom wood installed I will tackle this next.

Thank you again!

Frey
 

Frey0357

Petty Officer 1st Class
Joined
Mar 13, 2014
Messages
313
No Title

Well the progress has been slow with the project, but I did get the transom cap off and corner caps. As you can see: CONFIRMED, the transom is bad! As expected I will be removing this rotten transom and replacing it with a much stronger, sealed, marine grade plywood. This is big fun....:faint2:

The pics arent great ( I was tired :sleeping:), but I think you get the point.....

Frey
 

Attachments

  • photo231050.JPG
    photo231050.JPG
    225.2 KB · Views: 3
  • photo231051.JPG
    photo231051.JPG
    185.2 KB · Views: 3
Last edited:

Frey0357

Petty Officer 1st Class
Joined
Mar 13, 2014
Messages
313
Anyone have any recommendations for removing a wet soaked transom from the metal casing it is presently in? I dont think it will work out, but I would really like it if it could remain a one piece board.....just curious if anyone has any solutions of things that they have used??

Frey
 

budski

Lieutenant Commander
Joined
Sep 12, 2012
Messages
1,845
My son and I used two large wood screw in I bolts and a come along mounted to a roof joist
fetch
 

Frey0357

Petty Officer 1st Class
Joined
Mar 13, 2014
Messages
313
My son and I used two large wood screw in I bolts and a come along mounted to a roof joist
fetch

Thanks Budski, that plan was exactly what I was thinking of doing, only I dont have exposed roof joists in my garage......:eek:

I might still be able to rig something up that will hold!

Frey
 

TruckDrivingFool

Lieutenant Commander
Joined
Jul 30, 2007
Messages
1,818
Looking at your picture I think you may need to do something with all that structure you have in the rear as it appears your transom wood is tapered.
 

Frey0357

Petty Officer 1st Class
Joined
Mar 13, 2014
Messages
313
No Title

Where did the rest of my tansom go? :faint2:

"But Frey, you said you wanted to try to get your tansom out in one piece, to use as a template..." - Yeah would have done that, but one important component is necessary to remove in one piece! The transom needs to be in one piece!:eek:

Check out the pics.....I think I could easily place my transom in my flower bed in the front of my home and no one would know it was part of my boat! Hey wait perhaps this is a recycling program?

All one can do is laugh!:lol:

Frey
 

Attachments

  • photo231100.JPG
    photo231100.JPG
    123.6 KB · Views: 3
  • photo231101.JPG
    photo231101.JPG
    122.4 KB · Views: 3
  • photo231102.JPG
    photo231102.JPG
    106.8 KB · Views: 3

Frey0357

Petty Officer 1st Class
Joined
Mar 13, 2014
Messages
313
You can see in the last pic ^^^^ (above) another contributing factor as to why the transom failed.....SN screwed right into the transom, to support with the bracketing in the stern of the boat. The whole transom has these screws placed into it (about 30 of em!) which only weakens and provides another way for water to get into the wood....

Thanks all for watching as this project unfolds.....by the way, like many have stated: nothing comes easy with this project! I found the PO ran the speedometer and transducer cable through one of the drain holes in the splash well, so now I am at a decision...do I cut the wires and risk reduced performance from these electronics or unwire them from the console back?

Question: Can someone recommend a good method for removing 50lbs. of soaked wood pulp from the remainder of what should be my transom area? Cant get any of my shop vac accessories down there.....? thoughts?


Thanks!
Frey
 

Frey0357

Petty Officer 1st Class
Joined
Mar 13, 2014
Messages
313
Looking at your picture I think you may need to do something with all that structure you have in the rear as it appears your transom wood is tapered.

Thx Truck for your comment. The transom is tapered to match the sides of the hull if that is what you meant, but removing it wont be an issue any longer. I'm sure once you see my ^^^^ post you will see why!

I will keep this project moving forward albeit slowly....;) I wish the Mrs. would understand that I need more time in the garage :D! Lol, jk all!
 
Top