1971 Starcraft Falcon V14 - Merc400 (Pic heavy)

FoolishOne

Seaman Apprentice
Joined
Jul 28, 2019
Messages
40
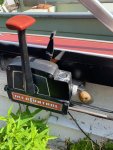
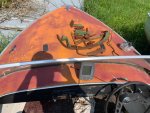
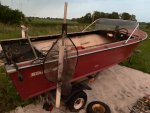
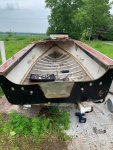
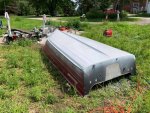
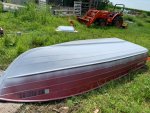
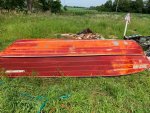
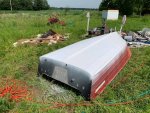
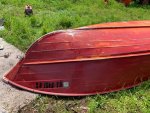
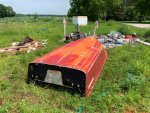
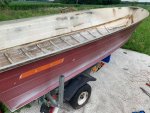
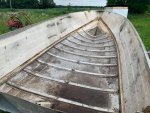
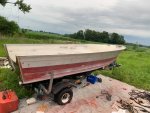
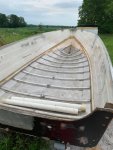
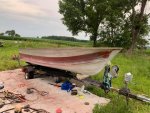
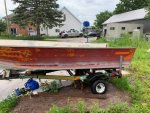
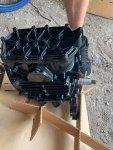
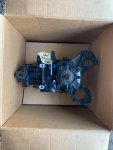
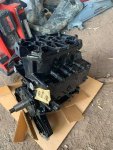
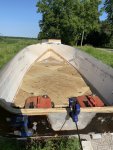
Hey all, this is my first post on iBoats. I wanted to share a project I've been working on. The boat is a 1971 Starcraft Falcon V14 with a Merc 400.

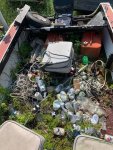
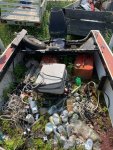
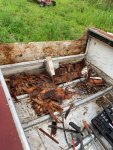
My brother in law bought the boat some years ago for $300. He ran it around on Shawano lake (north of Green Bay) until the engine gave out. It got parked behind the barn at my father in laws house and has sat there for a few years. They had been planning on gutting it and scrapping the hull but never got around to it because "the price for aluminum has been so low."

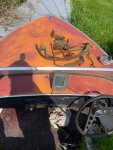
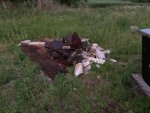
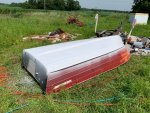
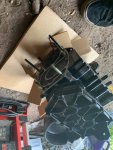
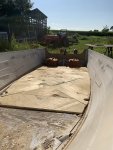
Yep...those are weeds and moss growing out of the floor and carpet.
 

Attachments

  • photo317715.jpg
    photo317715.jpg
    79.5 KB · Views: 6
  • photo317716.jpg
    photo317716.jpg
    79.3 KB · Views: 5
  • photo317717.jpg
    photo317717.jpg
    74.8 KB · Views: 5
  • photo317718.jpg
    photo317718.jpg
    97.6 KB · Views: 6
  • photo317719.jpg
    photo317719.jpg
    130.6 KB · Views: 5
  • photo317720.jpg
    photo317720.jpg
    134.8 KB · Views: 6
  • photo317721.jpg
    photo317721.jpg
    98.2 KB · Views: 5

FoolishOne

Seaman Apprentice
Joined
Jul 28, 2019
Messages
40
Got to work cleaning it out - doing a bit of gardening - and stripping everything out. Both the floor and transom were rotted (no real surprise there). I did get a bit of a surprise from the wasps living in the bow and under the gun wales. Sprayed everything with hornet killer and came back after lunch to an absolute massacre. Worked until dark 'gently' persuading stubborn bolts and rotted wood to cooperate. Started again in the morning getting the transom, dash, and windshield removed.
 

Attachments

  • photo317722.jpg
    photo317722.jpg
    138.8 KB · Views: 7
  • photo317723.jpg
    photo317723.jpg
    83.6 KB · Views: 5
  • photo317724.jpg
    photo317724.jpg
    72.9 KB · Views: 6
  • photo317725.jpg
    photo317725.jpg
    67.1 KB · Views: 6
  • photo317726.jpg
    photo317726.jpg
    116.1 KB · Views: 6

FoolishOne

Seaman Apprentice
Joined
Jul 28, 2019
Messages
40
Got it pulled off the trailer and flipped over. I started sanding with 80 grit on a random orbital. No real intentions of taking it down to bare aluminum except in a few places the paint was particularly bad. Once I was happy with the sanding I used an HVLP sprayer to lay a coat of gloss white on the bottom. Mostly this is a test/practice for the rest of the paint. I'm planning to wet-sand between coats, working my way to finer sanding with each coat.
 

Attachments

  • photo317727.jpg
    photo317727.jpg
    134.4 KB · Views: 5
  • photo317728.jpg
    photo317728.jpg
    150.6 KB · Views: 5
  • photo317729.jpg
    photo317729.jpg
    121 KB · Views: 5
  • photo317730.jpg
    photo317730.jpg
    139.9 KB · Views: 5
  • photo317731.jpg
    photo317731.jpg
    132.9 KB · Views: 5
  • photo317732.jpg
    photo317732.jpg
    119.1 KB · Views: 6
  • photo317733.jpg
    photo317733.jpg
    134.4 KB · Views: 6
  • photo317734.jpg
    photo317734.jpg
    141.1 KB · Views: 6

FoolishOne

Seaman Apprentice
Joined
Jul 28, 2019
Messages
40
What paint are you planning on using?

Right now I have a gallon of rust oleum professional oil enamel. I power washed the top side today and hit the bottom that I was testing out and it held up in the places that were prepped and came right off everywhere else. I’m taking that as a good sign.
 

Woodonglass

Supreme Mariner
Joined
Dec 29, 2009
Messages
25,924
Don't forget to use SE Primer on all bare aluminum. Also Prime the whole boat with Rustoleum Bare Metal Primer and also add the AE Hardener to the Final Rustoleum paint. You'll be glad you did.

If you haven't read this link you might wanna, it's got some good info

Paint Your Boat with Tractor Paint
...Say What!!!
eek.gif
 
Last edited:

FoolishOne

Seaman Apprentice
Joined
Jul 28, 2019
Messages
40
Don't forget to use SE Primer on all bare aluminum. Also Prime the whole boat with Rustoleum Bare Metal Primer and also add the AE Hardener to the Final Rustoleum paint. You'll be glad you did.

If you haven't read this link you might wanna, it's got some good info

Paint Your Boat with Tractor Paint
...Say What!!!
eek.gif

Thanks for the tip! I've been using this stuff as my go to paint for all kinds of misc. projects but this is the first time for aluminum. (Hence the test on the bottom side) I was planning on using a clear coat since I plan on doing some blue vinyl stripes. The clear would go on after the vinyl; I've had some good results with this on other projects.
 

FoolishOne

Seaman Apprentice
Joined
Jul 28, 2019
Messages
40
Pulled off the last few pieces today. Power washed everything and started sanding. I picked up some 60 grit to help with stripping. I originally had not planned on taking it down to metal but changed my mind :noidea:. Cutoff wheel took care of the pulley hangers and factory seat brackets. I also picked up two sheets of 3/4" GC for the floor and transom. These will need to be coated before installation (Aluminum and ACQ are a BAD combination). I also grabbed one sheet of 1/2" PVC to be used for the livewell, seat boxes and other misc. stuff.
 

Attachments

  • photo317767.jpg
    photo317767.jpg
    105.4 KB · Views: 4
  • photo317768.jpg
    photo317768.jpg
    104.3 KB · Views: 4
  • photo317769.jpg
    photo317769.jpg
    90.7 KB · Views: 4
  • photo317770.jpg
    photo317770.jpg
    78.6 KB · Views: 4
  • photo317771.jpg
    photo317771.jpg
    122.6 KB · Views: 4
  • photo317772.jpg
    photo317772.jpg
    121.6 KB · Views: 4

FoolishOne

Seaman Apprentice
Joined
Jul 28, 2019
Messages
40
Here are a couple of highly advanced digital renderings of the finished boat. (Wife wanted to know what I was talking about.)

The plan is to used 1.5" sch 80 aluminum pipe to build a small arch which will be used to mount rod holders but will also serve as the backrest for the bench seat which sits on top of the livewell. I'm planning to use a pair of 1000 gph pumps in an in/out configuration. Since I will not be able to build a particularly large livewell I want to make sure that I can change the water very quickly. The live well will sit on three UHMW plastic runners and secure to the transom by square aluminum and quick release pins. Two additional brackets will be mounted on the sides with release pins as well. Release pins at the transom and in the sides will be accessed via "fuel cap" style covers. This allows the live well to be slid forward or completely removed to provide access to the area under the splash well.

Front seats will be mounted on boxes. Each box will hold a battery
 

Attachments

  • photo317774.jpg
    photo317774.jpg
    31.7 KB · Views: 2
  • photo317775.png
    photo317775.png
    6.9 KB · Views: 2
Last edited:

FoolishOne

Seaman Apprentice
Joined
Jul 28, 2019
Messages
40
I found a 1976 Merc400 powerhead. The motor was built at the Mercury factory in Fond Du Lac, WI in '76. It was boxed up to be shipped out to Washington state but for whatever reason never left. It has been sitting untouched in that box for 43years. I bought it from Green Bay Prop for $500.
 

Attachments

  • photo317803.jpg
    photo317803.jpg
    54.9 KB · Views: 3
  • photo317804.jpg
    photo317804.jpg
    90 KB · Views: 2
  • photo317805.jpg
    photo317805.jpg
    83.6 KB · Views: 1
  • photo317806.jpg
    photo317806.jpg
    56.1 KB · Views: 2
  • photo317807.jpg
    photo317807.jpg
    97.5 KB · Views: 2
  • photo317808.jpg
    photo317808.jpg
    104.1 KB · Views: 2
  • photo317809.jpg
    photo317809.jpg
    92.9 KB · Views: 2

emoney

Commander
Joined
Jul 19, 2010
Messages
2,551
That's a great find. Looking forward to seeing this thing progress!
 

FoolishOne

Seaman Apprentice
Joined
Jul 28, 2019
Messages
40
Got the floor and transom roughed in today. I won’t make it back out there again until the weekend so final fitting is going to have to wait. I used the original floor as a template working through the angles in marker first then cutting with the circular saw. I screwed each piece to the old floor piece and put them together like a big puzzle. Once the general shape was laid out I flipped the whole thing over and cut around with the jigsaw. Then I flipped it back over and ran strips of 3/4” across the seams and removed the screws holding it to the old floor. I could then pick it up and put it in the boat.

I’m leaving the back portion of the floor uncovered in order to recess the gas tanks into the floor. They will sit flush with the top of the aluminum ribs.

I plan to use plasdeck as the floor covering.

In future projects I will use pvc sheeting instead of plywood for the floors.
1vcsMtu.jpg
 

Attachments

  • 3uVIAIh.jpg
    3uVIAIh.jpg
    1.6 MB · Views: 4
  • DvJ5oFk.jpg
    DvJ5oFk.jpg
    1.4 MB · Views: 5

FoolishOne

Seaman Apprentice
Joined
Jul 28, 2019
Messages
40
660$ for the diy floor and 25$ a sq ft for the custom panel on the bow. that’s based on 53” width and 96” long. Running strips the length of the floor. I’m working on designs that would reduce the amount needed and incorporate other materials as well. For example running a center line and then cutting 45s along the sides. And using pvc sheeting along the outside edges. I’m planning to drop side walls off the gun wales which takes up another 6in or so off the width.

Another option is to run a pvc center section the same width as the space between the seats , like a walkway. And then cutting 45s in plasdeck for the space between the center and the sides
 
Last edited:

jbcurt00

Moderator
Staff member
Joined
Oct 25, 2011
Messages
24,871
What kind of plywood did you use?

Why the odd harlequin/harringbone pattern of new ply?
 

FoolishOne

Seaman Apprentice
Joined
Jul 28, 2019
Messages
40
What kind of plywood did you use?

Why the odd harlequin/harringbone pattern of new ply?

3/4" ground contact MCA treated.

The pattern is kind of a funny /stupid story. I went with my father in law to pick up the wood in his van. We've used it before and it will fit full sheets with the seats laid down. My wife is out of town for work so without really thinking anything of it I took my son along... you can probably see where this is going... so neither of us thought about it until we were heading to the register. Being the 'creative' problem solver I am, I did some quick math and a couple of sketches and figured I could have the sheets cut at the store into 48 x 48. In case you're wondering, yes it was a huge PITA to get them to sit together nicely and wound up turning what should have taken an hour or two into a most of the day thing.

Now my wife wants to name the boat "Pythagoras"
 

FoolishOne

Seaman Apprentice
Joined
Jul 28, 2019
Messages
40
I started working on the splash well today. The plan is for the top to be some kind of brushed finish. The underside will be painted white and allow me to test the prep/paint before committing to the rest of the hull.

f9GyKja.jpg


Igk9Nxx.jpg


u9i5eUm.jpg


SZmbDzt.jpg


DMs6xt6.jpg
 
Top