ANOTHER Seville Restoration!

Joined
Apr 12, 2013
Messages
16
Hello all!

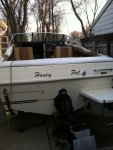
Let me start out by introducing myself! My names Nate, I'm 23 years old(just a youngster!), live in NE Ohio, new to Iboats, and have got one hell of a project ahead of me!:facepalm: Growing up my family had a 1978 24' Sea Ray Sundancer, that my father maintained immaculately until we got rid of it sometime around 2001. We kept her docked up at Catawba Island and spent just about every weekend on her. Those weekends and vacations growing up on the boat are some of my most cherished memories! Ever since shes been gone though there has been a big hole missing in my heart and last fall I decided it was time to start searching for a boat of my own. After searching around for a little bit I came up with a crazy idea... I decided I wanted to buy a boat that would need work! I'm a repairmen by trade and simply fixing something that is broken is what I love to do, and I figure I will be able to learn all the intricacies of the vessel I will own, and have the pride in being able to say that I rebuilt every bit of this thing! Plus the amount of uncared for, neglected boats for sale at a cheap price seems to out weigh the nice ones available! I knew that I wanted something small enough that I could trailer around easily but be big enough at the same time to handle Lake Erie, be somewhat economical, and have a cuddy so my father and I can once again have some weekends on the lake together. I searched around for a couple months and finally saw something that caught my eye, a 1984 19' Sea Ray Seville cuddy cabin. I had mainly been looking for a Sea Ray, partially because that's what I grew up around, and also because I just really like the lines of Ray's. So I contacted the seller, went and looked at it, Interior was roached, hull heavily oxidized, plenty of soft spots in the floor, the only bonus being he started it up for me and the engine ran great! It came with a nice shape EZ loader style trailer, and I couldn't argue with what his asking price was. I bought it on the spot! So I brought it home and there it sat until 3 weeks ago when winter finally started to lift and I could begin examining just how big of a mess I had to deal with. Well with a squishy floor, as you can guess, she has rotten stringers, bulkheads, motor mount, 2 of the 3 transom pieces, and probably 400 pounds of water logged foam! So I began that day tearing everything out and am just about done with the destruct, plan on finishing up later today. I just got the majority of glass, resin, and fillers I will need ordered yesterday and have the goal of putting every bit of time away from work into getting the boat finished by mid-summer and actually get some use out of it this season!(remember I'm young and with that comes loads of optimism!:rolleyes:) I have loved going through all the restores on here and am blown away by how knowledgeable, and supportive everyone is on here! I'm sure I will hit some road bumps and have plenty of questions along the way, but I'm sure there will be plenty of help from you guys out there! Now I know how you guys love pictures on here, so I'll post some of what I have gotten ripped apart so far!
2.jpg4.jpg6.jpg7.jpg20130414_153047.jpg
 
Joined
Apr 12, 2013
Messages
16
And the last of the pictures!

And the last of the pictures!

20130422_144021.jpg
20130427_200848.jpg
A pine tree and my chain hoist worked perfect as mother natures cherry picker!:laugh:
20130423_192212.jpg20130429_135105.jpg20130429_135120.jpg

Alrighty that's it for now! hah As I progress I'll be sure to update along the way!:joyous:
 

GT1000000

Rear Admiral
Joined
Jul 13, 2011
Messages
4,916
Re: ANOTHER Seville Restoration!

Let me be the first to welcome you to the Iboats Dry Dock and wish you an awesome time restoring and later enjoying this really nice looking 'Ray'...
I commend your commitment and optimism...thanks to your age and determination, I fully believe you will be able to reach your goal...
I will gladly come aboard and watch and if possible, lend a helping hand with whatever info you might need...
Best of Luck,
Gus
 

kabookey

Petty Officer 3rd Class
Joined
May 12, 2009
Messages
79
Re: ANOTHER Seville Restoration!

Beautiful boat man. I am in the midst of re-restoring my '87 Seville so I will be following your progress closely. Best of luck!
 

redstrat

Petty Officer 1st Class
Joined
Dec 29, 2011
Messages
202
Re: ANOTHER Seville Restoration!

Sounds like you're in the right frame of mind for a project like this. Good luck and keep us posted.
 

Panoguy

Petty Officer 2nd Class
Joined
Jul 29, 2011
Messages
150
Re: ANOTHER Seville Restoration!

Your Seville & mine are twins - I'm gonna be watching this thread with interest! I was thinking about leaving the floor & everything under the cubby alone - tell us, how wet was the foam under there - would that be a big mistake??

Good luck to you - these boats are just GREAT!
 

tpenfield

Moderator
Staff member
Joined
Jul 18, 2011
Messages
17,710
Re: ANOTHER Seville Restoration!

Thanks for posting the pictures. It looks like you have a good start into the project.

Looking forward to your updates. :)
 
Joined
Apr 12, 2013
Messages
16
Re: ANOTHER Seville Restoration!

Thanks for all the encouragement already! Kabookey - I'll be watching to see updates on how your gelcoat on the deck goes as that is what I am planning to do on mine! And Panoguy at first I wanted to do the same with the wood in the cuddy as it was the only bit where the wood hasn't rotted out (or atleast it doesn't seem like it yet). However the foam under there is soaked and the stringers go all the way up to that first bulk head so to fiberglass them in completly it has to come out, which should happen today so I will see if it actually wasn't rotted or not. I will update tonight on what I've gotten done in the past 2 days.. After I shower really good and roll a lint roller all over my body to pull the glass out of my skin!:lol:
 
Joined
Apr 12, 2013
Messages
16
Re: ANOTHER Seville Restoration!

Alrighty, time for an update!:happy:

So in my two days off I really haven't made as much headway as I would have liked. I fix cars as a side job and had two brake jobs and had to fix a friends dash lights that went out on them. But some progress is better then none, and it gives me some more money to throw in this hole in the water (err maybe hole in my backyard is a better phrase right now)!:lol:

20130502_173226.jpg

I managed to get the very outer layer of ply from the center transom out in one piece which I can use as a template on how much the new one will need to be tapered for the steering and what not. The transom was nice and juicy and made removing the rest of the wood a breeze as you can see from the image below!

20130502_173237.jpg

Once all the wood was out of the center transom I found something that was a little upsetting to me. From what I've always known Sea Ray's have a good solid build quality. Now I know when they came out with the Seville line that they made these boats to be geared towards being more affordable to make boating more available to lower income family's. However I figured these savings came from using smaller motors, and slightly lower quality materials. But I've noticed that the thickness of the hull compared to what my dad's was is at least a 1/4" thinner if not more and in the image below you can see that when they glued the transom into this thing they left about a 1/8" void in the area of the transom that from what I understand needs to be the strongest and most solid!

20130503_141955.jpg

Something that I would just like to get an okay on from you guys is my stringers on this end at the bow facing side of the gas tank bulk head. From there another piece is just butted up to the bulk head and continues on to the front of the boat. However it was not bedded and fiber glassed to the hull as you can see from the picture below. Am I correct on my thinking that when I put my new stringers in that I can bed them in the entire length stern to bow? I see no cons here and all it will do is leave me with a much more solid boat when all is said and done. I know Panoguy was questioning this too and we'll be happy to get some input!:joyous:

20130503_124649.jpg

But yeah so basically all I got done was removal of the back starboard seat and the rest of the deck underneath it, got the three sections of the transom out and got most of the grinding done on it, just need to grind some more around the edges where the new glass will join to the hull. Got the grinding done on the front port side seat completed, and began to grind out some of the deck lip! Like I said not as much as I wanted to accomplish but moving forward none-the-less!

20130503_194711.jpg
 
Joined
Apr 12, 2013
Messages
16
Re: ANOTHER Seville Restoration!

Time for a quick update!

So this week I got around to cutting out the rest of the wood that made up the cuddy.. When I first looked over the boat I was thinking that I would leave the cuddy untouched as it seemed to be the only wood in the boat that felt solid. However I figured if I'm going to tear the rest of the boat up why not do the right thing and replace it all and make this old girl brand new. Well sure am happy I did! It may have seemed solid but it sure as hell was not! The only wood that is completely dry and sound was the little 3 inch lip around the perimeter, which I decided to leave there (going to reseal it all up) and use it as the surface where I will be attaching the new wood to. Also once I pulled the foam up and cut the small cuddy floor out, which originally was fully sealed by Sea Ray, I found about 2 gallons of water trapped inside of it and the lower 8" of foam was fully soaked. But just as I was finishing that up I checked the weather and saw rain only a couple hours away, so I took a break to do a small project I've been planning on doing to protect all of my work with the upcoming rainy weather we'll be having. With 6 2x2's, 20 some 1x2's, and a MASSIVE tarp I built myself a nice "boat port". Which I made sure to make large enough so that I can move around on the boat and not have to worry about having to duck around things and kill my back. Came out nice!


Expect most of my future update pictures to have a nice blue tint to them! hah But yeah then today I got a little more work done after getting back from my roommates college graduation ceremony. I went to town grinding and in the 3 hours I went at it I was able to finish the grinding on the port side of the bow.. I must say I'm quite happy with how the grinding is going, not taking as long as I figured it would and I'm awkwardly finding it to be relaxing! Ehh I'm going crazy already!:cold:


When I wake up in the morning I'm going to get an early start and see if I can't complete the rest of the grinding all in one day! My US Composites order arrived this week, and my marine ply for the transom should be here Monday! I'm starting to feel like I might just meet my completion goal! (knock on glass):lol: Wellll that's it for now!
 
Joined
Apr 12, 2013
Messages
16
Re: ANOTHER Seville Restoration!

Quick update time! So in the past week my marine ply came in so I started to tackle making the new transom pieces. I bought 2 4x8 sheets of 1/2" and plan on using it for the transoms, stringers, and motor mount. Everything else like the seats, and the cuddy structure I plan on using 1/2" exterior, and 3/4" exterior for the deck. I cut the three pieces for the center transom to get my 1 1/2" and PL'ed them together, then cut out the two outer transoms and PL'ed those.. originally the outer transoms were only 3/4" and the new ones I made are 1", but I figured a little extra wouldn't hurt. After letting them sit for 2 days I un-clamped them, removed the PL that squeezed out, and used my angle grinder with a flapper wheel to make the reliefs for the steering and the relief on the bottom to match the original.


I then glassed on a layer of 1708 to the side of the center transom that would be glued to the hull. It was my first time ever doing any type of fiberglass work and I'm proud to say it came out nice with no air bubbles! I thought I took a picture of it but could not find it on my phone!:mad: I also mixed up some really slow resin and coated the edges of the transom really good. I let that all cure for a day then today I spent a little bit finishing the grinding on the transom and getting it all pretty, flat, and ready for the new wood to go in. I mixed up 2 quarts of peanut butter and with the help of my buddy got the new transom in the boat and clamped down good and tight. I then had to mix up another 2 quarts of peanut butter to finish up making the fillet. You'll be able to see in the picture that I completely filled in where the garboard plug will go and I am going to re-drill the hole so water will never be able to get near the wood!


That's it for now.. Work the next three days but will be back at it Saturday. Plan on getting the two outer pieces glued in and all of the tabbing done. And in between waiting for the layers to cure enough for the next layers of tabbing I am going to get the stringers cut and PL'ed together! I have to say it feels great to have put something back in the boat after tearing it all out.. definitely an uplifting moment!:whoo: Until the next update!
 
Joined
Apr 12, 2013
Messages
16
Re: ANOTHER Seville Restoration!

Well since my last update the boat is coming along, but I've come to the realization that I'm not going to meet my mid June completion that I was hoping for.:grumpy: Not going to let that mess with my motivation though!

So I started back on the transom.. got the center tabbed in with 2 layers of 1708 and then put on 2 more layers for it's skin.


Then got the keyhole cut back out.


I then got both of the side transoms peanut buttered in and the fillets around them.


Put on two layers of tabbing on these as well.


I ALMOST have a completed transom!!!:D I just have to put on the skins on the outers and while im glassing those I'm going to put one more layer on the center.. I'm right at 2 inches on it so I figure one more layer for good measure won't hurt!

In between layers of glass I started doing some other work.. the gel underneath the windscreen and dash came painted brown and I want it to just be gel so I sanded the paint off and rubbed it out with Meguiars #49 then Polished with #45.. Nice and shinny now and looks nice except for the fact that there are insane amounts of stress cracks in it.. When I get around to spraying new gel on all the areas of the boat that need it I plan on redoing it, but that is a good ways down the road so it will do for now! Since I had the supply's out I started removing the massive oxidation on the port side of the hull and polishing it up.. Still amazed right now how good it is looking! Smooth, shinning bright, and I could see myself well enough in it to tell I had a 5 o'clock mustache coming in! I also filled in most of the random screw holes that were riddled about!

That's most of it for now though! Until the next one!
 

Panoguy

Petty Officer 2nd Class
Joined
Jul 29, 2011
Messages
150
Re: ANOTHER Seville Restoration!

Looking good, Nateshindig! I glued-up my stringers & transom just yesterday. It cracks me up, my sanded transom looks EXACTLY like yours, I actually did a double-take!

I'm thinking that I may wait to cut the keyhole in the transom till I have it glassed-onto the boat, it seems that it would just be easier that way - but everybody seems to cut it out 1st. Can you see a reason for not going this route?

I'm also going to raise my floor by a few inches, so that it's level the whole width, right to the boat sides - I think that would work best with my buckets & rear bench.

Really great idea about removing the brown paint on the dash - I really hate that also, and may follow your lead on that one. I'm also considering making some sort of cowl for underneath the dash, a place to internally mount my radios.

Keep up the great work!!
 

pckeen

Commander
Joined
Jun 20, 2012
Messages
2,067
Re: ANOTHER Seville Restoration!

You're flying on this - excellent work.
 

Brickie

Seaman
Joined
May 15, 2013
Messages
59
Re: ANOTHER Seville Restoration!

what progress Nateshindig way to go, I have identical boat and need to do stringers and transom as well. I have had boat for 11 years and just did complete bellows job, then discovered soft spot and you know how that goes. I saw your post how you received order from US Composites and was wondering what shipping cost were like as i live in Ohio as well.
 

Attachments

  • 1984 Seville cuddy cabin picture.JPG
    1984 Seville cuddy cabin picture.JPG
    77.1 KB · Views: 0
Joined
Apr 12, 2013
Messages
16
Re: ANOTHER Seville Restoration!

Well guys, after a couple month hiatus I'm backkk! I feel bad for just up and disappearing like I did but once summer took off work got crazy, all of my family's cars started breaking down left and right and I had to come to the rescue, trying to enjoy a couple days off when I could, and have been battling a migraine for the past 2 months and trying to get to the cause of it! But in between all of this I have still been putting hours in on the boat, just not nearly as much as I wanted to. Once it got to the point where I knew it wouldn't be ready in time for summer I just told myself that I will take my time, do everything right without taking any sort of short cuts, and will have it done for next year, or possibly for this falls perch fishing! So since the last update here's whats gotten done....


STRINGERS!! I went with what I originally intended and clued together two 1/2" pieces of ply to make one inch stringers and ran them solid the whole length of the boat unlike the original 1/2" stringers with a 1 foot gap between the front stringer and back in the middle of the boat.. took a little bit of time to get the shape of them right but once that was taken care of I bedded them in with PL leaving about a 1/4" gap between them and the hull, then made fillets with peanut butter, tabbed them in with 2 layers of 1708 and capped them with another 2 layers of 1708.. They seem to have come out nice and are ROCK SOLID!=D

Then I really went to town on the outside of the boat. removed the horribly worn and faded hull stripes, removed the oxidation with meguirs rubbing compound, and polished, then polished it, and for good measure polished it some more.. She shines nice and pretty now! Still need to get some new hull stripes but just haven't got around to choosing what size and colors I wanna go with. Also I managed to get the stringers completed just in time for my appointment with a nice Amish man who lives about 25 miles away to have him make a new canvas for the boat.. I was scared to death trailering it that far with it only having the stringers in but it seemed solid enough and I had been waiting for 2 months to get the boat in for it's new cover. My dad took his boat to this guy back in the day and he did amazing work so I just went straight to him.. After making the appointment I still called around to get estimates at other places and everyone said it would be 1000+. This guy had it done in a week, used really nice and heavy Sunbrella material, and it only set me back... $325!!!! Check it out!!


Right now im back on the inside of the boat. Have the bulk heads in, belly board for the gas tank, and the floor for the cuddy. Just have to finish up the glass on them..Heres a pic of them just setting in the boat while I was test fitting everything..


I will get current pics of where I'm at on it next week when I get Back from my business trip. But I am oh so close to putting the deck in and not having to walk on 40 degree angles anymore... THANK GOD my ankles will love that!

Till next time! And I won't disappear this time I promise!:rolleyes:
 
Joined
Apr 12, 2013
Messages
16
Re: ANOTHER Seville Restoration!

Also Brickie if your still curious my first order from them was four packages, three of which weighed over 50 pounds and the shipping was 134 on that order, I also ordered another 5 gal of resin a month later and shipping on it was just under 50 with the hazmat fee included so the shipping is deff very reasonable!
 

Brickie

Seaman
Joined
May 15, 2013
Messages
59
Re: ANOTHER Seville Restoration!

Great to see your still working on boat, sorry to hear about migraines, hope they go away. I got quote from US composites and received my order they are great to deal with. I am working on my boat almost done with demo can't wait to start putting back. I love seeing your pictures as well as Panoguy as they are identical boats. Keep up the work it will be worth it when its done:joyous:
 
Joined
Apr 12, 2013
Messages
16
Re: ANOTHER Seville Restoration!

Welll time for the next update!

So since the last update I have gotten all of the bulkheads, the gas tank belly board, and what will be the floor for the cuddy all glassed. Transom, bilge, and gas tank area are painted. Unfortunately for about the past two weeks now it has gotten to cold to do any glass work. So I went ahead and started on the engine and drive maintenence. Mounted the gimbal housing back on the boat, took it apart and changed the gimbal bearing, u-joint and shift cable bellows, and switched to an exhaust tube. Also put in new trim sender and trim limit switch as the old ones where roached out. Changed the impeller in the outdrive and put in fresh gear lube. Dropped the engine back in the boat. Spent probably 5 hours getting it to properly align!:facepalm: and got the outdrive back on. Re-installed the trim pump and put fresh oil in it. I haven't gone through the wiring just yet but maybe someone can chime in on what could be wired wrong but trim up/down works fine, however whether I hit tilt up or tilt down the drive goes up?! Fired up the engine and it started up fine to my relief! Although I have found an issue with the carb. I was planning on going ahead and getting the rebuild kit for it so I went to pull the numbers off of it.. well I noticed two lines coming out of it that are plugged with bolts, checked the carb number online and it seems someone put a carb off of an el camino on this thing at some point:confused: Sooo looks like I'll be purchasing a mercarb here in the near future! This week I'm going to get the wood for the deck, seats, cuddy, and dog house cut out and put a layer of glass on them inside the shop where its warm. that way they'll be ready to go if I get a warm enough day that I can glass it all into the boat, if that warm day doesn't come however I'm going to try to find a heated storage unit it'll fit in around here and finish it all up in that! Well here's some pictures 'till next time!


Top