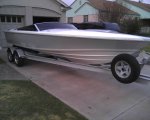
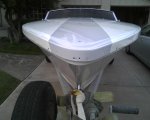
Hi folks. I just funished a 22' Donzi, platinum gray perfection paint. My results are nothing short of jaw dropping. I am a first timer. Here is what I did and learned. I sanded the red faded gelcoat with 220. I applied two coats of interlux epoxy primer with a roller. No tipping. I sanded the stipple out with 220. Wet sanded. It took about 8 hours to block it out. The stuff is hard. Change paper often. I applied two coats of perfection. I did not sand between the first two, waited 8 hours to apply the second coat. It looked just ok, lots of stipple. I let it dry for two days and then sanded the color with 320 and 400. Only took a couple of hours to get it smooth. I applied the third coat using the following learned process: You need two 4.5' foam slicker rollers and one purdy flat 3" brush for each coat. This works. I promise. Clean the heck out of everything with diluted TPC and water, then clean it with a tiling sponge again. Then tack rag everything, your lights (which you MUST have) and your step ladder included. Get it clean in your area. Mix your paint at 60 degrees if possible, 70 is fine, but 60 is great. Let the paint sit for at leat 20 minutes. I thinned mine 10%. It was perfect. Use a small tray and roll as much paint out of the roller(gently) on the tray treads as possible. Apply gently in all directions with good light, being very careful to get full, even coverage. Use a dry roller to smooth out anything that bugs you. Go three feet or so at a time. After it is even and smooth, like you weren't going to tip; tip it. Start at the top, as lightly as you can and go all the way to the boot. If you see brush strokes, dry roll it quickly out and do it afgain. You should not see them. They dissappear instantly. Do not miss any spots. It is all you will see the next day. About every 6 feet, use a rag moistened with brushing liquid to clean your tipping brush tips, it only takes about 15 seconds. Roll you dry roller on a paper towel periodically to keep it dry. If you do this, you will have a paint job that will rival your car. Seriously. It took only 10 ounces to do each coat, all the topsides and stripes on my boat. A quart will almost do three coats. I kid you not. This stuff goes on thin and smooth.