14 Ft. Sears Aluminum Project

camwillett

Cadet
Joined
Feb 19, 2013
Messages
19
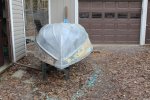
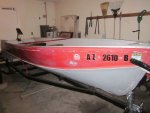
Bought an old beat up 14 ft. Sears Aluminum boat. The goal is to have it pretty well done in 4 weeks when my folks come to visit. My son and daughter are loving it, and have really enjoyed helping. So far. This is my first time taking on a boating project, so excuse me if some of these questions are silly, but I do have many questions and will likely have many more.

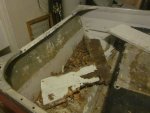
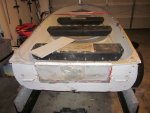
First, I Ripped everything out. All the wood was rotted. Both the wood used to support the pedestal seats and the entire transom. Everything had to go. Fresh start.

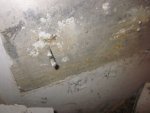
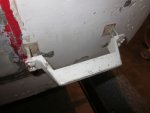
Then I panicked because the wood on both sides of the transom was actually riveted through the hull. I had to drill/cut out several rivits get it out. During that process I noticed several cracks and splits in the transom cap. My biggest concern though is the the handles on back of the boat were/are attached with rivets that went through the hull and out the interior side transom board. The end result has been a transom full of rivet sized holes and handles I am not sure how to repair. Anyway, the boat is stripped. My next move is to give it a bath in Aircraft Remover and then pressure wash it to get it down to aluminum. There must be a million coats of paint on it. Once I get that done, it's time to start putting her back together. My immediate questions are...

1. What kind of wood is the best option that won't cost an arm and a leg? I know pressure treated is bad, but marine is proving hard to find and very expensive.

2. Will JB Weld suffice to fix the cracks in the transom cap? I've used this on other projects in the past with great success.

3. What about all the rivet holes in the hull? Do I need to JB Weld those as well before I bolt the wood for the transom on?

4. What do you recommend for sealing the wood before attaching it to the hull?

5. Should I use some type of silicone sealant on the bolts and in the bolt holes I will use to mount the transom to the hull?

6. Can I just use bolts in place of rivets, and keep the handles how they were? Bolt them through the hull and to the interior wood wall of the transom? If so, again, do those bolts need any kind of sealant?
IMG_1440.jpgIMG_1442.jpgIMG_1444.jpgIMG_1447.jpgIMG_1446.jpg
 

ezmobee

Supreme Mariner
Joined
Mar 26, 2007
Messages
23,767
Re: 14 Ft. Sears Aluminum Project

Marine grade plywood is best. However, as you may have read, marine grade isn't actually treated. It's just a better quality product with some combination of improvements: better glue, more plys, diagonally laid plys, etc. Good exterior grade will work fine too, especially for this boat where if you have to redo it again in 10 years it isn't a major deal. A lot of us have used Arauco plywood which some Lowes and possibly Home Depots or Menards have. I used it and it's excellent. I do know they had a big fire at the plant in Chile where they make the stuff so I don't know if the supply chain has been refilled from that yet or not.

I wouldn't worry a ton about those cracks in the transom cap. They aren't really structural. The transom itself is the structure. JB Weld should cosmetically fill them just fine.

I'd just use stainless nuts and bolts in place of all the rivets. Bed them in 3M 5200 (or 4200) to seal.
 

jigngrub

Fleet Admiral
Joined
Mar 19, 2011
Messages
8,155
Re: 14 Ft. Sears Aluminum Project

Nothing to panic about, it's all good!
Cut the rivets off and remove them, holes were meant for filling and aren't a problem.

Use an exterior grade plywood, ABX or BCX will be fine. Exterior grade spar urethane will be a good sealer for the plywood, and it'll look nice too. Use 4 coats.

JB Weld Marine or Loc-tite Marine Epoxy will be fine for filling the holes in your transom. Tape one side with painters tape and fill the other side.

Use 3M 5200 marine sealant for sealing penetrations through your new transom wood. Use stainless steel bolts and stainless nyloc nuts.

After you strip all of the paint off the boat check it for leaks by filling the inside with a few inches of water. Look for and mark any leaks on the outside of the hull. If you have some leaky rivets, they can be replaced easily. If you have some leaky seams they can be fixed easily with a product called Gluvit, a paintable epoxy applied to the inside of the hull. It will have to be painted over to protect it from the sun and UV break down.

After all of the leaks are fixed you can paint the outside of the boat if you want.

I suspect your boat has so many coats of paint on it because it does leak and that's the only way the previous owners could think of to try and stop the leaks... it doesn't work, paint won't fix leaks.
 

camwillett

Cadet
Joined
Feb 19, 2013
Messages
19
Re: 14 Ft. Sears Aluminum Project

I wouldn't worry a ton about those cracks in the transom cap. They aren't really structural. The transom itself is the structure. JB Weld should cosmetically fill them just fine.

I'd just use stainless nuts and bolts in place of all the rivets. Bed them in 3M 5200 (or 4200) to seal.

This gives me a great deal of peace of mind. Thanks! Sounds like it shouldn't be to hard to pull off.
 

camwillett

Cadet
Joined
Feb 19, 2013
Messages
19
Re: 14 Ft. Sears Aluminum Project

Nothing to panic about, it's all good!
Cut the rivets off and remove them, holes were meant for filling and aren't a problem.

Use an exterior grade plywood, ABX or BCX will be fine. Exterior grade spar urethane will be a good sealer for the plywood, and it'll look nice too. Use 4 coats.

JB Weld Marine or Loc-tite Marine Epoxy will be fine for filling the holes in your transom. Tape one side with painters tape and fill the other side.

Use 3M 5200 marine sealant for sealing penetrations through your new transom wood. Use stainless steel bolts and stainless nyloc nuts.

After you strip all of the paint off the boat check it for leaks by filling the inside with a few inches of water. Look for and mark any leaks on the outside of the hull. If you have some leaky rivets, they can be replaced easily. If you have some leaky seams they can be fixed easily with a product called Gluvit, a paintable epoxy applied to the inside of the hull. It will have to be painted over to protect it from the sun and UV break down.

After all of the leaks are fixed you can paint the outside of the boat if you want.

I suspect your boat has so many coats of paint on it because it does leak and that's the only way the previous owners could think of to try and stop the leaks... it doesn't work, paint won't fix leaks.

All very good info! I think this is going to be my play-by-play for next weekend. This brings up another thought. I'm certain that there is a couple of leaky rivets as is, but I'm told it's nothing more than maybe 8 oz of water for about 4 hours on the water. That's WITH all of the paint on the boat. The leaky rivets that are known are between the transom and the rear bench. In addition, it looks like the PO used something like Gluvit and put it all over that section of the boat. There is tons of plasticy transparent-yellowish stuff that you can tell is rather old by the way I can just peel it off. My thought was to brush or spray just that section of the interrior of the boat with rubber truckbed liner (the floor from the transom to the rear bench). Anyone have any thoughts on truckbed liner? I can't see why it wouldn't be bulletproof.
 

jigngrub

Fleet Admiral
Joined
Mar 19, 2011
Messages
8,155
Re: 14 Ft. Sears Aluminum Project

This is the easy way to fix /replace rivets:

1989 Sylvan Boat Rebuild Part 4 - YouTube

Peel off/remove all of the old gluvit type stuff, it should clean up quickly with a cup brush in a grinder or drill.

Truck bed liner only stops leaks temporarily, then you have to remove the stuff to find where the leak is and fix it the right way. Truck bed liner is also a paint on product that requires the proper prep before applying it. If you want to use the bed liner, fix all leaks first and prep like you would for paint... then apply it. Coose a light color, black will get very hot in the summer.
 

camwillett

Cadet
Joined
Feb 19, 2013
Messages
19
Re: 14 Ft. Sears Aluminum Project

Thanks guys. Much appreciated. I'll post more as the journey continues.
 

Banker Ed

Petty Officer 3rd Class
Joined
Dec 23, 2012
Messages
86
Re: 14 Ft. Sears Aluminum Project

Cam, I am working on a 14 ft. Aluminum Arkansas Travler almost exactly like your Sears. These guys on iboat have been a great help. This is my first project boat and has really occupied a lot of my time. I am working through removing 6 coats of paint. Your forum here is a great help to me. You ask all of the right questions. Jigs has responded to my forum about paint strippers but he has answered a few more of my questions here on your forum. That was a great Youtube link he posted about the rivets. I will now be following your progress and questions. They are really helping me on my project especially since I don't have a clue of what I am doing. Here is a picture of my boat. Ed Bell

225IIa.jpg
 

camwillett

Cadet
Joined
Feb 19, 2013
Messages
19
Re: 14 Ft. Sears Aluminum Project

This forum has been a huge help for me as well! Glad my bonehead questions are benefiting someone other than myself...

So here's where I am so far:

Stripped all the paint off (I'm never going to do that again ever). Filled the boat up with water, found 3 leaky rivets, fixed them. Found some patches that are maybe 100 years old and starting to fail around the edges, reinforced them with JB Weld. All of the seams weep a little bit, but the seams between the transom and the rear bench leak a lot of bit. Hopefully Gluvit inside and out on the seems and rivets will do the trick.

The next step is Gluvit and then prime and paint on the outside of the boat. A couple Gluvit questions:

1. I've read to put the boat at an angle to let gravity help the Gluvit find its way into the leaks and seams. How long do I need to let it cure before I can flip it to the opposite angle and do the other side?

2. Do I need to Vinegar wash before applying Gluvit? Can I vinegar wash after applying Gluvit?

3. Any special steps I need to take to be darn sure that primer and paint adhere to the Gluvit?

After Gluvit, my plan is to rattle-can a wash coat of the Rustoleum Self-Etching Primer. Then hit it with the Clean Metal Primer. Then I'm going to Roll on Rustoleum Pro Series thinned with acetone and mixed with an acrylic enamel hardener. After reading a ton of threads and sending a few PM's to people who sound like they know their stuff. This appears to be my best bet within my budget. Anyway, it's my plan and I'm sticking to it!

A couple painting questions:

1. If my expectations aren't that of a brand new ferrari finish, do I really need to wet-sand between coats? I feel like I should be able to get away with a light sanding witha 3m finish pad.

2. What would you use do wipe down after sanding between coats? Mineral Spirits? Thinner? A mix?

3. I know Rustoleum takes a long time to fully cure. How long should I wait after my final top-coat to flip it over and start working on the interior of the boat?

As always, thanks guys! Everyone on here has been such a huge help so far!
 

64osby

Admiral
Joined
Jul 28, 2009
Messages
6,799
Re: 14 Ft. Sears Aluminum Project

1- I did the tipping thing and it worked great. The hotter it is the faster it cures. Several hours in 80 to 90 degree, several days in the 40's.

2 - Vinegar wash is to neutralize any corrosion issues you may have. If you are using stripper follow the instructions for clean up.

3 - Bare Alum needs an etching primer, zinc works well. Gluvit takes regular primer good. I cleaned the surfaces with acetone before primer

Sounds like you have a good plan on the paint side.

I have read that Rustoleum takes a really long time to fully cure. One thread stated about a month. The more heat the faster the cure process. Maybe some wax paper would help protect the surface after the flip???

Nice project.
 

camwillett

Cadet
Joined
Feb 19, 2013
Messages
19
Re: 14 Ft. Sears Aluminum Project

1- I did the tipping thing and it worked great. The hotter it is the faster it cures. Several hours in 80 to 90 degree, several days in the 40's.

2 - Vinegar wash is to neutralize any corrosion issues you may have. If you are using stripper follow the instructions for clean up.

3 - Bare Alum needs an etching primer, zinc works well. Gluvit takes regular primer good. I cleaned the surfaces with acetone before primer

Sounds like you have a good plan on the paint side.

I have read that Rustoleum takes a really long time to fully cure. One thread stated about a month. The more heat the faster the cure process. Maybe some wax paper would help protect the surface after the flip???

Nice project.

I know the Gluvit can take several days to fully cure, but my questions if I tilt it at an angle to let it work into the seams, how long until its only hard enough that tilting it the other diretion won't make it run the other way. Anyone have any thoughts?

I will wash with vinegar before applying Gluvit and then again before paint. I guess it can't hurt to wash twice.

Thanks for the info about regular primer working over the Gluvit. Wasn't sure if I needed something special. I'll scuff it up a bit with sandpaper then wipe it down with Acetone and prime over it.
 

camwillett

Cadet
Joined
Feb 19, 2013
Messages
19
Re: 14 Ft. Sears Aluminum Project

Applied the first of the Gluvit tonight. It's suposed to be 80 here tomorrow so tomorrow night I'm going to tip it the other way and do the other side. Then primer and hopefully the first coat of paint this weekend. Fingers crossed. Can't help but feeling I'm in a bit over my head...
 

64osby

Admiral
Joined
Jul 28, 2009
Messages
6,799
Re: 14 Ft. Sears Aluminum Project

cw - glad to help. I had a 12' Sears that I traded for the 14' Lone Star.

Keep asking questions and someone will help. All the work is pretty easy and there is lots of info here on the site.
 

Bwana Don

Lieutenant Commander
Joined
Oct 20, 2009
Messages
1,951
Re: 14 Ft. Sears Aluminum Project

Good luck on this. I've got a 14' Sea Nymph I'm fixing up. I also did a 12' Starcraft. Check out my projects. Look at 64osby's, Lone*Star Tinny Fixin' Up. He did a really nice job on his. I'm going to copy some or all of his ideas. It's that good. I think the Tin Boat hoard has pretty much answered your questions, but I'll add this; don't pass up an opportunity to buy some tools. It makes the job go easier and tools are just cool to buy and own. Then when you do your 2nd and 3rd.....you'll have the tools.lol

Kids love projects, mine can't get enough of boat projects. Keep us posted.
Don
 

Banker Ed

Petty Officer 3rd Class
Joined
Dec 23, 2012
Messages
86
Re: 14 Ft. Sears Aluminum Project

Aren't you lucky with 80 degrees weather? It was only 40 here yesterday and for some reason that stripper just don't work well at 40. I've got one pannel left to stripp before the water test on mine. I also read Osby's link on Gluvit and found it helpful. That will be my next step after repairing any leaking rivets. Ed Bell
 

camwillett

Cadet
Joined
Feb 19, 2013
Messages
19
Re: 14 Ft. Sears Aluminum Project

Aren't you lucky with 80 degrees weather? It was only 40 here yesterday and for some reason that stripper just don't work well at 40. I've got one pannel left to stripp before the water test on mine. I also read Osby's link on Gluvit and found it helpful. That will be my next step after repairing any leaking rivets. Ed Bell

I couldn't get aircraft remover to work either. It did a fine job on the first couple layers of paint. I scraped all that gunk off, and applied another coat of aircraft remover. Waited a half hour, and the darn stuff wouldn't budge. Not at all. I then spent 9 straight hours with a wire wheel and grinder in hand... Not the best of times.
 

camwillett

Cadet
Joined
Feb 19, 2013
Messages
19
Re: 14 Ft. Sears Aluminum Project

Got the Gluvit on the other side of the outer hull tonight. While applying it, I thought of another question. Might be a silly one, but I don't know the answer to it...

I know that I only NEED to apply the self etching primer to the bare aluminum of the boat, but will it HURT the Gluvit in any way if the self etching primer is sprayed on it? Dont want to compromise the seals, but it's going to be almost impossible to spray a wash coat on the entire boat and not hit any spots that have Gluvit. I know the self etching primer has corrosive properties, which is why I ask. Thanks everyone!
 

Banker Ed

Petty Officer 3rd Class
Joined
Dec 23, 2012
Messages
86
Re: 14 Ft. Sears Aluminum Project

Cam, your "not the best of times" sounds exactly like mine. You are right the first two coats seem to come off pretty well but the last four are tuffer. Seems like waiting 30 minutes before starting to scrape wasn't a good idea for me either. It would dry out and it seemed to come off much better wet. It may have been that the first coat of aircraft stripper hardened the under layers to make it come off much harder. Ed Bell
 
Top