New project GW Invader Bravo

Nazzcus

Cadet
Joined
Sep 6, 2012
Messages
15
Hello, I am new here but have been reading absorbing a'lot if info from the forum. I recently purchased a 93 GW invader Bravo ES, for a good price. I knew upon purchase that it needed a floor and possibly new stringers. So it is not a surprise as too what I found. So pics of the boat prior to work.

side.jpg

front.jpg

Pics from the beginning of tear down.

floor1.jpg

floor2.jpg

floor4.jpg

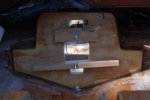
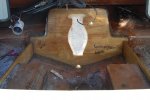
I have alot of body work experience, including some marine work ( fiberglass, gelcoat, etc. ). My first question for the experts here. The boat has a fiberglass bench seat in the rear, supporting the sun deck/engine cover, that runs the width of the boat. Despite the pics, the stringers seem solid but I have not made it toward the rear of the boat yet. Would it be easiest to cut the fiberglass bench in order to remove the floor and stringers, or to remove the cap? My space for working is limited so I was leaning toward cutting the bench seat and replacing it after the floor was in. I plan to re gelcoat or possibly paint, so the seams will not be a problem. I did not take a good pick of the bench seat but you can get an idea from this.
 

Nazzcus

Cadet
Joined
Sep 6, 2012
Messages
15
Re: New project GW Invader Bravo

Ok, the 5 pic limit got me. Here is what the rear of the boat looks like.

topdown.jpg

I have never replaced a full floor or stringers so any help is much appreciated. I have already began recovering the seats( which I have never done) and they have turned out pretty nice for a first try. I will upload some pics when I get them.
 

Woodonglass

Supreme Mariner
Joined
Dec 29, 2009
Messages
25,924
Re: New project GW Invader Bravo

Welcome to iBoats!
Based on the pics you've posted, I'd recommend "De-Capitating" her. The design of your boat will make it much easier if you do. Getting to the stringers under your consoles would be a problem as well. Shouldn't be that hard to remove it.
WelcomeAboard.jpg
 

Nazzcus

Cadet
Joined
Sep 6, 2012
Messages
15
Re: New project GW Invader Bravo

Update on progress. I got the engine out today. Could not wait on a friend with a boom, so I built my own gantry. I told my neighbor it was a you tube moment but there where no problems.

gantry.jpg

Engine out.

engine.jpg

What do you think of the engine mount supports. The seem to be solid and look to be somewhat isolated from the stringers. I plan to thermal the mounts and transom tomorrow (I will see if I can get a pic of the thermal). If possible I would like to leave them in place.

mount.jpg

The transom.

transom.jpg

I have a question for down the road. I plan to keep the carpet out of the interior and refinish the exposed surfaces. My question, what is a good high build primer to fill in the rough surface along the hull. My plan is to shoot it with epoxy, followed by urethane high build (its what I am used to working with). And depending on the finish possibly paint (rustoleum) or gelcoat. Still have not decided, but I have been impressed with the rustoleum jobs I have seen on here. Thanks for any help.
 

Nazzcus

Cadet
Joined
Sep 6, 2012
Messages
15
Re: New project GW Invader Bravo

More progress. Removed the last of the deck today and got a good lock at the stringers. They need to come out.

boat (3).jpg

Stringers out.

boat (5).jpg

The engine mounts are looking pretty good. hopefully I can keep them in place but we will see. I got plenty of measurements today and it is time to order materials. I have been researching and it look like US composites is the cheapest. I would love to buy locally but have been unsuccessful in finding a local supplier. If anyone knows a supplier around Birmingham Al. let me know.
 

Woodonglass

Supreme Mariner
Joined
Dec 29, 2009
Messages
25,924
Re: New project GW Invader Bravo

Have you core sampled the mounts?
 

Nazzcus

Cadet
Joined
Sep 6, 2012
Messages
15
Re: New project GW Invader Bravo

Not yet. That's on the to do next week along with thermal imaging the transom.
 

glassmaster84

Recruit
Joined
Sep 13, 2012
Messages
5
Re: New project GW Invader Bravo

I think I was looking at that boat. Did you get it online auction?
 

Nazzcus

Cadet
Joined
Sep 6, 2012
Messages
15
Re: New project GW Invader Bravo

I found it on Craigslist, locally. But it may have been on an auction at one point. It had been for sale awhile.
 

Nazzcus

Cadet
Joined
Sep 6, 2012
Messages
15
Re: New project GW Invader Bravo

The transom is toast. Pulled it out today. Where the cable for the depth finder was run through was completely gone. Finished grinding and sanding and hopefully can start on rebuilding. I plan to pull the engine mounts but I will leave them in until later for measuring purposes.

transom.jpg

After removal.

transomclean.jpg

I had not noticed until now but the boat has no gear lube reservoir and is sealed at the housing.

gearlube.jpg

Should I add the external lube setup or leave it as be? Its and Alpha I gen II drive.
 

xanthras

Petty Officer 3rd Class
Joined
Jun 29, 2009
Messages
76
Re: New project GW Invader Bravo

Not sure if the internal one is an option for that year or not, but i can tell you that I added an extrernal one. Install is pretty straight forward. Does the same thing as the internal one. I can get you some pics and part numbers if you want.

That said, if you can go internal I would do it.
 

Nazzcus

Cadet
Joined
Sep 6, 2012
Messages
15
Re: New project GW Invader Bravo

That's what I was thinking. Had it on the water this summer and no problems so unless someone knows of a reason to switch it over I will leave as is. Ordered resin and glass today, US Composites, ready to put er together when it gets here.
 

Nazzcus

Cadet
Joined
Sep 6, 2012
Messages
15
Re: New project GW Invader Bravo

More progress, received supplies and got busy on putting things back together. Because I was in a hurry I PL'ed the transom in place. Bad decision, to much flex in the hull side of the transom, got about 1/16 separation at the top of transom. I elected to not pull it out and redo so I re clamped it and PB'ed and tabbed it in. I will fill the small voids with resin later.

View attachment 172596

2 layers 1.5 CSM, 1708 tabbing, and a finish layer of woven. overall right at 1.75 depth.

Also got the foundation of the stringers in. I PB'ed the load bearing points and support corners then filled the voids with expanding foam.

boat3 (41).JPG

boat3.jpg

I was concerned about how the foam would do when tabbing with 1708 but it held up very nicely when the resin hit it. In my opinion it is much simpler and more resin efficient that PB'ing the length of the stringer. After all the idea is to provide support for the stringer while eliminating the hard bond to the hull. So far so good. When i finish up tabbing in the stringers, its on to the deck.
 

Attachments

  • transomin.JPG
    transomin.JPG
    137.3 KB · Views: 3
  • transomcomplete.jpg
    transomcomplete.jpg
    135.1 KB · Views: 3

Nazzcus

Cadet
Joined
Sep 6, 2012
Messages
15
Re: New project GW Invader Bravo

Ok, im having some issues with the reply function. here is a pic of the stringers in place.

boat3 (39).jpg

Other than the constant pain of fiberglass, it has been a relatively simple process. A'lot of work but much simpler than I expected. I leveled the boat the hung supports from the gunwall to level the first stringer then simply leveled each adjacent stringer from the first, PB'ed the corners and went from there.
 

fat fanny

Lieutenant Commander
Joined
Feb 9, 2006
Messages
1,935
Re: New project GW Invader Bravo

That hull looks fast! and quick work on the gut and re-fab. And if I were you I would leave more room in the new bilge for motor service and stay away from carpet for gods sake!
 

Nazzcus

Cadet
Joined
Sep 6, 2012
Messages
15
Re: New project GW Invader Bravo

Thanks, it is fast 55 with the hull full of water. I cant imagine what it will do now that it is lighter. I agree, I have added about 6 in to the bilge area. The factory had an overhang and a fiberglass cap/cover that covered the bilge area. I removed it and the overhang. I also agree and the only carpet will be a fitted/bound area (that can be removed) on the deck/and partitions for the bilge area.
 

Nazzcus

Cadet
Joined
Sep 6, 2012
Messages
15
Re: New project GW Invader Bravo

Getting close now. Transom and stringers glassed and tabbed in. I plan to finish up the cleating and give everything a good coating of resin and call it done. I plan to use sheet foam for flotation.

IMG_0244.jpg

IMG_0245.jpg

I designed it not hold water again. I will cut the foam to mirror the cutouts and allow drainage.

IMG_0246.jpg

I think I will go with paint for the floor, bilge, and transom. I have been researching the best I can and have what I believe to be a safe system for the raw glass.

1. Clean everything with degreaser and a brush.
2. Clean with acetone and brush, followed by another whip down with acetone.
3. As many coats as needed of Easypoxy high build primer http://www.westmarine.com/webapp/wc...toreNum=50218&subdeptNum=50229&classNum=50232
4. Follow woodonglass's paint method. Either Rustoleum or Majic rolled.

What do you think? Anyone see a problem with bonding or interaction. I have never painted over raw glass so any experience is help full.
 

Nazzcus

Cadet
Joined
Sep 6, 2012
Messages
15
Re: New project GW Invader Bravo

Sorry about the pics. I posted with my tablet and they were the right direction on my side.
 
Top