Transome rot

Rick-101

Seaman Apprentice
Joined
Jan 27, 2012
Messages
48
I have been reading the forum religiously for the past few weeks. I am blow away by the work, information, projects and community on Iboats.
I find myself nearing the end of my own boat project with my buddy, thought the summer with our university classes.

We purchased a 1986 Benito open bow with a 140 merc. We ended up gutting everything above the fiberglass floor (solid). The seat cushions and their wood backing were all rotted (neglect, no cover/tarp). Numerous engine problems along with a broken foot gear. Upholstery, bench insert and finishing up the bellows to splash her.
I will be posting our boats project thread once completed, but for now i would need your experts opinions.

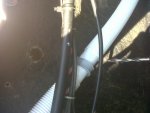
The boat is solid in terms structural rot. Apart from one area in the back that i have notice to be soft on the transom (left rectangle). This to seems to be from holes the previous owner put through the hull for the speedo tube and possibly fish finder. I have a 2-3 inches or more from the top, sides, I/O transom, fiberglass floor and stringer.

Most/all repair i have come across have been complete transom replacements. How bad is it?
Could i leave it for the season (i have read about the safety concerns here) dig some out and fill with filler?
Cut out from the inside, THAT section, replace it with 2 layers of glassed plywood in the bad section (iboats recipe)?
Must i do whole transom replace and create a iboats threat "fast forward and rewind build project" ?

Your opinions are greatly appreciated.
Hopefully i wont get roasted today :p
 

Attachments

  • Transome rot.jpg
    Transome rot.jpg
    26.7 KB · Views: 0
Last edited:

ricohman

Lieutenant Commander
Joined
Jul 30, 2011
Messages
1,631
Re: Transome rot

There is no such thing as a partial transom replacement and if your transom is rotten then it is very likely that the stringers have rot as well. Did you core sample the stringers and transom when you redid the deck?
Don't slather body filler over rotten wood.
 

Rick-101

Seaman Apprentice
Joined
Jan 27, 2012
Messages
48
Re: Transome rot

I apologize i wasn't able to attach the diagram. Its up now. We core sampled the deck/floor as well as the transom on the port side, not the starboard side. Its where the fish finder and speedo tube go through the hull, thoses fitting were verypoorly/not sealed with cocking or marine sealant. This is in my opinion where the water was introduced. Installing the bilge piping i discovered this last week.

I will try to explain myself a little better, we didn't take up the deck, just replaced the vertical support on top (plywood in the front under the gel coat/fiberglass mold of the open bow.
 

ricohman

Lieutenant Commander
Joined
Jul 30, 2011
Messages
1,631
Re: Transome rot

You need to core sample the transom down low near the bottom of the boat. Stringers as well. I helped a buddy do this to his very nice but aging Bayliner and the rotten wood we found surprised me as the boat seems so solid. If you have replaced rotten wood above the floor due to exposure the transom and stringers should be examined as water drains down. If it all seems solid then seal the holes. But the area in you diagram will be larger than what you think as the water will have traveled down the inside of the transom. I would bet the transom below your areas of concern is rotted as well.
 

Yacht Dr.

Vice Admiral
Joined
Feb 26, 2005
Messages
5,581
Re: Transome rot

Welcome to Iboats Rick .. :)

We really need to See it .. Pics would be Very helpful.

Taking small core samples is always a good idea every few years .. might as well take some now and see what you have.

Pics and complete openness is what we thrive on here :D .

YD.
 

Rick-101

Seaman Apprentice
Joined
Jan 27, 2012
Messages
48
Re: Transome rot

Here are the pics i took minutes ago.
This may well be the kiss of death
The wood from top to bottom across the whole transom is rotten not as dark and wet to the port side.
the wood had pretty much the texture of sawdust...
IMG-20120802-00076.jpgIMG-20120802-00085.jpgIMG-20120802-00084.jpgIMG-20120802-00083.jpg

What would be the cost of a DIY transom replacement run me? I am in Canada not sure how much more materials are around here. My gut feeling is telling me the stringer are rotten in the back end.

The last largest part of the upholstery was intended to be done this weekend...
Thanks for your help.
 

Yacht Dr.

Vice Admiral
Joined
Feb 26, 2005
Messages
5,581
Re: Transome rot

Not sure if your pics are representing what your saying ..

Wet and dark wood stuff is bad .. wet and normal looking color is not really Rotted out.. just wet and needs to be addressed in the near future.

YD.
 

Rick-101

Seaman Apprentice
Joined
Jan 27, 2012
Messages
48
Re: Transome rot

My original main area of concern is the dark kind of moist stuff. The fiber glass has de-laminated from the wood and the area dose spread down all the way on the transom (pictures bellow). On the port side i took a few samples and it had a much lighter color to it. Both side the wood extracts were almost powdery and broken down is this normal?
 

Attachments

  • IMG-20120802-00083.jpg
    IMG-20120802-00083.jpg
    148.7 KB · Views: 0
  • IMG-20120802-00081.jpg
    IMG-20120802-00081.jpg
    152.3 KB · Views: 0

ricohman

Lieutenant Commander
Joined
Jul 30, 2011
Messages
1,631
Re: Transome rot

A ideal core sample will be dry drill shavings and nothing more.
If you don't know what dry plywood drill shavings look like grab a hunk of scrap and drill a few holes, then compare with what you've got.
 

Rick-101

Seaman Apprentice
Joined
Jan 27, 2012
Messages
48
Re: Transome rot

This boat must be playing tricks on my mind its been since April we have been trying to get it sea worthy. I just cross referenced with the plywood at my house, the boat transom shaving have close to no consistency. There is a little less flex in the port side transom than half inch plywood. my transom is scrap.

In regards to replacement, most of the thread i have read you have to cerebrate the top from the bottom of the hull and then hollow the old and rotten wood between the 2 thickness' of glass in the transom. Is there an alternative going at it from the back without removing the top shell of the boat?
 

jbcurt00

Moderator
Staff member
Joined
Oct 25, 2011
Messages
24,871
Re: Transome rot

This is an alternative to removing the entire cap:
2012-08-01_151144.jpg


In regards to replacement, most of the thread i have read you have to cerebrate the top from the bottom of the hull and then hollow the old and rotten wood between the 2 thickness' of glass in the transom. Is there an alternative going at it from the back without removing the top shell of the boat?

You must be reading threads that used SeaCast or similar products. As I recall most threads remove the inner transom skin & all the wood pulp consistency transom wood. Then rebuild the plywood lamination transom, install it & re-glass the inner transom.

The SeaCast type products are typically expensive when compared to rebuilding it w/ similar materials & techniques as were original used.

The exterior transom skin is significantly more structurally integral to the boat then the inner. It would be much more work, and require much more care & attention to even attempt an exterior repair. You will be working on the trailing edge of the hull, where the hull bottom & transom meet, which impacts overall performance of the boat. Just to make it strong enough for use. It will all need to be filled & faired, and sanded smooth. Then add that it's all going to need to be finished to a much higher standard, as it's all visible. Unlike the repair from the interior which will be mostly confined to surfaces that are not easily seen.

If the transom is in less then ideal condition, you may need to fully inspect the deck for signs of soft spots. If the deck or transom is compromised, generally the other could be compromised as well.
 

produceguy

Lieutenant Junior Grade
Joined
Sep 30, 2010
Messages
1,243
Re: Transome rot

I might of missed it but is this an inboard or outboard? Looks like you might have enough room to get in their and work.If so you might not need to pull the cap.
 

Rick-101

Seaman Apprentice
Joined
Jan 27, 2012
Messages
48
Re: Transome rot

Thank you Jbcurt and produceguy for the help!

I have got myself in so deep with the engine, carpet change, bottom hull gelcoat. Therefore its only fit for me to do the transom, I will be able to say that i almost literally rebuild the boat.

I'll be attacking it from the inside, it is an I/O so ill cut into the back of the deck which will allow me to inspect the stringers at the same time.
I have the choice of Home Depot untreated plywood, Marine plywood or Russian plywood(only 5' long, my transom is 6')
I'm thinking of going for the Untreated, I may also have one sheet left of marine from doing the interior structure.
The transom must be 2'' thick from what ive seen in another threat, correct?

As for Bonding, i have the choice of West System epoxy ($$) or A poly resin (red can) from my local boat store. Us-composites remains a possibility. Would Home depot sell poly resin or epoxy in the amounts i would need by chance?

Produceguy thanks to you thread i might attempt a swim platform at the same time!

As for the tear-down I'm thinking of starting tomorrow morning or Sunday, Electric grinder would be the best idea?(I'll post up some pictures)

Let it begin!
 

produceguy

Lieutenant Junior Grade
Joined
Sep 30, 2010
Messages
1,243
Re: Transome rot

Hey Rick, Its been awhile but yes I do think t is 2 in on the transom. do some measurmnts of yours all the way around the key hole. it has to be darn near perfectly flat and plum around the key hole when you put the new transom in. You just build it up with glass. 2 to 3 layers of it might get you their.
Yes on the grinder and get you a good resperator and eye protection.
I bought my resin at home depot. some guys dont like it but it worked for me.It was an all purpose resin Ido beleive. I did have to sand a little between coats thou.
Have fun and be carefull.
 

Rick-101

Seaman Apprentice
Joined
Jan 27, 2012
Messages
48
86 18ft Benito, Open bow Rebuild UPDATE

86 18ft Benito, Open bow Rebuild UPDATE

Update!

So I have spent the last two weeks, weather permitting on the boat. I was adopted by our yacht club's shipwright, who gives me some awesome tips along the way. I was lucky enough to borrow his diamond bit dremmel for an afternoon!

Pulled I/O... and jumped into the tear down. The the transom was totally shot, some sections where fine and solid other wet mostly, not much rot but it was starting. As you can see from the picture of the keyhole its clearly wet and rotting away, one side thinned out, most likely where the water was coming in and not the bellows.
IMG-20120823-00095.jpgIMG-20120823-00093.jpg

The transom and stringers where separated by glass. The stringers are solid!! and were also covered in glass, best news so far!
IMG-20120823-00097.jpg


There was little water in the side compartments but...the foam is wet, although it did not seem to be rotting?? as it was not discolored?
As i cut more of the starboard stringer forwards i noticed the foam transferred humidity to the base of the stringer but the wood was still rock solid.
IMG-20120823-00099.jpg
 

Rick-101

Seaman Apprentice
Joined
Jan 27, 2012
Messages
48
Re: 86 18ft Benito, Open bow Rebuild UPDATE

Re: 86 18ft Benito, Open bow Rebuild UPDATE

Update #2

Here is a picture of the stripped transom.
IMG-20120828-00105.jpg

The last few days I made the new transom (2x 3/4 British Columbia Fur Select sheets, when with this instead of the Marine)

When dry fitting, we drilled out all the through hull holes (except gimbal). In order to drill out half a inch more around them on plywood to later fill with resin to prevent future water infiltration.
(pic soon to come)

The shipwright and I are going to PB the sheets tomorrow morning.
We are going one sheet at a time from what i understand. He seems to think two braces pressing against the inside is enough to get it to bond and attach to the outer skin. And then glass the whole thing in once everything is PB'ed and cured
I mentioned all the 2x4, bolt clamps and other contraptions but he believes this way will avoid any "waves"


Looking to hear what you guys have to say.

Looking forward, I'm planning on pulling up another two feet of the floor (dry/solid) up to 3 inches from the carpet (new)and put a new plywood down for that back section. Possibly give it a black gel coat finish after.
Should i be removing all or part of the foam, considering boat size and what was mentioned in the post before?
If i gut the foam, i could refill the sections or possibly put ballast bags for wake boarding. Would this be something to consider since she'll be open or would this be infective since there is not much square footage under the floor between the stringers. (I'm running with a 140 3.0L)

Thank you all for your encouragement and advice so far!
 

nrasnake

Seaman
Joined
Aug 13, 2012
Messages
62
Re: 86 18ft Benito, Open bow Rebuild UPDATE

Re: 86 18ft Benito, Open bow Rebuild UPDATE

Hey Rick, looking good! Looks like our projects are coinciding pretty well.

Sounds like a good idea on drilling out the transom holes oversize to allow for extra PB in there. I was thinking of that the other day. You spend all this time covering the transom with fiberglass and in the end drill a bunch of holes in the edge of the keyhole where the water is!!! I'm thinking I might follow your plan on my transom as well. I was even thinking of cutting the keyhole oversized and putting a layer of 1708 all around the keyhole edge. My only concern was the PB in the bolt holes cracking/chipping out over time which may lead to slop/play in the transom plate through bolts, but maybe that's not realistic... just a thought.

As for the wet foam, I didn't really see where you're talking about, but I would say remove it if it's wet or questionable. When I gutted my boat, I actually didn't find much water in the foam until I got further into it. Some spots in the middle and towards the back were sopping wet. Glad I got all of that out of there. However, that was before I looked at prices on the two part foam!!! It's more expensive than resin!!! :eek: But, in the long run it's worth it in my opinion. Look for low spots, or corners where water could drain or be trapped. Maybe try drilling down to the bottom of the foam in those places to check for water or wet foam. At least that way you could feel better about leaving it and not need to re-pour as much. If you drill it though, you will want to fill it back in with new foam.

Good luck. Keep it going!
 

Rick-101

Seaman Apprentice
Joined
Jan 27, 2012
Messages
48
Re: 86 18ft Benito, Open bow Rebuild UPDATE

Re: 86 18ft Benito, Open bow Rebuild UPDATE

Nrasnake looks like they are!

The boat has moved along quite a bit since i last posted, I got caught up with the first weeks of school and designation I'm doing.
Here's a picture of the transom in, as you can see i did go a size bigger for all the through hulls and filled them, the though in this is they would be the most likely places to let water in and start the process over again. I did not oversize the keyhole though.
IMG-20120907-00004.jpg

I Polyfaired all the voids around and sculpted the groove along edges the bottom for the glassing.
IMG-20120907-00005.jpg

The boat has now had its stringers glassed in as well as the deck/bilge section. I'm planning on black gel-coating the back till the carpet as its under the engine box/bench. Still waiting for my buddy to go back down to PA in one of the next weekends to pick up some of the vinyl we ran out of for the upholstery, trim senders and gaskets for the gimbal housing.

Anyone know "how" perfect my key hole bolt holes have to be drilled? In addition to the spacing around the gimbal housing/keyhole?
For the time being i need to do some gelcoating on spots where the swimplatform/5200 removed and various other places.

Cheers!
 

jbcurt00

Moderator
Staff member
Joined
Oct 25, 2011
Messages
24,871
Re: 86 18ft Benito, Open bow Rebuild UPDATE

Re: 86 18ft Benito, Open bow Rebuild UPDATE

Anyone know "how" perfect my key hole bolt holes have to be drilled? In addition to the spacing around the gimbal housing/keyhole?

How perfect to drill the hole locations, how perpendicular to the transom, and how correctly spaced? Fairly perfect... Else you'll struggle to get the alignment bar installed to correctly align the components & allowing the drive shaft to correctly mate up thru the coupler. Mis-alignment is likely to cause noise, added stress & friction, and possible premature failure of all or some of the driveline components.

The I/O threads I've read normally spend a great deal of time ensuring that the transom is oriented & installed correctly, that the keyhole is correctly positioned & cut, and that the thru bolt pattern is correct & accurately drilled. A lot of time in some cases.....

But I am not an I/O owner, thats ^^^ just IMHO. Read thru Friscoboaters threads. His threads often have the most pix & video and fairly good text for all stages of his builds. And I'm fairly certain he documented his outdrive installation really well.
 

nrasnake

Seaman
Joined
Aug 13, 2012
Messages
62
Re: 86 18ft Benito, Open bow Rebuild UPDATE

Re: 86 18ft Benito, Open bow Rebuild UPDATE

Rick,
Use the Volvo template at the link posted by Don S. here:
http://forums.iboats.com/showthread.php?t=474549

In Adobe PDF viewer, you can use the snapshot tool (the icon is a camera with a dashed line box around it) and select the top 1/3 of the template, click print, set the printer to print 8.5x11, and without scaling the image. Repeat for the middle and bottom sections of the template. You can get the template on 3 sheets of paper and then tape them together to line up on your transom. This is what I did last night... it worked perfectly and I confirmed the Volvo template is exactly the same as the Mercruiser.

With that said, jbcurt00 is correct with making sure to drill and cut everything exact. The most important thing is to get the holes drilled in the exact location (to match up with the template and the holes that should already be in the hull) so that the bolts on the gimbal housing will fit properly. The second most important thing is to drill your holes perpendicular (at 90 degrees) to the flat surface of the transom. As long as the gimbal housing will fit into the keyhole and bolt holes properly you should be good (assuming the bolt holes in the hull are located properly... which they should be if an engine was in there before right :)). As far as mis-alignment, noise, friction and all of that... you will align the engine to the mounted gimbal housing/bearing once the engine is put back in. The point is that the gimbal housing/bearing just needs to be positioned close enough to ensure you have enough adjustment on the engine mounts to get your final alignment in the end.

I am cutting my keyhole and bolt holes this evening so I'll give everybody and update in my thread.
forums.iboats.com/showthread.php?t=577100&p=3964674#post3964674

Use the template, triple check, triple measure, and make sure everything is good to go before you start cutting. You don't want to mess up now and have to build a new transom!!!!!

Good luck!
 
Top