Rebuild of 1986 Starcraft Medalist 1901

BillyOldBoat

Cadet
Joined
Aug 21, 2011
Messages
13
I hope someone can give me some advice. I am replacing the transom and stringers in a 1986 Starcraft Medalist 1901.

I have the stingers and transom out and am in the grinding phase.

The hull skin thickness of the transom is 1/4". I'm trying to figure out what thickness of plywood to use to rebuild it. In particular how much thickness does the fiberglass add. I was planning to glass it as such:

Hull + layer of 1.5 csm + wood + layer of 1.5 csm + layer of 1708 + layer of 1708. I think this is how Friscoboater did his.

Does this seem OK? And, what thickness of plywood should I use? Is there a list somewhere that tells you the thickness of cured fiberglass layer for the different types/sizes of fiberglass? I thought I saw one awhile back, but can not find it for the life of me now.

Also, when installing the stringers, should they butt up against the transom and be tabbed in, or should there be a layer of PL or peanut butter between stinger and transom as their is between stinger and hull?

Many thanks for any help you can provide.
 

Woodonglass

Supreme Mariner
Joined
Dec 29, 2009
Messages
25,924
Re: Rebuild of 1986 Starcraft Medalist 1901

Welcome to iBoats! The first link in my signature below has drawings and info on how to fabricate and install your Deck, Stringers and Transom. Transom should be Two pieces of 3/4" Ext. Grade or Marine Grade plywood. You can glue em up with Titebond III wood glued using deck screws as clamps. When dry remove the screws. I recommend using Peanut Butter (Poly resin thickened with Cabosil and cut up scrap pieces of CSM.) Details are in the link. Stringers should be butted and tabbed to the transom and or bilge.
 

BillyOldBoat

Cadet
Joined
Aug 21, 2011
Messages
13
Re: Rebuild of 1986 Starcraft Medalist 1901

Welcome to iBoats! The first link in my signature below has drawings and info on how to fabricate and install your Deck, Stringers and Transom. Transom should be Two pieces of 3/4" Ext. Grade or Marine Grade plywood. You can glue em up with Titebond III wood glued using deck screws as clamps. When dry remove the screws. I recommend using Peanut Butter (Poly resin thickened with Cabosil and cut up scrap pieces of CSM.) Details are in the link. Stringers should be butted and tabbed to the transom and or bilge.

Thanks Woodonglass. I attributed my fiberglass plan for transom to Friscoboater (he may have done it this way too) but after looking at your link for the 100th time I remembered that is where my plan came from! I've looked at so much great stuff on this site that I cant keep it all straight!

So, I will follow your recommendation and use 3/4" plywood for the wood layers and glass it just like you have pictured.

I plan to do the stringers and deck like you have designed as well. How do I know where to cut the stingers for height to accommodate for the glass layers and a 3/4" ply deck? I plan to use the 6oz as the last layer on the deck. I guess I'm back to the question of how thick is each layer of glass??

Thanks again for all your advice and willingness to give it... ding dongs like me need it!
 

Woodonglass

Supreme Mariner
Joined
Dec 29, 2009
Messages
25,924
Re: Rebuild of 1986 Starcraft Medalist 1901

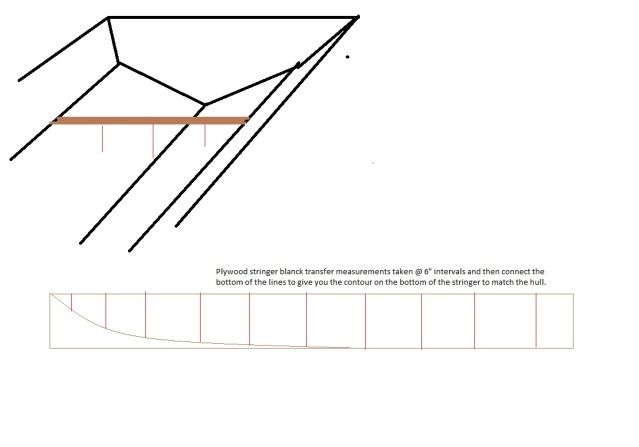
Hopefully you marked the sides of the hull where the previous deck was attached. If not then you will have to Guess-ti-mate it and then cut a 1x2 to fit across the width. You can then measure down from that to determine the stringer height. Slide it forward every 6" and take the measurement. Transfer to your plywood and cut em out. This might give you an idea of what I am talking about...
FabricatingStringers.jpg
 

BillyOldBoat

Cadet
Joined
Aug 21, 2011
Messages
13
Re: Rebuild of 1986 Starcraft Medalist 1901

Thanks again WOG. I haven't cut the lip of the deck off yet, so I have that to work with.

What allowance should I make for the glass that will cap the stringer and the glass on the deck?

If I'm counting correctly there will be the following layers to adjust for:

1) 1.5 CSM capping stinger
2) 1.5 CSM on bottom of deck
3) 1.5 CSM on top of deck 1st layer
4) 1.5 CSM on top of deck 2nd layer
5) 6 oz on top of deck last layer

I know it wouldn't make a huge difference if I were simply replacing the whole deck. However, I'm only replacing from the console back, so I'm trying to match the height of the new section of deck with the existing. Not knowing how much thickness the glass adds makes this more difficult. Am I trying to get too precise with this??

Thanks again for any help!
 

BillyOldBoat

Cadet
Joined
Aug 21, 2011
Messages
13
Re: Rebuild of 1986 Starcraft Medalist 1901

Hi everyone. I need some help again. I managed to zip a hole in my boat as I was taking out the transom. Can anyone give me some advice as to how to repair it the correct way. There should be a picture of it below.

Thanks in advance.

cut in hull small.jpg
 

BillyOldBoat

Cadet
Joined
Aug 21, 2011
Messages
13
Re: Rebuild of 1986 Starcraft Medalist 1901

Hi, just a bump to see if anyone is up for giving me some advice?? Thanks!
 

jbcurt00

Moderator
Staff member
Joined
Oct 25, 2011
Messages
24,862
Re: Rebuild of 1986 Starcraft Medalist 1901

If that hole is anywhere near where you'll be reinstalling the plywood transom against the fiberglass hull, cover the exterior of the slice w/ tape to prevent the repair from sagging out onto the exterior surface of the boat.

Slightly widening out the interior edges of the slice to give you more room into which you can 'pack' PB (thickened poly resin paste made to the consistancy of peanut butter) after thoroughly cleaning the area of the hull you've been grinding on with acetone.

You'll need to feathered back the edges around the slice 4 to 6" to allow you to layup alternating layers of CSM, the smallest first only to cover the slice with about an inch of overlap into the area you feathered, the next layer slightly larger, the next slightly larger again, thoroughly wetting out each layer. They may be laid up 1 right after another, all essentially in 1 layup or allowed to tack off slightly between layers before adding the next. If they are allow to dry too thoroughly you'll need to scuff them & clean them w/ acetone before applying the next layer of CSM

You want the multiple layers of CSM to be only slightly higher then the surrounding hull when you are finished with the layups. Once cured, you can grind the repair to basically the height of the surrounding hull. Once you re-make the transom laminations & PB it onto the fiberglass transom, you can remove the exterior tape and check to confirm the repair has been completed. If need be, you can repeat those steps for the exterior side of the slice. Sand, fair & paint
 

jbcurt00

Moderator
Staff member
Joined
Oct 25, 2011
Messages
24,862
Re: Rebuild of 1986 Starcraft Medalist 1901

If the slice thru the hull is not near where you'll be covering it up w/ the transom plywood PB'd to the hull, the fillet at the transom/hull transition & the multiple layers of tabbing & 1708, you may want to add a layer or 2 of 1708 to the order of your layering:

CSM, 1708, CSM, 1708, CSM, still trying to be only slightly higher (proud) then the surrounding hull when finished. That may require a larger feathered area surrounding the repair. If not needing to be smooth/flat for esthetic or fitment reasons, leave the repair proud of the surrounding surface.

If not near the transom plywood, then perhaps use CSM, 1708, CSM on the exterior side too. Build to just proud & grind flat/smooth as in 1st example above. Again, the 1708 will require a larger feathered area surrounding the repair.

Does all of that in both posts ^^^ make sense????
 

jbcurt00

Moderator
Staff member
Joined
Oct 25, 2011
Messages
24,862
Re: Rebuild of 1986 Starcraft Medalist 1901

This video has similar steps to what I posted above. Because it was only an exterior repair, on a curved surface, the patches were place larger to smaller, on the interior of your transom area, I'd go smaller to larger on the patches. You can see in the video how he tapered back the fiberglass & gelcoat away from the damaged area to allow various sized patches that build to a final build up thickness that is slightly below the surrounding surface to allow him to fill & fair it smooth...

Hope it all helps
 

BillyOldBoat

Cadet
Joined
Aug 21, 2011
Messages
13
Re: Rebuild of 1986 Starcraft Medalist 1901

Thank you very much for the advice. I believe I understand things. The video was very good. If I have questions I will post them.

I slice is probably right at the edge of where the transom wood will end. So, it would be getting covered with the tabbing of the transom.

I will follow the process you laid out in your first post, and I thank you again for responding!

Bill
 

BillyOldBoat

Cadet
Joined
Aug 21, 2011
Messages
13
Re: Rebuild of 1986 Starcraft Medalist 1901

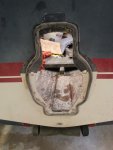
Hi... looking for help again. In reference to the picture. Can someone tell me:

1) What is the rubber gasket called that surrounds the key hole? I don't believe I have seen one of those on any of the restore threads I have seen here on iboats.

2) Is it necessary? I assume it is.

3) Do I include its thickness somehow in the calculation of hull thickness (2 to 2.25 inches)?

Thanks for your help. Bill
pic of keyhole rubber gasket.jpg
 

jbcurt00

Moderator
Staff member
Joined
Oct 25, 2011
Messages
24,862
Re: Rebuild of 1986 Starcraft Medalist 1901

A transom seal is a part listed for a:
Parts for MerCruiser ALPHA ONE (GEN.II) 1996-1997 GIMBAL HOUSING Components


So I suspect whatever yr & model your's is, a transom seal is required.

iboats.com (our generous host) probably sells it, solo or as part of a seal/gasket set.

There are other retailers, online, marinas, & physical stores that should carry it.

Please don't just take my word for it, but I suspect the seal is independant of the thicknesss measurement, so no don't allow for it. Measure your transom thickness outside of 'glass hull to inside finished surface, allow for any touchups to the glass, and the bilge coat, gelcoat, or paint. It isn't much but if you build to 2.25" before bilge paint @ the interior, a little glass touchup & paint @ the exterior, that may cause it to be too thick.
 
Last edited:
Top