1999 Four Winns Candia 214 Restoration - Return of the Hangar Queen!

Ski1491

Seaman
Joined
Jul 26, 2009
Messages
57
Really sorry, this is going to be a long post, been working on this Gal for over a year and thought it time I get some of the great advice offered on the forum. I have been keeping notes and pictures so here goes. It will only let me post five pictures at a time so I will have to do this in pieces I guess. thanks for the patience and thanks in advance for the great help and advice

Ski


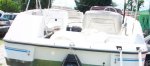
I ‘m restoring a 1999 Four Winns Candia 214 (Funship Deckboat ) and thought I would share my progress and take advantage of the great advice and expertise you guys provide. As I searched the restoration forum I didn’t see many posts on this style boat, so maybe someone can benefit from my experiences and mistakes along the way also. The boat was free, but for certain it needs a lot of work and numerous parts. If I had any sense I would run from a free boat! (FREE – Freakin Run -Extremely Expensive) However, it is the type of boat I was looking for to cruise Choctawhatchee Bay here in NW Florida and it is built to hold up to 12 people, a big plus when family visits or when we have an office party at Crab Island. I had rented a few deck boats from the base, so I was pretty certain this was what I wanted. Overall, probably easier to just find something in better shape, but like most on this forum that’s way too easy!

Need to point out that this was a real tough sell with the SU. Before retiring from the Air Force I was given the shell and parts of a pontoon boat in a big heap and I parked it in the driveway and covered it with a Kmart tarp. I was sent on a deployment and while I was gone a near miss hurricane came through and shredded the tarp and scattered boat pieces everywhere. Buddies helped pick up a bit, but it was still a big mess. When I returned and dispensed with the usual kisses and hugs I was directed by an individual of much higher rank (my wife) to “get that thing out of our driveway”! So, to add insult to injury as I was towing it to the dump the trailer frame busted and I had boat parts all over the road. Still a sore spot around the house, but a great story over beers to this day! So I have to proceed carefully with this one and I’m keeping the boat at a storage lot! That pontoon boat was free also, starting to see a pattern here.

This forum has been invaluable in getting me going and giving me the courage to take on this project, so I ask the online experts to maintain your patience and keep us rookies straight. I’m sure I will have lots of questions as I move forward and I do appreciate the time and advice provided. Below is a laundry list of things the Old Gal needed at first glance to get back in any kind of shape and hopefully on the water again;
- Volvo Outdrive ( Penta SX-M)
o Missing from the boat
- Engine (5.0) condition unknown
o Sitting sideways in boat
o Carburetor missing
o Bell housing missing
o Flywheel missing
o Condition of Power Steering pump, exhaust manifolds, risers, alternator, water pump etc unknown
- Power steering cylinder/ram missing
- Engine cover and seat back/sun deck missing
- Small Hole in bow cap (looks like dropped an anchor on it)
- Entire boat severely oxidized
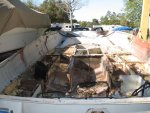
- Engine mount stringer and fuel tank bulkhead rotted
- Seat cushions weather, cracked, seat cushion bases rotten
- Two biminis tops condition unknown
- Transom condition unknown
- Nice to do, strip off bottom paint

2.jpg
102_0730.jpg
Engine resize.jpg

rot resize.jpg


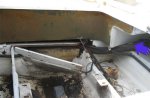
First order of ops was to get the engine out of the boat so I could get a good look at the wood rot and to pull the transom shield so I could see what kind of shape the transom was in. I also wanted to pull the fuel tank so I could hopefully get a good look at the stringers and other cross members.
Really had my fingers crossed on the stringers due to the way the boat seems to be constructed? After getting with an engineer at Four Winns regarding the building of these boats I learned that the top cap, molded seat bases, sink, cockpit and fiberglass deck were a single insert that was lowered onto the hull and attached with adhesive. You can see his response below. The thought of how to approach removing this entire assembly was a little daunting, so I decided to do some investigation first. Love to hear others views on this type of construction and if there is any experience out there.

Your message was forwarded to me during our holiday break; please excuse the delay in response. You did not specify where the wood rot was occurring but you are correct in your assumptions. The seat bases are molded as an integral part of the deck and the entire part is lowered onto and secured to the hull around the perimeter as well as to the stringer via bonding putty. The stringers are fabricated from marine grade plywood as is the transom. We do not have drawings available for this older model or I would have attached them for reference. I hope this answers your questions.

Kind regards,
Director – Warranty/Customer Service


With a little help from Craig’s List I picked up an engine hoist and an engine stand. Had to purchase a new hydraulic ram (eBay) to get the engine hoist working. Since the engine wasn’t attached to anything it came out pretty easy, got it home and put it on the old engine stand.


Attachments

  • 1.jpg
    1.jpg
    58 KB · Views: 3

Ski1491

Seaman
Joined
Jul 26, 2009
Messages
57
Re: 1999 Four Winns Candia 214 Restoration - Return of the Hangar Queen!

View attachment 133674View attachment 133675

I starting tearing the engine down hoping to salvage what I could so I could possibly rebuild it or worse case find a long block. Nothing prepared me for what I found, as I removed each part it seemed to get worse. If there was ever doubt as to what salt water can do to a motor this baby is the poster child. My list of things needed just got quite a bit longer. Below is a list of the damage I encountered
? Sea water pump – unserviceable, severely corroded
? Thermostat housing – unserviceable, thermostat fused to inside of housing
? Water pump pulley – unserviceable, probably will fail due to corrosion
? Harmonic Balancer – unserviceable, starting to pull apart due to corrosion
? Water pump – unserviceable, shaft and blades fused to housing
? Valve covers – unserviceable, probably won’t seal due to corrosion
? Oil Pan - unserviceable, corroded around mating surface, will probably leak
? Power steering pump bracket – unserviceable , nearly rusted through
? Starter - unserviceable, lugs rusted to body. Snapped off trying to remove
? Intake – not sure, lots of crud, I will try and clean it
? Engine block and heads – unserviceable, pitting, crud, corrosion etc
? Engine mounts – bolts are completely gone, may be able to salvage the mount itself
? Exhaust manifolds and risers – unserviceable, heavy rust, crud inside and pitting. Sheared riser bolts off trying to remove after soaking 14 hours in PB6.
Caution the following pictures may be disturbing to some viewers!!!
View attachment 133676

View attachment 133677
View attachment 133678

Anyway, as you can see a real mess. Not what I was hoping for looks like a total replacement. Pictures just don’t do it justice. In light of this I believe I’m going to replace it with a 5.7 and start looking for all the parts that are trash. Valve covers, oil pan etc are no big deal; however that sea water pump has given me sticker shock along with the exhaust manifold and risers. If anybody has experience with the aftermarket manifolds like to hear about your experience good or bad. Also, after market water pumps by Sierra look attractive, like to hear if anyone has used them. If you know where a good value can be had on a sea water pump, I’m really interested in that. Think I will give the engine a rest and get back to working on the boat while I figure out what I want to do.

With the engine pulled I can get a better view of the engine compartment and rotten fuel tank bulkhead. Fuel tank is on the other side, I will be pulling the fuel tank to see just how extensive the rot is and to start cutting out the bulk head. The bulkhead does have the engine mount stringers tied into it, however it has a gap under the deck and a square slot cut across it, I guess that is to allow for ventilation to maybe dry it out. Didn’t work! With the engine gone, fuel tank pulled and transom shield removed I finally got a good look and could see how good or bad things really are. Bad news is there is rot; good news is it seems to be isolated to the aft section of the boat. First couple of inches on the sides of the fuel tank bay has some rot as well as the bulkhead between the fuel tank bay and engine compartment. The main culprit seems to be the large holes they cut to run the fuel line and fuel filler hose. No sign of resin at all, just some paint.


Ski1491

Seaman
Joined
Jul 26, 2009
Messages
57
Re: 1999 Four Winns Candia 214 Restoration - Return of the Hangar Queen!

Engine Block.jpgfuel tank.jpgfuel tank compart1.jpgfuel tank compart2.jpg

Had a couple of hours to mess with the boat so I pulled the transom shield off, bigger job than I expected mostly due to corrosion on bolts caused by salt water . In the end I prevailed and got the whole thing out of the boat. Found some rot in the transom, not extensive, but probably enough to warrant replacement, I’ll be reading up on some of those great posts, I’m sure I’ll have some questions along the way.
Spent an entire Saturday disassembling the transom shield, lots of corrosion lots of PB6! The SS pin that runs through the transom shield and tilt cylinders was fused to the inside of the cylinders, lots of persuasion to get that sucker out of the transom and off the cylinders. Steering arm attached to the steering fork requires a $90.00 Volvo tool for removal, trip to Home Depot and I was able to fashion a make shift tool that separated the arm from the fork. The gimble bearing no longer rotates and it took quite a bit to break it loose, bigger hammer was in order!! Exhaust bellows fell apart during disassembly. Plan is to get all the remaining hardware off, strip the many layers of spray bomb paint and barnacles off the parts and shoot it with a silver/gray automotive paint. Thanks to the aluminum construction the major assemblies seem to be OK in spite of years of neglect. I’ll take some pictures as I go along.
 

Attachments

  • sealant.jpg
    sealant.jpg
    39.2 KB · Views: 5

Ski1491

Seaman
Joined
Jul 26, 2009
Messages
57
Re: 1999 Four Winns Candia 214 Restoration - Return of the Hangar Queen!

Christine's pics 001.jpg
Transom Shield Resize.jpg

Christine's pics 003.jpg

Well, got lucky and scored a Volvo Penta SX-M outdrive from a V-8 boat off Craig’s List at a decent price. After cross referencing the model number to the Volvo owner’s manual looks like the same gear ratio that came off the boat originally. The skeg has a little piece out of it, other than that it seems to be in good shape. Did a quick pressure and vacuum test on it, held fine. The gear oil is clean with no sign of water or metallic particles. Turns freely and seems to shift properly, at least as far as I can tell. It’s time for a little luck on this project, maybe this will be it. I will strip it and paint it along with the transom shield after I fix that skeg. It also has quite a few layers of poorly applied spray bomb paint, so it should look good after getting that all off and putting on a couple coats of automotive silver/gray.
outdrive resize.jpg
 

Ski1491

Seaman
Joined
Jul 26, 2009
Messages
57
Re: 1999 Four Winns Candia 214 Restoration - Return of the Hangar Queen!

Decided to continue messing with the mechanical pieces since it is so hot. Worked on the exhaust elbows and the Y-pipe, stripped them all the way down to metal and prepped and painted them, turned out pretty good, a lot better than they originally were.

After my progress with the exhaust parts I started on the transom shield, wow, big project! Three cans of aircraft stripper and hours and hours of scraping and sanding. Lots of layers of paint and barnacles on all the parts and all the angles make it really tough to get in all the little nooks and crannies. Happy to say I am now ready for epoxy primer, got all the parts washed and treated. Decided to prep and paint the outdrive later since it took so long to get the transom shield ready. Need those little milestones to keep me motivated, nothing like a little progress to keep you going. Hope to shoot the primer and base coat on the transom shield tomorrow. More pictures to follow.
stripped parts.jpgy pipe.jpgelbows.jpg

Transom Shield.jpg
I Couldn’t have picked a better day for painting, 71 degrees with low humidity, really an awesome day. Got off to a slow start, equipment just didn’t want to cooperate. First I kept popping a breaker every time my air compressor cycled on, got that sorted out and then I couldn’t get my paint gun to flow properly, turned out to be a problem with the inline filter I was using, after about two hours finally got going. Shot two coats of epoxy primer, two coats of base coat and finished up with two coats of clear. It turned out okay for painting outside with a HF spray gun. Colors a tad lighter than the original Volvo color, but that’s okay since I will paint the outdrive with the same stuff.


Well the more I stare at the color the more I don’t like it, so back to the paint shop with a Volvo part to match the color more closely. I’m stubborn (or stupid) like that. Good news is they did not charge me because they matched it so poorly and I just need to sand the parts a bit before hitting it again with the new color. Also separated the outdrive upper and lower units, lower unit is at a metal fab shop getting the skeg fixed and I’m stripping the upper unit so I can shoot everything this go around.
 

Ski1491

Seaman
Joined
Jul 26, 2009
Messages
57
Re: 1999 Four Winns Candia 214 Restoration - Return of the Hangar Queen!

I have learned working on this project that Craig’s List can be your friend if your patient. Doesn’t hurt to buy in the off season when folks are not looking feverishly for boat parts. I have not had very good luck with on line auctions, seems most folks want top dollar and the bidding can get out of hand. Where is all this going, well I picked up a bell housing for $20.00, a brand new aluminum Volvo prop for $25.00, a trim motor, pump and reservoir for $50.00 and the guy threw in two hydraulic trim cylinders and the icing on the cake was a brand new Volvo Penta sea water pump for $55.00, can’t usually touch them for less than $250.00. I now hunt on Craig’s List daily.
IMG_4793.jpg

Well weather has gotten great here in NW Florida and I’m back on the boat. Cleaned it up so I could see what I had going on a little better. I jumped in the fuel tank compartment and started cutting back the rotten wood and you know the rest of the story, found more and more. As I was staring at it and contemplating the secrets of the universe I also realized that in its current configuration (deck/cap insert installed) I had no way to repair it properly, everything is in the way. Well it was time for an epiphany; I was getting over the denial that so many experts on this forum constantly refer to and realizing I either need to fix this right or surrender it to the land fill. I looked around for other boats so I could do a sanity check and they were either extremely expensive, not what I wanted or in just as questionable shape as what I had. Besides, I really like this old boat. After lots of soul searching I decided I’m going to go for it and pull off the cap insert and repair it properly. No room for quitters! On another sites forum one of the boat fabrication experts outlined a process for pulling the cap insert by starting at the bow and working backwards. That’s the plan for right now, but flexibility is the key to airpower (not sure what that has to do with boats, but it sounded good!); let you know how it goes and will get some pictures as I move along.


top cap.jpg

I made some great progress in getting ready to remove the cap insert. Got all the seats out, dash removed, electrical disconnected, hoses disconnected, and courtesy lights removed. I pulled the rub rail off and then proceeded to remove the screws holding the cap in place and that’s when the fun began. For the most part all the screws came out fairly easy had a couple that didn’t want to cooperate. I had to carefully get behind them with my saws all and cut through them. The one area in the bow starboard side that I mentioned being damaged really gave me some fits. Seems someone had done a HA repair and actually fiber glassed the cap to the boat in that area. Looked underneath and there was actually cardboard stuck to the fiberglass, not sure what that was all about. Definitely got some fiberglass work ahead of me on the cap after I get it removed, I’ll be looking for some pointers, new territory.


Started messing with removing the cap insert, much tougher job than I anticipated, may have to call in reinforcements! I took a HF hot knife and ran it around the cap/hull seam to try and cut through some of the 5200, worked good for awhile, but in the end the hot knife wasn’t up to the challenge and fell apart. So I got out my engine hoist and starting lifting the bow trying to get a bite where I could avoiding that damaged area, didn’t want to make it any worse. Went pretty well initially, started lifting it out, I was stoked. Got to the mid section and aft and it became obvious that the deck insert is stuck down with some large blobs (like a ten whole tubes) of 5200 and it is holding good. I also realized that I need something much higher than my engine hoist to get the cap insert high enough so I can pull the boat out from under it. Dragging that engine hoist through the dirt with those metal wheels whooped my butt. I started fabricating something similar to what oops used and I will rig a 2 ton chain hoist to it. Didn’t get it completely done, ran out of sunlight, I guess attack it on another day with some additional support probably. Cold beer is in my future!
cap remove 4.jpgcap remove 2.jpgcap remove 3.jpg


Ski1491

Seaman
Joined
Jul 26, 2009
Messages
57
Re: 1999 Four Winns Candia 214 Restoration - Return of the Hangar Queen!

Well I regrouped; built a gantry similar to the one Oops had fabricated, got a 2.5 ton chain hoist and declared war on my deck cap insert! It put up a noble fight, but in the end I prevailed and after lots of cracking and popping it broke free and separated. I could see why it was so stubborn; they really laid the goop on thick in the stern and it took a railroad breaker bar to get it to pull loose. Took over six hours and victory is bitter sweet. Pretty complex structure below it so I am carefully taking measurements so I can rebuild it and the cap will drop in place after I’m done. There is a flange around the fuel take and ski locker that I have to be sure to get right or if won’t drop down far enough. Lot’s of shotty workmanship under the cap, they didn’t get the deck right in several places so they just slapped another layer of unprotected plywood on top to try and bring the height up. In the front there is a cross brace that supports the front of the cap so it was only supported on one side and it cracked the brace. Well, regardless got the opportunity to rebuild it right; as soon as I’m sure I got all the dimensions down I will start the disassembly.

cap remaoval.jpgcap remaoval 1.jpgcap removal 3.jpgcap removal 2.jpg
 

Ski1491

Seaman
Joined
Jul 26, 2009
Messages
57
Re: 1999 Four Winns Candia 214 Restoration - Return of the Hangar Queen!

I started on the tear down today, my hats off to those who have accomplished this. Taking the deck off wasn’t too bad, but the foam is another story. Used all the tricks I have read up on and it was still a bear. Five solid hours and I’d say I have less than half of it done. This is definitely something I need to do before it turn warm again. Today’s score foam 10 me 1, kicked my butt! Odd thing as I got the foam out of the various compartments on the port side of the boat and as I looked at the joints I realized that there are no stringers that run from front to aft in a single piece. The bulkheads aft and forward are a single piece from port to starboard and what I would consider a stringer is in small sections between the bulkheads. Like to know if this is a common practice or unusual. I know as I read through the many posts most boats seem to have long continuous stringers. Sure would like to hear from some of the experts on this method of construction. Attached some pictures, don’t look like much, but it was pretty tough going getting that foam out. Lots of rot and water, made the right choice not to band aid fix this tub.

foam 5.jpgfoam 1.jpgfoam 2.jpgfoam 3.jpgfoam 4.jpg
 

Ski1491

Seaman
Joined
Jul 26, 2009
Messages
57
Re: 1999 Four Winns Candia 214 Restoration - Return of the Hangar Queen!

Some more pictures of the area below the Cap Insert before I tore off the decking

Picture 035.jpgPicture 013.jpg
Picture 020.jpgPicture 018.jpgPicture 019.jpg

Well that is where I am as of today. Again, sorry for the long post, I will do a beter job in the future of keeping up. Look forard to comments and advice, thanks

Ski
 

Friscoboater

Captain
Joined
Jul 3, 2009
Messages
3,095
Re: 1999 Four Winns Candia 214 Restoration - Return of the Hangar Queen!

Looks like you are off to a good start. Like someone on this forum said once "A free boat will be the most expensive boat ever" and "we build 100 thousand dollar boats 100 bucks at a time"

Keep truck'n
 

Ski1491

Seaman
Joined
Jul 26, 2009
Messages
57
Re: 1999 Four Winns Candia 214 Restoration - Return of the Hangar Queen!

Thanks for the encourgement Frisco, it's kind of like therapy for me on the weekends, of course my SU says I probaly need therapy!
 

Ski1491

Seaman
Joined
Jul 26, 2009
Messages
57
Re: 1999 Four Winns Candia 214 Restoration - Return of the Hangar Queen!

Back at the destruction today, had about a good five hours or more of foam removal and started removing the aft bulkhead at the rear of the fuel tank compartment. It's really a shame the wood has rotted so bad because all the foam is bone dry. The foam was really in there good and fought me the whole day long. Cut it in little squares as others had recommended, but still was tough to get out. Had some water get in my cover and added to the time actually working as I bailed water, really wish I had a large garage or building to work in. Oh well, got to make the best of what I got. Tried a few different things to get the bulkhead removed, in the end the recip saw won out. Put a piece of sheet metal on the other side to hopefully keep from cutting through the hull. Worked much better than the grinder with a cut off blade. Took a picture of the inside of the transom, the holes for the transom shield broke through into the key hole in several places, hope I can resolve that when I replace the transom. Probaly added to the water getting at the transom, some shoty fabrication. This is young mans work, time for a hot shower and a cold beer, hit it on another day!

foam mar 4.jpg
foam mar 4-2.jpg
foam mar 4-3.jpg
foam mar 4-4.jpg
 

Attachments

  • foam mar 4-5.jpg
    foam mar 4-5.jpg
    148.9 KB · Views: 3

bear_69cuda

Commander
Joined
Oct 10, 2008
Messages
2,109
Re: 1999 Four Winns Candia 214 Restoration - Return of the Hangar Queen!

Wow this is a cool project! I know this is the suck stage, but it will get better! Your lookin like a pro dude! I'm tuned into yet another build....
 

Ski1491

Seaman
Joined
Jul 26, 2009
Messages
57
Re: 1999 Four Winns Candia 214 Restoration - Return of the Hangar Queen!

Thanks Bear, hats off to all the guys who took this on, sounds easy on the forum until you jump in. Enjoying it and with some good help from this site hope to have a solid boat and lots of enjoyment. I will keep thye updates comming as I progress

Ski
 

rchapa28

Cadet
Joined
Mar 5, 2012
Messages
18
Re: 1999 Four Winns Candia 214 Restoration - Return of the Hangar Queen!

I'm watching your progress keep up the great work. Researching for my boat its a 89 four winns. I noticed for some reason both of our boats currently have identical color below water line interesting
 

rickryder

Commander
Joined
Jun 24, 2010
Messages
2,722
Re: 1999 Four Winns Candia 214 Restoration - Return of the Hangar Queen!

Ahhhh Another Four Winns restore! Great job so far! Keep at it ;)
 

Ski1491

Seaman
Joined
Jul 26, 2009
Messages
57
Re: 1999 Four Winns Candia 214 Restoration - Return of the Hangar Queen!

Back at it today, worked at geting the old transom out as well as part of the stringers. Got about half of the transom removed and ran out of daylight. I don't want to completly gut everyting because I need some refrence points to insure I get the stringers at the right height. The deck cap sits on top of a sub deck (not sure if that is a correct term!) and the two decks are attached with adhesive. Get it too low and not sure how well the adhesive will hold. Get it too high and the deck cap won't go completly down. So the plan is to get the transom in and repace one side at a time and make some jigs to keep everything square and at the proper height. At first it almost looked like there were no stringers, but when I started pulling things apart they had notched the crossmembers and stingers were they were joined. I included a drawing of what I mean, I'm sure there is a term for this kind of joint. Also had an "awl Crap!" at the end of the day, cut throught the skin on the top of the transom. One thing for sure the transom is mush about 3/4's down. Still put of a fight, but was pretty soft and wet.

So got some questions and hope to get a little bit of advice. First you will see there are some areas on the transom skin that have voids/pits in them, should I fill it with PB and level it all out before attaching the plywood to the fibergall or will the PB on the plywood be sufficient to deal with these pits. Next question is should I rebuild the boat with those overlapping joints? Like to hear some thought on that. Lastly any advice to repair my grinder cut through on transom would also be appreciated. Well that's it for now, probaly be next weekend before I can at *** again. Pretty painful today watching all the troops hooking up thier boats and heading to the bay, I'll get there. Thanks and look foward to your responses

Ski

IMG_4957.jpgStringer Joint.jpgIMG_4953.jpgIMG_4954.jpgIMG_4955.jpg
 

Ski1491

Seaman
Joined
Jul 26, 2009
Messages
57
Re: 1999 Four Winns Candia 214 Restoration - Return of the Hangar Queen!

Some more pics

IMG_4962.jpgIMG_4958.jpgIMG_4959.jpgIMG_4960.jpgIMG_4961.jpg
 

Ski1491

Seaman
Joined
Jul 26, 2009
Messages
57
Re: 1999 Four Winns Candia 214 Restoration - Return of the Hangar Queen!

Any takers on my stringer/bulkhead joints as mentioned above? I looked it up and it's called a Cross Halving Joint Edgeways, looks like the fuel tank compartment and ski locker bulk head have these type joints. Just looking to see if anyone has seen this type arrangement before or if a simple butt joint will be fine. Appreciate the help

Ski
 
Top