Proper fix for damaged wire. Pic included.

MassillonBuckeye

Chief Petty Officer
Joined
Jul 26, 2010
Messages
400
BrokenWireCopytoEdited.jpg


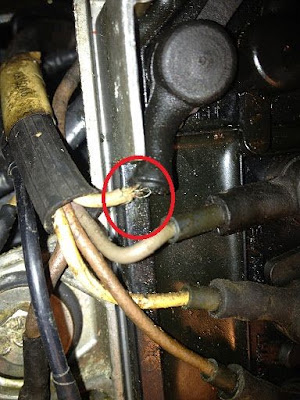
Looks like its running to the trigger according to manual. This is the switchbox end. Anyone willing to give a brief description of its function, and the proper way to repair since its at the end of that wire which doesn't seem long enough to begin with.

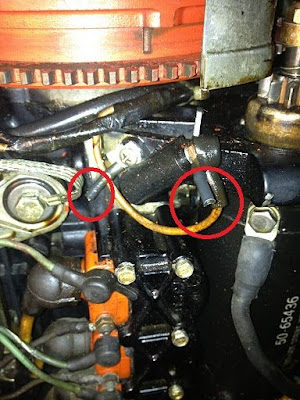
Another question. In the picture below there are two wires cut. Any ideas what they were and why they are cut?

CutWireToBeEditED.jpg


Just picked this motor up today, its a 1978 70HP 3cyl motor ser# starting with 4827***. Will probably have a few more questions regarding this motor here although I got a bit of a headstart when I acquired its little cousin in the 1975 7.5HP and wrenched on it a bit. I'm in the process of committing the manual to memory ;) Thank you for any assistance :)
 

brandon110

Seaman
Joined
Nov 20, 2010
Messages
55
Re: Proper fix for damaged wire. Pic included.

the trigger tell the switchbox when to fire the coil/spark. best thing to do is buy a new trigger as to the insulation on the wires on these older motors teands to fall off. so you could fix this but wont be long till it happens agian. good luck with you new motor
 

MassillonBuckeye

Chief Petty Officer
Joined
Jul 26, 2010
Messages
400
Re: Proper fix for damaged wire. Pic included.

the trigger tell the switchbox when to fire the coil/spark. best thing to do is buy a new trigger as to the insulation on the wires on these older motors teands to fall off. so you could fix this but wont be long till it happens agian. good luck with you new motor

Gotcha. The rest of the wires look great is why I hesitate to replace the whole thing. Wasn't looking to fork out $100+ right off the bat. Thanks for the info. Anyone have any ideas on the cut wires there?
 

phebus1

Petty Officer 3rd Class
Joined
Aug 19, 2011
Messages
85
Re: Proper fix for damaged wire. Pic included.

You could trace back to good wire and insulation, cut, strip , and splice in good replacement wire. Solder and heat shrink connection and then crimp a ring terminal on the end.
Should be good to go if that is the only wire and the only bad section.
I would then go through and do a thorough electrical test and make sure everything was up to spec before I ran the motor.
 

MassillonBuckeye

Chief Petty Officer
Joined
Jul 26, 2010
Messages
400
Check/test the trigger before you spend time repairing it and the cut wires are the "mercury" kill switch, this kills the ignition in the event of engine tilted to high or impact with a object. Below link is trigger testing....
http://www.cdielectronics.com/InstallSheet/134-6452.pdf

Ahh thank you. The motor ran so I can only assume the trigger is working right? It didn't sound like it was missing. I'll check out that link and thanks for the kill switch info. I wonder why they did that. The connections there look a bit corroded compared to the rest.

But yeah, the motor Definitely runs. But he did mention last summer about an issue with higher RPMs which he then attributed to a fuel line issue which he said a local marina diagnosed and fixed. I haven't had it on the water yet. I'll see what sort of diagnostics I can do. I have a simple multimeter but no DVA adapter.
 

phebus1

Petty Officer 3rd Class
Joined
Aug 19, 2011
Messages
85
Re: Proper fix for damaged wire. Pic included.

It looks to me like that wire has been cut and a new end put on it already. When I repaired it I would lengthen it a little.
 

MassillonBuckeye

Chief Petty Officer
Joined
Jul 26, 2010
Messages
400
Re: Proper fix for damaged wire. Pic included.

It looks to me like that wire has been cut and a new end put on it already. When I repaired it I would lengthen it a little.

Yeah it doesn't looks the same as the others.. Missing that bit of insulator there before it goes into the boot. I'm gonna take that boot off tonight and take a looksy. Someone recommended using a conductive paint to restore conductivity to that wire. Kinda just paint it on then use a liquid insulating material after it dries? Obviously you want to be careful to avoid painting it to something else and shorting it. Is this acceptable?
 
Top