Template for factory Sevylor Fish Hunter Floorboard

Devil_Inside

Petty Officer 3rd Class
Joined
Jun 17, 2007
Messages
76
I am looking for a trace-out of the factory Sevylor HF360 Floorboard to use as a template. If anybody here has the factory floor and is willing to help me please let me know. I will pay for all materials, shipping and most importantly a case of beer :p
 

CopperFox

Petty Officer 2nd Class
Joined
Jan 13, 2012
Messages
169
Re: Template for factory Sevylor Fish Hunter Floorboard

First off, I do not have a factory floor board for a Sevylor HF 360.

That said, I do have a Sevylor HF 360, with a home-made floor board that I just made this year and which has been on the water a total of 1 time, so far, for maybe 3 hours. I like it! With all that said, I would be happy to give you any numbers/measurements/photos, plus my thoughts, if you wish.

Let me know if you still have an interest, given the current date and the fact that I do not have a factory floor board, and I'll do what I can.

Dave
 

cj9127

Recruit
Joined
Mar 16, 2012
Messages
1
Re: Template for factory Sevylor Fish Hunter Floorboard

I would like to get them from you if possable, I have been looking "with no luck"
 

dsumner1

Recruit
Joined
Jul 29, 2011
Messages
3
Re: Template for factory Sevylor Fish Hunter Floorboard

I would love that information also. I have seen some wonderful videos on *Tube with some great modifications. The floor piece would be nice to have.
 

saabsaviorlee

Seaman
Joined
Mar 16, 2012
Messages
59
Re: Template for factory Sevylor Fish Hunter Floorboard

My question is do you build the floor to rest on the plastic rope runners on the floor or build similar sized supports underneath to keep the floor off the plastic things on the inflatable floor? Thanks!
 

CopperFox

Petty Officer 2nd Class
Joined
Jan 13, 2012
Messages
169
Re: Template for factory Sevylor Fish Hunter Floorboard

I did respond to CJ with a private response, but since there is more than one person interested I will post what I can here, for others to use as they see fit. Brief Recap: I used the shape/design/drawing that has appeared in this site's forum as a basis, but modified it from there. Since I intend to deflate and pack my boat between trips, and set it up at the water's edge, my floor is in 2 pieces. I included the 3 inch scoops at each end (bow/stern), not knowing why they were added, and see no use for them, so won't recommend them. Unlike others, I have not added piping around the edges of the floor, to protect the boat, but did sand the edges carefully and have painted the floor with an enamal paint, which I hope will provide enough protection. As noted, my time on the water with this set up to date is limited, and I might add piping later.

I had hoped to be able to photograph my floor boards last night and post them today, but life got in the way, so hopefully I will be able to do that tonight. I also plan to show length measurements, and a width measurement each 2 inches from bow to stern, assuming that should provide enough information to replicate what I have, to the extent you see fit.

In regard to dealing with the 6 plastic the line holders on the bottom of the boat: I believe that the Sevylor floor boards sit on top of these (not 100% certain). Wanting to avoid this much pressure on these 6 points, for the front and back 2, I put chalk on them and positioned the floor board on top, so that chalk marks would transfer to the floor boards, in those spots. The using a Dremel course sander, I made 'gouges' in the underside of the boards, at these spots. These went through all but the last ply of the plywood. When placed in the boat, my floor boards fit in front and in back of the 2 middle plastic rope holders very nicely. I can't claim this was intentional but turned out to be a very fortunate coincidence. Yes there is roughly a 1 inch gap between my front and back floor board but this does not appear to affect the stability and I intend to cover the whole thing with indoor/outdoor carpet, to prevent slipping and limit the loss of any small pieces (think snap swivels, shot weights, etc.) that might fall and bounce around.

I hope this helps. More tonight or tomorrow.
 

saabsaviorlee

Seaman
Joined
Mar 16, 2012
Messages
59
Re: Template for factory Sevylor Fish Hunter Floorboard

I did respond to CJ with a private response, but since there is more than one person interested I will post what I can here, for others to use as they see fit. Brief Recap: I used the shape/design/drawing that has appeared in this site's forum as a basis, but modified it from there. Since I intend to deflate and pack my boat between trips, and set it up at the water's edge, my floor is in 2 pieces. I included the 3 inch scoops at each end (bow/stern), not knowing why they were added, and see no use for them, so won't recommend them. Unlike others, I have not added piping around the edges of the floor, to protect the boat, but did sand the edges carefully and have painted the floor with an enamal paint, which I hope will provide enough protection. As noted, my time on the water with this set up to date is limited, and I might add piping later.

I had hoped to be able to photograph my floor boards last night and post them today, but life got in the way, so hopefully I will be able to do that tonight. I also plan to show length measurements, and a width measurement each 2 inches from bow to stern, assuming that should provide enough information to replicate what I have, to the extent you see fit.

In regard to dealing with the 6 plastic the line holders on the bottom of the boat: I believe that the Sevylor floor boards sit on top of these (not 100% certain). Wanting to avoid this much pressure on these 6 points, for the front and back 2, I put chalk on them and positioned the floor board on top, so that chalk marks would transfer to the floor boards, in those spots. The using a Dremel course sander, I made 'gouges' in the underside of the boards, at these spots. These went through all but the last ply of the plywood. When placed in the boat, my floor boards fit in front and in back of the 2 middle plastic rope holders very nicely. I can't claim this was intentional but turned out to be a very fortunate coincidence. Yes there is roughly a 1 inch gap between my front and back floor board but this does not appear to affect the stability and I intend to cover the whole thing with indoor/outdoor carpet, to prevent slipping and limit the loss of any small pieces (think snap swivels, shot weights, etc.) that might fall and bounce around.

I hope this helps. More tonight or tomorrow.

Copper fox thank you so much for your reply! You gave me some more fodder for new ideas. Maybe make the board so the runners will pop through the floor but still be flush somehow. I don't want to rest all the weight on those plastic runners but I also don't want to lose level storage space wit the runners popping up if I drilled them through. The more pics info ideas etc you wanna throw my way id appreciate it! Thanks again
 

CopperFox

Petty Officer 2nd Class
Joined
Jan 13, 2012
Messages
169
Re: Template for factory Sevylor Fish Hunter Floorboard

I was able to take the measurements we discussed and photograph my new floor boards.

IMAG0627.jpg IMAG0625.jpg IMAG0626.jpg

The 1st photo shows my stern (L) and bow floor boards (R). These are based on the diagram posted elsewhere in this forum by dobbs571, on September 6, 2010, and I cut my original sheet of plywood to the 80" x 29" as he suggested. After cutting this piece into two, and then shaping it first by eye and then trial and error to fit, I came up with the dimensions shown the 2nd and 3rd photos. As I stated earlier, when placed in my boat, bow and stern floor boards sit on either side of the 2 middle plastic rope holders on the bottom, so they are separated by a little more than an inch.

I will use the 2nd photo to explain the numbers. This is the stern floor board. A question often asked of the dobbs571 photo is, "What is the distance between the 2 end points?". For mine, that distance turned out to be 11.5", as written on the masking tape. The tape down the middle of this piece is marked in 4" increments, from left to right. The number in each box to the right of these 4" increments, is the width of the floor board at this point. From the 20" point to the middle of the boat, the width is uniformly 26.5". Measurements for the bow floor board are similarly marked.

Note that these numbers are not hard and fast. With no protective piping around the floor boards, at the widest, mine are 26.5", while dobbs571 recommended 29". Also, for mine, an extra inch in length wouldn't have hurt. That said, you might be best starting with a piece 81" x 29", and trimming it to fit your boat from there. Also, as I said earlier, the scoops at either end still don't seem to serve a purpose, and sacrifice solid floor space. For now I'd recommend you make the ends rounded (> 81 inches long) or at least don't include the scoops.

This last photo shows the bottom of the 2 floor boards with points Dremel-sanded out so that when pplaced on the boat bottom, the plastic rope holders fit within them. With floor boards installed, there is less pressure on these plastic pieces and the rope is not visible.

IMAG0631.jpg

I'll try to post a photo of my boat with the floor boards installed, the next time I assemble it, which will hopefully be this weekend. Fish on!
 

saabsaviorlee

Seaman
Joined
Mar 16, 2012
Messages
59
Re: Template for factory Sevylor Fish Hunter Floorboard

Is this the measurements for the 360 or 280? Great looking designs and thanks for the pics! Any thoughts on a bench or swivel seat setup?
 

CopperFox

Petty Officer 2nd Class
Joined
Jan 13, 2012
Messages
169
Re: Template for factory Sevylor Fish Hunter Floorboard

These measurements are for the Sevylor HF 360. Thanks for the comments. Glad I could help.

Actually, I have just finished making 2 relatively inexpensive seats, which seem to have come together as I'd hoped, though I have yet to try them in the boat. I bought 2 actual, folding padded boat seats (reg. $39 ea. for $29 in olive color) from Cabella's, 2 swivels ($9 ea.) & 2 milk crates ($6.50 ea.) from Walmart and used some left over plywood and a bit of 1" x 2". Another small amount (<$10) was spent on stainless steel: bolts (8), nylon locking nuts (8) and washers (8). The crates support the seats on the plywood, with 360 degree swivel ability and there is storage underneath. If there is any interest I could post pix of these as well.
 

BMSR

Recruit
Joined
Mar 3, 2012
Messages
1
Re: Template for factory Sevylor Fish Hunter Floorboard

CopperFox, I'm very interested in updates with photos, since I'm also on the process of customizing my HF360.

Are you planing to install a battery? (what's the best location to put it, regarding stability?)
 

CopperFox

Petty Officer 2nd Class
Joined
Jan 13, 2012
Messages
169
Re: Template for factory Sevylor Fish Hunter Floorboard

BMSR,
I'll be happy to help and actually did have some photos on my phone to upload, but a seat design flaw on my part landed me and my phone in the water! Back to the drawing board there!

With my seat design (see above), the intent is to have the battery inside the crate that forms the seat base. Because of the load at this point, the seat can't be positioned right at the back of the boat without feeling that you are tilted back, but should work about 1 foot from the back of the boat. I'm currently modifying the seat design slightly to avoid further mishap, and should be able to report on the result after this weekend's trial with it. Your patience is appreciated!
 

CopperFox

Petty Officer 2nd Class
Joined
Jan 13, 2012
Messages
169
Re: Template for factory Sevylor Fish Hunter Floorboard

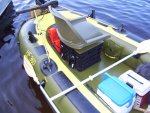
Finally! This is a photo of my now-modified seat. Another is planned for the front of the boat.

The crate is positioned with the longest dimension running bow to stern. The battery sits in the front half, with motor cables entering the crate through the hand hole in the back. The seat is as described above, with one exception. I mentioned I had ended up in the water, and that was the result of me overextending, and having the seat, swivel and plywood base simply pivotiing off the crate. As you can see in the photo, I have since added tie-down straps (2 pack ~ $6 @ Walmart). Two slits were made in the floorboard, on either side of the crate. One goes through the 2 front slits, and one through the back 2. When on site, they are loosened, the crate/seat/battery set moved into position and the straps cinched tight. This worked like a charm last week, after this photo was taken. The only change I intend to make is to reposition the swivel 4-5 inches forward. Right now it still feels like I am leaning backward a bit. I hope this helps.
100_1378.jpg
 

saabsaviorlee

Seaman
Joined
Mar 16, 2012
Messages
59
Re: Template for factory Sevylor Fish Hunter Floorboard

Hey copperfox your seat and boat look great. I'm thinking about trying to save space with my 280 by using a bench across the tubes with cutouts for the rod holders so ill have more leg room and then use the gap under the bench for storage. Do you think it'll be too close to the transom and the controls for the trolling motor? What's your thought on offsetting the seat for easier trolling control?
 

saabsaviorlee

Seaman
Joined
Mar 16, 2012
Messages
59
Re: Template for factory Sevylor Fish Hunter Floorboard

do you feel that marine plywood is absolutely necessary or would thompson sealer and outdoor carpet seal just as well? What thickness is too much or too little? I was thinking either 1/2 in or 3/4in thoughts?
 

CopperFox

Petty Officer 2nd Class
Joined
Jan 13, 2012
Messages
169
Re: Template for factory Sevylor Fish Hunter Floorboard

Saabsaviorlee: Thanks on the boat comments. I have given a decent amount of thought to doing just as you are suggesting. You may want to check out a thread that started on Auguust 26, 2009, titled "Sevylor Floorboard???". It gave me a lot of good ideas and there are some pictures of what others have done along the lines you are suggesting. Just getting up off the floor adds a decent amount of leg room and should add to your motor control ability. As others have said, it is a fairly stable boat, so I'm sure that that setup will not significantly destabelize it. Some have even put a seat board on the back tube alone, so very little floor space is taken up. The best advice I can give as to offsetting the seat is to try to design it so you could move it or yourself a little if you felt off balance. The positioning of my seat is still taking a little tweaking itself. It does give a sense of being a little top heavy but I have no experience in a bass boat so this may just be something I will need to get used to.

I have no expertise on the relative merits of marine plywood but my thinking was as follows: I bought a good quality latex enamel paint and have put on 2 coats. I intend to assemble and dismantle my boat at the site for each use so the wood won't stay wet long. Marine plywood is more expensive. Taking these 3 into account, I went with regular plywood. As to thickness, I have read of both those sizes being used, and I believe those using the 3/4 have said they later felt they could get away with thinner wood. I chose thinner (I believe 7/16") to limit weight. If you plan to stay standing in the boat, you may want thicker, but I am comfortable stepping in and out and standing a bit, if need be, with this thickness.
 

CopperFox

Petty Officer 2nd Class
Joined
Jan 13, 2012
Messages
169
Re: Template for factory Sevylor Fish Hunter Floorboard

One last post (barring new comments), as I said I would, either in the text above or in a couple of private messages.

Here is the boat with the front seat installed. The rear seat has also been moved forward 3-4 inches by adding 4 new slots in the rear floor board for the tie down cinch straps.

A piece of rough plywood was also brought along to see if a much-needed workspace at this height in the rear of the boat would be possible. It worked, so I plan to create one here about twice the size of this board, custom shaped and painted. Another for the front passenger would be helpful, to open and sort through a tackle box or such, but the space between the seats is limited and I am not sure about locating one in front. I'll give it more thought after the back one is done.

Dave

2012-05-19_15-01-12_263 Boat.jpg
 

chopper269

Recruit
Joined
Jun 13, 2012
Messages
1
Re: Template for factory Sevylor Fish Hunter Floorboard

HI ALL - not sure if my last post went thru or not. Just wanted to say Copper fox template is the best for a sevylor floor board. I bought two sevylors fish hunter 360's. Both rafts have a sevylor floorboard in them. They must be diiferent times purchased because they are slightly different but both fit fine. One is three seperate boards that gets together with 2 splines on each side that the boards groove into. The other is same however all three boards are tied together with a burlap strap then splined together like the other one. It does help distribute weight. I am going to use a crate with battery in it and seat over top but I'll leave it loose so I can move it up and down. That way I can distribute weight better by moving it up or down raft as needed depending on gear and amount of passengers. thanks and be safe
 

Chicho77

Recruit
Joined
Sep 18, 2012
Messages
2
Re: Template for factory Sevylor Fish Hunter Floorboard

I am really glad I found this thread. I was given a free Sevylor Super Caravelle 3 person. I stupidly bought the Sevylor motor mount at the Bass Pro Shop. When I took it out of the box I noticed I could have easily made it myself for a 1/4 of the price I paid. I ordered the 6 person fish hunter yesterday. I am going to borrow Copper Fox's template and have my floor cut today. I do have two questions though. My floor will be in two pieces like a above. Any tricks for holding them together? Also, how and what did you use to attach the wooden shelves to the boat?
 

CopperFox

Petty Officer 2nd Class
Joined
Jan 13, 2012
Messages
169
Re: Template for factory Sevylor Fish Hunter Floorboard

Chico77: I don't use anything to hold thefloorboards together, the boat itself does a decent job, but have considered it. My main focus was ease of storage and assembly, and this design works for that. But I will concede that depending on weight distribution, one of the boards can be an inch or two above the other. I have placed a rubber door mat across the two to smooth out this 'ridge' and cover the gap, but it is far from a perfect solution. Rigidity and stability could be improved. Something I have considered is getting 2 small lengths (~12 inches) of PVC tubing (~1.5 inch dia) and cutting each the full length, so that on end it looks like a C. The intent would then be to slip this over the side of each (front and back) board, on either side (left & right) of the floor.

I haven't tried this, but think it should help with rigidity/stability, be light weight & easy to assemble, and be relatively inexpensive. Post back if you do give this a shot, as will I, if I try it myself.

The wooden shelf that I have on the back of the boat is only held in place by the 2 poles that hold the motormount to the boat. When the boat is inflated this seems to be all that is needed. The board can be slid into and out of place when wanted but doesn't move easily.

I just realized that I haven't posted what my shelf/work area currently looks like, and that the last pic only has a sheet of plywood there. I have since shaped it to the contour of the back of the boat and painted it the same color as the boat & floor boards. Then, just to have some stained wood, the way all the "expensive boats" do (!), I got some simple edge molding, cut it to fit, and stained and varathaned it. Some wood glue and 3 short screws keep it in place. Aside from the look, this keeps small round bits (bobbers, etc.) from rolling into the boat. The motormount poles generally keep things from rolling off into the water. A pic will follow.
 
Top