1986 MonArk Rebuild / Restoration

enforce

Cadet
Joined
Dec 12, 2011
Messages
26
Hello Fellow iboaters!

My first thread...

I will be documenting, photographing and recording my rebuild of a 1986 MonArk 171 with a 1986 Suzuki DT115 outboard engine.

Background of this project -

Back in November of this year (2011), a friend of mine who is an auto mechanic gave me a 1986 MonArk 171 with a Suzuki DT115 outboard engine. He's not a boat person and just wanted it off his property. So, after looking it over, i decided to take it off his hands.

My friend informed me that this boat has been sitting outside, uncovered for about 10 years. It has not been used for over 10 years. It was originally owned by an older couple, who bought it new and used it a little bit in the summers and only in fresh water in upstate New York.

Upon my initial inspection, I found what everyone would suspect; (i will explain this in categories - boat, engine and trailer).

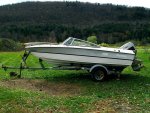
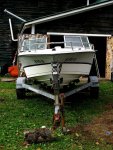
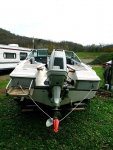
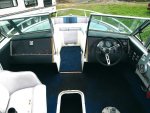
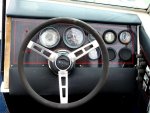
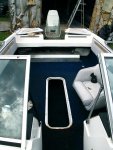
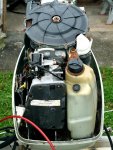
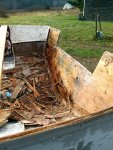
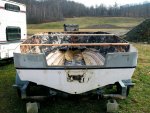
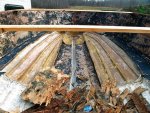
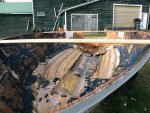
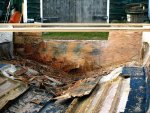
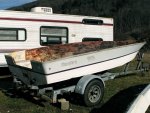
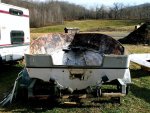
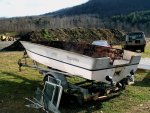
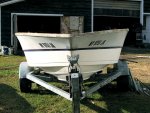
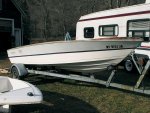
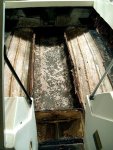
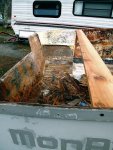
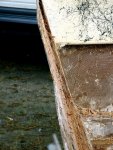
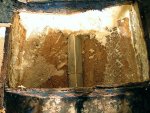
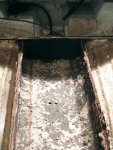
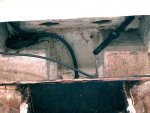
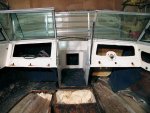
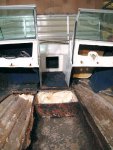
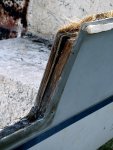
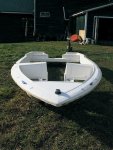
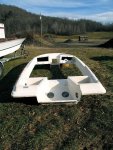
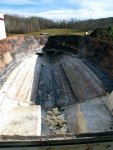
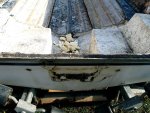
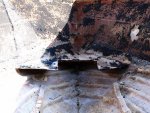
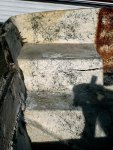
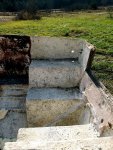
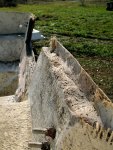
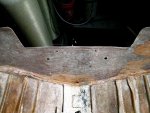
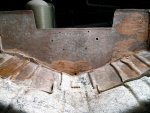
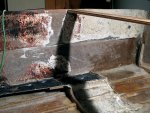
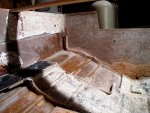
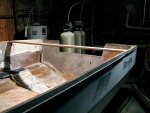
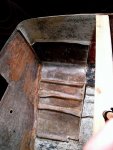
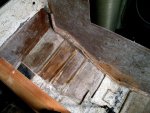
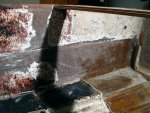
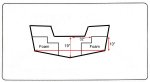
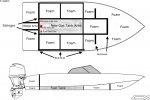
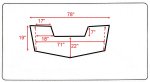
Boat - 16.5 ft. fiberglass hull, plywood deck/stringers and bulkheads. The deck was completely rotted (with heavy moss growing on/in and under it), rotted transom, electrical shot, broken windshield on drivers side, all seats and seat cushions completely rotted and soaked, stern compartment covers rotted and soaked, aluminum gas tank full of gas but in great condition. All holes in the hull show signs of wear and rot behind them (where screws were put through). Drain hole rotted and under drain hole on bottom of hull...worn out and exposing bottom wood edge of transom wall. This is probably due to pulling boat up on shore...small wear areas in different areas on bottom of hull. The boat is rated to handle a 130 hp. outboard engine.

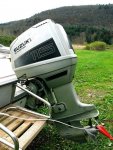
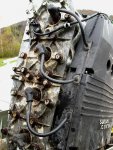
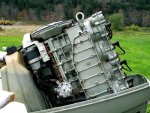
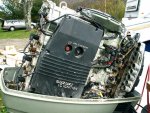
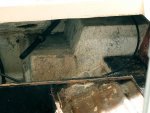
Engine - The engine is "relatively" shot (but i was able to turn the flywheel with a breaker-bar and a socket on the flywheel), so that was a good sign that the engine was not seized, unable to determine the condition of the wiring harness as the gear shift in the engine was rusted / frozen. It looks as though a small rodent (chipmunk or mouse) had mad its home inside the engine and the carb areas...lots of acorn scraps, a nest in the carb cover, lots of urine pitting all over the lower half of the engine. carbs completely shot, oil and fuel pumps completely shot, all fuel and oil lines shot, most of the electrical is shot...rusted and corroded, flywheel is ok but rusty, magnetos under flywheel shot...all rusted, i actually broke quite a few of the head bolts and other miscellaneous bolts while taking apart the engine. In general and as expected...a complete rebuild depending upon how much i will have to spend in parts...

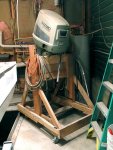
Trailer - in great condition, needs new tires and full electrical system...but otherwise, in good shape.

So, with all this said, here are my intentions...

I plan to completely rebuild / restore the hull...from keel to glass, deck, stringers, bulkheads, gas tank, etc...everything will be re-built stronger and better than original. I am not sure about the engine yet...it really depends upon how much I will have to spend on the parts...i plan to completely dis-assemble the entire engine (every nut and bolt) and have a mechanic friend of mine give it the once over to let me know what parts are good and what need to be replaced. Additionally, I have another friend who has a beautiful sand blasting machine which I can use to clean any of the engine parts.

I have attached a few images of the boat when I first got it...before any work was done to it...

I hope I have given you guys a general understanding of what I am dealing with...any questions and/or comments and/or suggestions would be greatly appreciated.

updates to follow...
 

enforce

Cadet
Joined
Dec 12, 2011
Messages
26
1986 MonArk 171 Rebuild

1986 MonArk 171 Rebuild

Hello Fellow iboaters!

Images of my winter project...
 

Attachments

  • IMG_3635a.jpg
    IMG_3635a.jpg
    126.6 KB · Views: 0
  • IMG_3636a.jpg
    IMG_3636a.jpg
    121.3 KB · Views: 0
  • IMG_3637a.jpg
    IMG_3637a.jpg
    94.2 KB · Views: 0
  • IMG_3639a.jpg
    IMG_3639a.jpg
    113.9 KB · Views: 0

Numlaar

Chief Petty Officer
Joined
Jul 9, 2009
Messages
633
Re: 1986 MonArk 171 Rebuild

Re: 1986 MonArk 171 Rebuild

Looks good!

Be sure to post up your progress on the restore.

Those old suzuki's are actually pretty good motors, just make sure the carbs are done, mix is right, and that your oil lines are Secured! I just blew one because the #3 oil line popped off :(
 

ezmobee

Supreme Mariner
Joined
Mar 26, 2007
Messages
23,767
Re: 1986 MonArk 171 Rebuild

Re: 1986 MonArk 171 Rebuild

Nice boat. Should move pretty good with that 115 on it. So what's it need? Just some freshening or a total refit?
 

enforce

Cadet
Joined
Dec 12, 2011
Messages
26
Re: 1986 MonArk 171 Rebuild

Re: 1986 MonArk 171 Rebuild

i posted a very detailed description and explanation under the MonArk Forum...images and descriptions can be fund there...more to follow later today...thanks for your interest!

later


Nice boat. Should move pretty good with that 115 on it. So what's it need? Just some freshening or a total refit?
 

Woodonglass

Supreme Mariner
Joined
Dec 29, 2009
Messages
25,924
Re: 1986 MonArk 171 Rebuild

Re: 1986 MonArk 171 Rebuild

This B true^^^^^. If you really want help restoring her, you need to post all your pics and descriptions here on the restoration, building, and hull repair site. This is where everyone comes to look for Boat Restoration information.
 

enforce

Cadet
Joined
Dec 12, 2011
Messages
26
Re: 1986 MonArk 171 Rebuild

Re: 1986 MonArk 171 Rebuild

will do...i was going to do that anyway...about to post more right now...thanks for the heads up!
 

enforce

Cadet
Joined
Dec 12, 2011
Messages
26
1986 MonArk 171 Rebuild Continued

1986 MonArk 171 Rebuild Continued

ok...so, i have embarked on a winter project...we'll see far i get...

I am lucky to have a friend who has a huge barn and has allowed me to store and work on the boat in the barn...and better yet, the bay that I am using is heated!!! it's getting cold here in upstate NY...so i just put it inside a few days ago...it's pretty cool, the bay I am using was actually used as a truck / tractor and auto repair bay, it has a pit in it, to work under vehicles, so i just pulled the trailer in right over the pit. the engine can hang straight down over the pit without touching anything, just open air below...so, it's cool...

however, i already removed the engine from the boat and it now rests on a huge stand i built for it...i probably overdid it, but better safe than sorry...the engine must weight like 300 lbs...so i used 2x6's and big bold and lots of 3" & 4" wood screws

I started to search you tube for instructional videos on fiberglass boat restoration, etc...below is a link for you tube that i found, some of you are probably already familiar with this guy, just thought you would find it interesting...if you get into it, watch all his videos, they are really interesting...check out the first video...very interesting story of what happened to this guy...everything he is doing is directly related to what i am about to embark on...

http://www.youtube.com/user/FriscoJarretts#p/u/92/kopF4muvF0c

let me know your thoughts....

a few images attached...i wish i could post more than 5 images at a time...
 

Attachments

  • IMG_3645A.jpg
    IMG_3645A.jpg
    62.8 KB · Views: 1
  • IMG_3640a.jpg
    IMG_3640a.jpg
    81.4 KB · Views: 1
  • IMG_3641a.jpg
    IMG_3641a.jpg
    74.9 KB · Views: 1
  • IMG_3644A.jpg
    IMG_3644A.jpg
    78 KB · Views: 0

enforce

Cadet
Joined
Dec 12, 2011
Messages
26
1986 MonArk Rebuild Continued

1986 MonArk Rebuild Continued

this post is just a few images of the 1986 Suzuki DT115 and the engine stand that I built to hold this beast while I work on the boat...don't bust my chops too much...remember, this engine has been sitting for like 10 years, not been run, just sitting outside, completely exposed to the elements of upstate NY...

I have already begun to dis-assemble the engine...much of it is rusted / frozen, pitted from rodent urine, etc...but a lot of it is still in pretty good shape...

wish I could post more than 5 images per post...
 

Attachments

  • IMG_3661a.jpg
    IMG_3661a.jpg
    118.8 KB · Views: 0
  • IMG_3646a.jpg
    IMG_3646a.jpg
    94.4 KB · Views: 0
  • IMG_3838a.jpg
    IMG_3838a.jpg
    89.4 KB · Views: 0
  • IMG_3649a.jpg
    IMG_3649a.jpg
    100.3 KB · Views: 0
  • IMG_3650A.jpg
    IMG_3650A.jpg
    123.4 KB · Views: 0

enforce

Cadet
Joined
Dec 12, 2011
Messages
26
1986 MonArk Rebuilt / Restoration Continued

1986 MonArk Rebuilt / Restoration Continued

another update on my boat 1986 MonArk 171 restoration...with images...

i removed the engine, the windshields, the side glass and the removed the top of the boat.

i am planning to hang the top of the boat inside a different bay in the barn, from the rafters. the hull will stay on the trailer and be put inside the work bay, i can grind and sand it and take it in and out pretty easily when the weather is nice...the engine is on a huge engine stand that i built.

check out the rotten stringers, bulkhead and transom...crappy original fiberglass work by MonArk. just typical mass produced shoddy work...it means a lot of grinding and glass work for me...anyway, all of it will be removed, ground out, sanded down, etc...the inside of the hull will be smoothed out, roughed up and prepped for a few layers of fiberglass before any stringer or bulkhead work is done...

My first dilemma that I am facing, is trying to figure out how to flip the hull upside-down, so i can work on the bottom of the boat. i want to flip the boat so i can sand and do glass work, paint, gel coat, etc...it would be much easier upside-down...any suggestions would be greatly appreciated...

My initial thought is...because the hull is so thin and light, i think i can simply roll it off the back of the trailer, onto the grass, get a few friends and lift it and flip it in the air. i would then like to put it back on the trailer upside-down...i will remove the rollers on the trailer, rig some 5/8" 4x8 sheets of plywood, flat on the trailer and just rest the boat, nice and flat, right on the plywood...

let me know if that is ok to do...a already have cross supports along the cap/top edge so the hull does not warp out of shape, my friend who is a carpenter suggested a few supports under the boat, when it is upside-down, from the plywood up to the keel, something like 2x4's with some padding on the top, that touches the keel...just for additional support...sound good?

let me know your thoughts...

I am posting all this info because my questions will be coming soon...i have a bunch...but i will keep posting until i am caught up with where I am right now...

...more to come...
 

Attachments

  • 05.jpg
    05.jpg
    137.9 KB · Views: 0
  • 01.jpg
    01.jpg
    117 KB · Views: 0
  • 02.jpg
    02.jpg
    145.5 KB · Views: 1
  • 03.jpg
    03.jpg
    134.9 KB · Views: 0
  • 04.jpg
    04.jpg
    138.7 KB · Views: 0

enforce

Cadet
Joined
Dec 12, 2011
Messages
26
1986 MonArk rebuild / Restoration Continued

1986 MonArk rebuild / Restoration Continued

1986 MonArk 171 Restoration Continued

this is a lot of work, especially this demolition part. i have to wear a full tyvek suit with a hood and a special
respirator for toxic fumes and toxic particles...due to the grinding, cutting and sanding of the fiberglass. the particles are really bad to breath and the fiberglass dust is like fine baby powder when sanded and grinded...i just ordered the tyvek suit and respirator off of eBay for a fraction of the retail price...

The stringers and deck are completely rotted, the hull is in good shape, the engine is in OK shape. I have already begun to take it apart...and i mean fully...i disassembled everything, even split the block and
removed the pistons, cam shaft, everything. i am going to do a full rebuild from the ground up...I have a friend up here who has a brand new sand blasting machine, so every part will be sand blasted, cleaned, etc...and then re-assembled. i also ordered the owners manual, so i guess all i have to do is follow directions and hopefully it will all fit back together. if it does, it will be mint...

I cut out the deck with a sawz-all, ALL of the foam under the deck was completely soaked and heavy. i removed 5 construction sized garbage bags of soaking wet foam. i could barely lift each bag off the boat, they probably weighed like 80 lbs each...so that was an additional 400 lbs of water weight soaked into the foam...the rotted stringers and deck were soaking wet and heavy as well...so a lot of additional water
weight...that makes a huge difference when in the water with an engine trying to push all that weight...not to mention the weight of the people and the boat...someone I know describes it as being similar to pushing a snow plow through the water...

i am dreading the next step - i have to actually cut the fiberglass mold off the bow seat walls that attach to a molded fiberglass deck in the bow area. I will have to cut a few inches up from the bow deck, the seat walls go down to the bow deck and in order for me to remove the rotted plywood deck below the molded fiberglass deck, i will have to cut the fiberglass. kinda stinks but rebuilding will be like working with plaster or spackle...I will apply the same general rules that I learned when painting, except it's just with epoxy and/or fiberglass resin and fiberglass cloth...my 4" grinder cuts through the fiberglass like butter, so I have to be really careful not to go thru the hull.

so, let me know what you think now...the boat looks like *** now...

...more to come...
 

Attachments

  • IMG_3743a.jpg
    IMG_3743a.jpg
    96.8 KB · Views: 0
  • IMG_3737a.jpg
    IMG_3737a.jpg
    121.1 KB · Views: 0
  • IMG_3738a.jpg
    IMG_3738a.jpg
    124.1 KB · Views: 0
  • IMG_3739a.jpg
    IMG_3739a.jpg
    95.4 KB · Views: 0
  • IMG_3740a.jpg
    IMG_3740a.jpg
    99.4 KB · Views: 0

enforce

Cadet
Joined
Dec 12, 2011
Messages
26
1986 MonArk Rebuld / Restoration Continued

1986 MonArk Rebuld / Restoration Continued

another update to my 1986 MoNArk Restoration

just a few more images of the demolition

more to come...
 

Attachments

  • IMG_3687a.jpg
    IMG_3687a.jpg
    106.6 KB · Views: 0
  • 06.jpg
    06.jpg
    107.3 KB · Views: 0
  • 07.jpg
    07.jpg
    106.4 KB · Views: 0
  • IMG_3678a.jpg
    IMG_3678a.jpg
    136 KB · Views: 0
  • IMG_3685a.jpg
    IMG_3685a.jpg
    118.6 KB · Views: 0

enforce

Cadet
Joined
Dec 12, 2011
Messages
26
1986 MonArk Rebuild / Restoration Continued

1986 MonArk Rebuild / Restoration Continued

more images of demolition of my 1986 MonArk 171

a lot of my questions will refer to these images...

thanks!
 

Attachments

  • IMG_3687a.jpg
    IMG_3687a.jpg
    106.6 KB · Views: 0
  • IMG_3681a.jpg
    IMG_3681a.jpg
    88.7 KB · Views: 0
  • IMG_3683a.jpg
    IMG_3683a.jpg
    85.8 KB · Views: 0
  • IMG_3674a.jpg
    IMG_3674a.jpg
    87.7 KB · Views: 1
  • IMG_3677a.jpg
    IMG_3677a.jpg
    96.6 KB · Views: 0

enforce

Cadet
Joined
Dec 12, 2011
Messages
26
1986 MonArk Rebuild/Restoration Continued

1986 MonArk Rebuild/Restoration Continued

more demolition images of my 1986 MonArk 171
 

Attachments

  • IMG_3746a.jpg
    IMG_3746a.jpg
    77.6 KB · Views: 1
  • IMG_3741a.jpg
    IMG_3741a.jpg
    109.8 KB · Views: 0
  • IMG_3742a.jpg
    IMG_3742a.jpg
    126.4 KB · Views: 0
  • IMG_3744a.jpg
    IMG_3744a.jpg
    108.4 KB · Views: 0
  • IMG_3745a.jpg
    IMG_3745a.jpg
    106 KB · Views: 0

enforce

Cadet
Joined
Dec 12, 2011
Messages
26
1986 MonArk Rebuild/Restoration Continued

1986 MonArk Rebuild/Restoration Continued

more demo images of 1986 MonArk 171
 

Attachments

  • IMG_3750a.jpg
    IMG_3750a.jpg
    147.5 KB · Views: 0
  • IMG_3747a.jpg
    IMG_3747a.jpg
    143 KB · Views: 1
  • IMG_3748a.jpg
    IMG_3748a.jpg
    144.6 KB · Views: 2
  • IMG_3749a.jpg
    IMG_3749a.jpg
    111.8 KB · Views: 1

enforce

Cadet
Joined
Dec 12, 2011
Messages
26
1986 MonArk Rebuild/Restoration Continued

1986 MonArk Rebuild/Restoration Continued

so, this is where I am right now...

i started the nasty grinding process. i am using a 4" grinder with a metal cutting blade for cutting through the glass skin and a 36 grit flap wheel for sanding/grinding the remainder of the stringers, bulkhead, transom and what I call flotation/buoyancy boxes which lie against the transom wall and side hull walls on either side of the stern of the hull. They kind of look like steps...I am assuming that these boxes are for buoyancy at the stern of the boat...what with the weight of the gas tank, the engine and two batteries all at the stern...let me know if I am wrong on that assumption...

when i cut open the buoyancy boxes, they were filled with soaking wet heavy foam...i got 2 more construction bags full of wet foam...probably another 150 lbs of extra weight in this poor boat...

so i would assume that i removed approximately 400 to 500 lbs of wet foam and wet rotten wood...

the hull skin of this boat is extremely thin...i think...i just can't believe how this it is (see images)...this will have to do with one of my main concerns...

also, if you notice in the images...there is a white and black speckled coating on the interior of the hull. it is really hard...almost like auto bondo...it is really difficult to sand off...what is this coating? is it some type of old gel coating?

anyway...you can also see the remains of the old carpeting that covered pretty much the entire interior of the hull...my only saving grace to this boat sitting outside for so long is that the carpet remains just disintegrate when i hit them with the 36 grit flap wheel...they are all dried out...it's actually very easy to remove this stuff...from what i understand, removing old carpeting glue (atomic glue) can be brutal...so, i lucked with this one...

also, notice in the images, the crappy original glass job by MonArk on the floor of the hull...there are tons of air pockets and just a really sloppy job when they laid out the fiberglass cloth...this will all be ground down to a good clean glass surface...

more to come...
 

Attachments

  • IMG_3831a.jpg
    IMG_3831a.jpg
    96.4 KB · Views: 0
  • IMG_3827a.jpg
    IMG_3827a.jpg
    113.4 KB · Views: 0
  • IMG_3828aa.jpg
    IMG_3828aa.jpg
    126.3 KB · Views: 0
  • IMG_3829a.jpg
    IMG_3829a.jpg
    115.6 KB · Views: 0
  • IMG_3830a.jpg
    IMG_3830a.jpg
    117.1 KB · Views: 0

enforce

Cadet
Joined
Dec 12, 2011
Messages
26
1986 MonArk Rebuild/Restoration Continued

1986 MonArk Rebuild/Restoration Continued

more images of where I stand right now on my 1986 MonArk 171 Restoration

ground and cut fiberglass today, made a huge mess...thank god for tyvek suits and 3M respirator and heavy duty safety goggles

look at that fiberglass job by MonArk...yikes...gonna fix that right up...

more to come...
 

Attachments

  • IMG_3831a.jpg
    IMG_3831a.jpg
    96.4 KB · Views: 0
  • IMG_3841a.jpg
    IMG_3841a.jpg
    68.6 KB · Views: 0
  • IMG_3834a.jpg
    IMG_3834a.jpg
    101.5 KB · Views: 0
  • IMG_3836a.jpg
    IMG_3836a.jpg
    120.3 KB · Views: 0
  • IMG_3837a.jpg
    IMG_3837a.jpg
    125.8 KB · Views: 0

enforce

Cadet
Joined
Dec 12, 2011
Messages
26
1986 MonArk Rebuild/Restoration Continued

1986 MonArk Rebuild/Restoration Continued

while working on this boat, i have a lot of time to think and plan...i get a real close up view of every inch of this hull...what needs to be done, what i believe could be done better, etc...

so, in order to help me with my concepts for rebuilding / enhancing, etc...i had to go online and find a boat diagram / image, etc...that was a close to my boat as possible...well, i found a few....they really help out a lot while i am still in the demolition stage...i am not the best artist, so these images really help...i have attached a few images of these diagrams. one is just the plain image, the others are my measurements of transom, stringers, bulkheads, gas tank, etc...

let me know your thoughts...

keep in mind...my thoughts and ideas are not carved in stone...these are just brainstorming ideas...i'm sure they will change...but this is all part of the process...right?

i beginning to believe that most of the rebuilding process is just thinking and planning and re-planning before any cutting and fitting is done...

One of my biggest changes to the overall design of this boat is to change the gas tank style and where it resides. I am going to move the tank to the center of the boat, where the ski locker used to be. So, no more ski locker...no big deal. I am planning to install a custom sized, flat tank...i believe they are call "belly tanks". One big question I have is what material is best to use? The original tank was aluminum...but I have searched for tanks on line and see they are also made out of heavy duty plastic...I'm not sure what type i will go with...any pro's and con's?

So, no more ski locker...i am planning to install a bench seat across the rear of the boat, on top of where the old gas tank used to be. you can see the outlines of where the old gas tank used to be in the images.

With all this said, i believe that the placement of the stringers and bulkheads will be determined by the new gas tank dimensions...
 

Attachments

  • transom cross section 3.jpg
    transom cross section 3.jpg
    52.6 KB · Views: 0
  • MonArk Diagram 01b.jpg
    MonArk Diagram 01b.jpg
    119.8 KB · Views: 0
  • MonArk Diagram - Empty Hull.jpg
    MonArk Diagram - Empty Hull.jpg
    89.1 KB · Views: 0
  • MonArk Diagram - Stringer and Bulkheads.jpg
    MonArk Diagram - Stringer and Bulkheads.jpg
    136.9 KB · Views: 0
  • transom cross section 2.jpg
    transom cross section 2.jpg
    60.8 KB · Views: 0

enforce

Cadet
Joined
Dec 12, 2011
Messages
26
Re: 1986 MonArk Rebuild / Restoration Continued

Re: 1986 MonArk Rebuild / Restoration Continued

thanks very much...sorry about that guys!
 
Top