Building Thru--Bolt Motor Mount Stringers

JohnHappy

Cadet
Joined
Sep 15, 2010
Messages
10
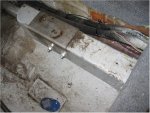
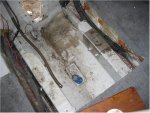
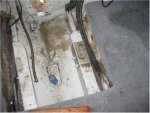
I'll be replacing the transom and motor mount stringers on my 1994 Crownline 225 CCR this winter. I have the 454 and the Bravo 1 out of / off of the boat. I know that I need to make careful measurements of my existing motor mount stringers befored I remove them. Crownline built the boat with the lag bolt motor mounts. I'm building and installing upgraded (wider, stonger) thru-bolt stringers. My question regards the holes I drill for the rear motor mounts through the stringers, putting the engine back into the boat and making sure I can align the sterndive with the engine correctly.

As I consider putting the very heavy engine back into the boat ... on my new stringers, I know I will be coaxing the two front motor mount bolts into place before dealing with the two rear motor mounts. It seems that getting the engine bolted down at the front will pretty much determine where the engine's rear motor mounts will sit on my new stringers. Once I get the engine settled onto the new stringers do I drill the holes through the stringers using a drill bit that is of the same diameter as the bolts I'll put through it or do I drill a larger hole? I'm asking because I have never done this task before and I'm not sure if the front of the engine will ever need to move from right to left a bit to properly align the engine with the stern drive. I know that the motor mounts allow the engine to be moved up and down on each side and if that is all I'll need to get an excellent alignment then great.

My best guess is that once the two rear mounts are tighted up and the engine's full weight is on the stringers I won't want it to move from side to side and will not need it to do so to get a proper alignment. Is my best guess correct or do I need some correction?
 

oops!

Supreme Mariner
Joined
Oct 18, 2007
Messages
12,932
Re: Building Thru--Bolt Motor Mount Stringers

hi john.....welcome to iboats.

there is another way that will make things very easy for you.

mount the transom gimbal inner and outer housings...... put your motor on a hoist.....and hang it in position. drop the two pins thru the rear mounts.....

while the engine is still on the hoist, and the two rear pins are in......align the motor. use the proper alignment tool. get it perfect.

then when it is correctly aligned.....mark the position of the front mounts.... take into consideration the isolators.....and make your measurements for the front mounts.

mark them.....remove the two rear pins on the transom.....lift the motor......when its out of the way....drill your holes.....and place your mounts and isolators.......then just drop the motor back down.....drop in the two rear pins.....and your set.
 

tpenfield

Moderator
Staff member
Joined
Jul 18, 2011
Messages
17,710
Re: Building Thru--Bolt Motor Mount Stringers

John:

A picture would be good, but I agree with "oops" post. Use the rear mounts on the transom plate as your guide. Also, the front mounts that attach to the engine block should have some up/down adjustment; about 1" +/-. The mounts that attach to the stringers should give you some side-to-side adjustment.

Also, is it possible to 'fill' the current stringers with fiberglass/resin to make them solid again? Or, do you need to replace them in order to accommodate a thru-bolt design?

Update -

I just noticed your previous post that no one replied to . . . I recently pulled the 7.4L mercruiser /bravo 1 out of my boat (Formula) and here is what the stringer and mounts look like. As you can see they are "L" brackets with a triangular piece welded underneath for support. Notice the channel in them for horizontal adjustment. You need that, as you will never get the stringers and mounts perfectly positioned. The problem with using just plain "L" or "U" stock is that the load will bend them.

100_0522.jpg100_0539.jpg
 

oops!

Supreme Mariner
Joined
Oct 18, 2007
Messages
12,932
Re: Building Thru--Bolt Motor Mount Stringers

Also, is it possible to 'fill' the current stringers with fiberglass/resin to make them solid again? Or, do you need to replace them in order to accommodate a thru-bolt design?

never do this.......resin by it self is brittle... it will crack with stress, in this situation it will crack right at the bolt.

always remember ....resin by it self is brittle
 

Bondo

Moderator
Staff member
Joined
Apr 17, 2002
Messages
70,525
Re: Building Thru--Bolt Motor Mount Stringers

I know I will be coaxing the two front motor mount bolts into place before dealing with the two rear motor mounts.

Ayuh,.... Is this a jack-shaft driven drive,..??

If not, the rear motor mounts Directly to the drive inner transom plate...
You don't need/ won't want rear block mounted motor mounts...

I recently helped hang a set of triplets into a 50' Scarab, 2 motors directly to the BIII drives, 'n the center motor on a jack-shaft, forward of it's sisters...

Throw up some pictures, 'n Please answer the questions posed...
We can help ya out, but We need more complete Info....
 

JohnHappy

Cadet
Joined
Sep 15, 2010
Messages
10
Re: Building Thru--Bolt Motor Mount Stringers

I've attached three pics of my engineless bilge area. I installed a U-shaped steel plate on the port side months ago which helped keep the 'torque-side' of the engine better attached to the very wet stringer.

Based on the replies thus far it appears I should build my new motor mount stringer 'system' in a way that gives the rear engine mounts some room to be aligned from left to right. My plan is to build the stringers out of wood - probably dimensional lumber - and incorporate some very stout U-shaped steel under the mount. Thru-bolt the engine mount to the stringer and thru-bolt the U-shaped steel through the stringer.
 

Attachments

  • Pic_ 006.jpg
    Pic_ 006.jpg
    101.3 KB · Views: 6
  • Pic_ 004.jpg
    Pic_ 004.jpg
    101.6 KB · Views: 5
  • Pic_ 005.jpg
    Pic_ 005.jpg
    102.3 KB · Views: 5

oops!

Supreme Mariner
Joined
Oct 18, 2007
Messages
12,932
Re: Building Thru--Bolt Motor Mount Stringers

im confused here.

the rear mounts are actually rigid. the flywheel bell attaches to the transom plate.......two pins go thru the plate and the bell housing.

the front mounts.....(the ones you have the pics of the mounting surface) are connected to isolators. the isolators are then laged to the stringers.

in a bolt thru situation, an angle bracket is mounted beside the stringer. bolted thru the stringer.....the isolators bolt to the angel iron.

this situation keeps water from running into the stringer from the top.
 

tpenfield

Moderator
Staff member
Joined
Jul 18, 2011
Messages
17,710
Re: Building Thru--Bolt Motor Mount Stringers

OK, a couple of things now that I see the pictures . . .

Your rear mounts should be only at the transom plate once you re-install the outdrive related 'stuff'. The front mounts are where you installed the steel plate as a temporary solution. There is no adjustment to the rear mounts, because the transom assembly determines where the rear of the engine needs to be. You talked about a rear engine mount that needs to be adjustable (?) :confused: I'm not sure what you are talking about.

Your stringers are too close together to easily accommodate a through bolt engine mount. You will have to come up with a creative design, probably a stringer that has a cut-out, so you could get a thru-bolt where normally you would have a lag bolt.

Something like this . . .
stringer1.jpg


That way you can do a thru-bolt without having a cantilever bracket. You could use "U" shaped steel on both top and bottom.
 

Bondo

Moderator
Staff member
Joined
Apr 17, 2002
Messages
70,525
Re: Building Thru--Bolt Motor Mount Stringers

Your stringers are too close together to easily accommodate a through bolt engine mount. You will have to come up with a creative design, probably a stringer that has a cut-out, so you could get a thru-bolt where normally you would have a lag bolt.

Something like this . . .

Ayuh,.... Agreed,.... but....
It'd be easier to just hog out the rotten wood from the motor bed that's there, 'n replace it....
Then bolt the motor back in the way it was originally...
Based on the replies thus far it appears I should build my new motor mount stringer 'system' in a way that gives the rear engine mounts some room to be aligned from left to right.

There ain't no rear motor mounts, persae...
The motor hangs off the transom housing....

Forget the steel strappin', 'n fix the Rot...
 

oops!

Supreme Mariner
Joined
Oct 18, 2007
Messages
12,932
Re: Building Thru--Bolt Motor Mount Stringers

There ain't no rear motor mounts, persae...
The motor hangs off the transom housing....

thank you......i was all confused by the front /rear motor mounts thing. ......

to the op......you didnt take this motor out your self did you?....

click the link in my sig.....read the motor mount pages in the index on the first post.....that will help
 

JohnHappy

Cadet
Joined
Sep 15, 2010
Messages
10
Re: Building Thru--Bolt Motor Mount Stringers

Ok, thanks for the input.

I have a engine mount stringer design in mind that should work fine.

Once I have the new stringers glassed in at the same height as the old stringers - with my stringer 'upgrades' in place - I reinstall the engine. Once I have the two rear mounts bolted up and the engine set on the new stringers, I'll align the sterndrive with the engine according the the directions in the service manual. At that point I'll drill the holes into the stringers for the front motor mounts and get all the mounts tighted up properly. Then, I'll check the drive alignment and realign if necessary.

At that point, it seems safe to assume that any future drive alignment can be properly done using the adustment nuts on the front motor mounts. No side to side movement, just up and down.
 
Top