2000 Bayliner Capri 1850 deck restoration project. I bought a can of worms, yikes!

malo68

Cadet
Joined
Aug 22, 2011
Messages
10
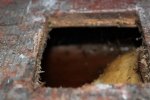
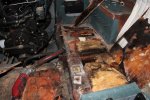
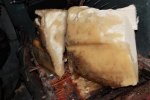
Hello everyone! My name is George and I?m new to the forum. Over the summer, I was looking for a family boat and ended up finding this running 2000 Bayliner Capri 1850 with trailer for $2000. The previous owner did not take very good care of the boat and it sat outside for quite a while without a cover. Needless to say, there was mold and mildew all over the boat but that was the least of my problems, I?ve found. Before I bought the boat, the owner told me that he had to patch a spot in the deck. He did this by putting a rough cut piece of plywood over the rotted area. When I got it home I stripped the rug to see the extent of the damage. I found what you see in pic 1. At that point, I began to research many articles and threads here on the forum and also on the internet. I found a thread about a guy who had a similar boat with water penetration problem under the deck behind the wheel where the driver?s feet would be. I decided to cut some random squares in deck there and felt damp foam. I then decided to cut a square towards the back where I saw a buckle in the fiberglass to check for bad areas. When I cut the square in the port side rear, I saw foam, then a void in the foam. I stuck my finger in and I was touching water! I opened up the hole, took the section out and my jaw dropped. Water was trapped between the stringer and cross section. The foam was saturated. I then saw a 1? hole in the stringer that had saturated foam in it. The hole was not sealed with fiberglass and water penetrated into the stringer. I dug out the foam from inside the stringer and found that most of it was dry except for the very bottom. After digging sucking out the water and digging out the foam, I couldn?t help but notice how lousy the factory fiberglass job looked on the underside (see pic) with loose strands of fiberglass everywhere. Water obviously penetrated the cracks of the very thin layer of resin on the topside of the ac plywood deck. The underside of the plywood is untreated?bad idea. Anyway, looks like a have quite a project on my hands. The next problem I will encounter is dealing with how to replace the floor without splitting the boat in half because the walkthrough areas on the side of the helm are built into the top half of the mold. This should be fun. I?m sure I will have a lot of questions in the future about this project. I was very inspired by bear_69Cuda?s documented project. I hope to document with pictures as I go along as well. I will be eternally grateful to be able to get some helpful insight from the many experts and enthusiasts I?ve read about here?Take care all! George
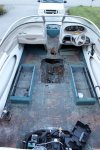
18 (800x533).jpg3 (533x800).jpg21 (800x533).jpg34 (800x533).jpg42 (800x533).jpg
 

Struc

Chief Petty Officer
Joined
Jul 27, 2011
Messages
409
Re: 2000 Bayliner Capri 1850 deck restoration project. I bought a can of worms, yikes

Welcome to Iboats! I'm fairly new here as well, but after reading a few threads (look up friscoboater, oops, and a few others and read their threads), you'll feel like an expert. There is nothing there that can't be fixed. If you like the boat you bought, and plan on keeping it for a while then it will be worth fixing, and fixing it right. You'll get all the help you need here.
 

isedhooah

Cadet
Joined
Sep 14, 2011
Messages
19
Re: 2000 Bayliner Capri 1850 deck restoration project. I bought a can of worms, yikes

looks like you and i have a very similar project going on. have you had a chance to dig into it anymore?
 

malo68

Cadet
Joined
Aug 22, 2011
Messages
10
Re: 2000 Bayliner Capri 1850 deck restoration project. I bought a can of worms, yikes

Hey there, got the 1/2 of the deck out on the port side from the engine bay to under the dash. In the process of taking the starboard side panel off (shifter disassembly). Going to need to figure out a way to get around those glassed in "boxes" under the dash (helm). As I cut the deck, I left about 1" of it in front of those boxes and on each side and along the side panels that lead to the bow. There is no way I'm splitting the boat in two so I'll have to find a way to get at the bad wood. The wood under the box on the port side actually looks pretty dry. I'm afraid the starboard side may have some issues. I'm going in sections. Got the port seatbox out (with plywood underneath still attached). I'm using a cordless skill saw with a 6" blade set at the depth of the plywood allowing for that thin layer of 'glass. I also bought one of those oscillating tools from Harbor Freight for 20 bucks for those hard to reach areas. I'll be taking more pics tomorrow. Here is a link to all of the photos I've taken so far: https://skydrive.live.com/redir.aspx?cid=d931de7aff3b5166&page=play&resid=D931DE7AFF3B5166!4385
 

malo68

Cadet
Joined
Aug 22, 2011
Messages
10
Re: 2000 Bayliner Capri 1850 deck restoration project. I bought a can of worms, yikes

Thanks Struc, yes, I do plan on keeping the boat for a while and I DO plan on fixing it right :) Love this site!
 

sjohnson44

Petty Officer 2nd Class
Joined
Aug 30, 2011
Messages
186
Re: 2000 Bayliner Capri 1850 deck restoration project. I bought a can of worms, yikes

I thought I was looking at my boat when I was looking at your pics. lol

Even though yours is 4 years newer than mine, they still have alot in common. The hull and stringers look to be the same. I'm going for getting the rest of my floor out today, come hell or high water.

I would like to ask, hows that little oscillating tool? How is it with the fiberglass? And how on earth did you get chunks of foam that big out in one piece? I have been taking mine out in 3x3 squares or smaller. Seems like the stuff just breaks off.

Keep up the good work, and keep us updated. I'll be keeping up with your resto
 

Struc

Chief Petty Officer
Joined
Jul 27, 2011
Messages
409
Re: 2000 Bayliner Capri 1850 deck restoration project. I bought a can of worms, yikes

Is it my imagination, or is there standing water in some of those side compartments once you pulled the foam up? If so, just wow!
 

Friscoboater

Captain
Joined
Jul 3, 2009
Messages
3,095
Re: 2000 Bayliner Capri 1850 deck restoration project. I bought a can of worms, yikes

Is it my imagination, or is there standing water in some of those side compartments once you pulled the foam up? If so, just wow!

Standing water is common. I had the same thing in my Sea Ray.

Keep up the good work.
 

oops!

Supreme Mariner
Joined
Oct 18, 2007
Messages
12,932
Re: 2000 Bayliner Capri 1850 deck restoration project. I bought a can of worms, yikes

im kind of shocked to see the foam wet in places that is is not supposed to be......even for a boat that lives outside with out a cover....the foam under the front consoles should not be wet. the water in the foam is even through out the forward sections.
im torn between a bad rub rail installation, and telling you that you got a sunk boat. im leaning toward sunk.

dont panic if it has been sunk....you are fixing it....(and doing a good job of the tear down).

the deck towards the aft looked great (where you cut the inspection hole) but to see wet foam there made me think hull hole.

any how.......no matter.....the truth is.... a 2000 boat for 2000 bux is a great deal. and one that i would have bought to fix.

if the foam is that wet up front....you will need to pull the cap any how. that is not a bad thing....it will give you a chance to eliminate any water intrusion from that source during re build.

as far as the un rolled fibreglass in the hull.....that is common....they will miss spots all over during fast production, but that is just the top layer of the chopped....your hull is thick enough that it wont matter.

standing water seems to be a concern of yours you will have a chance to add some limber holes thru the stringer system to eliminate that problem.
there is a post in my thread on how to foam a boat with out worry of water intrusion into the foam and have proper drainage thru the hull.

i really dont think you are going to have to open up the stringers. the bay liners used the fiber glass as a stringer any how.....they were foam encased. you might have a little water in the stringer foam....but unless its wet all the way thru i would leave it.

cheers
oops
 

sjohnson44

Petty Officer 2nd Class
Joined
Aug 30, 2011
Messages
186
Re: 2000 Bayliner Capri 1850 deck restoration project. I bought a can of worms, yikes

I wanted to get your ideas malo, how you plan on putting the deck back in the bow area and if you left that outter lip for a reason or will you be grinding it off later?

I started to cut mine out today but didn't really have a plan on getting it out while still leaving something up there to attach the deck to. I assume you will have to add some support of some kind to mount to?
 

malo68

Cadet
Joined
Aug 22, 2011
Messages
10
Re: 2000 Bayliner Capri 1850 deck restoration project. I bought a can of worms, yikes

Is it my imagination, or is there standing water in some of those side compartments once you pulled the foam up? If so, just wow!

Oh yes, you're eyes deceive you not. That IS standing water trapped in the voids in the foam between the stringer and hull. From being left outside uncovered, water penetrated the THIN layer of unmatted resin which had cracked and split thus trapping the water. Also found a problem area in a stringer where a foam fill hole wasn't properly sealed with 'glass also allowing water to penetrate.:rolleyes:
 

malo68

Cadet
Joined
Aug 22, 2011
Messages
10
Re: 2000 Bayliner Capri 1850 deck restoration project. I bought a can of worms, yikes

I would like to ask, hows that little oscillating tool? How is it with the fiberglass? And how on earth did you get chunks of foam that big out in one piece? I have been taking mine out in 3x3 squares or smaller. Seems like the stuff just breaks off.

Hi sjohnson44, I like the oscillating tool. Can't beat it for 20 bucks @ Harbor Freight. Figured if I got a couple of uses out of it, it would be worth it. Still going strong! Yes it's very good with the fiberglass and it's easy to control the depth of the cut. As far as the foam is concerned, I've been carving it with a large knife (see pics) and popping the pieces out with a long,narrow pry bar. Regards!

Link to pics: https://skydrive.live.com/redir.aspx?cid=d931de7aff3b5166&page=play&resid=D931DE7AFF3B5166!4466
 

malo68

Cadet
Joined
Aug 22, 2011
Messages
10
Re: 2000 Bayliner Capri 1850 deck restoration project. I bought a can of worms, yikes

friscoboater, thank you for the links! I've found them verrrrrry useful! Appreciate that..
 

malo68

Cadet
Joined
Aug 22, 2011
Messages
10
Re: 2000 Bayliner Capri 1850 deck restoration project. I bought a can of worms, yikes

oops! Thank you so much for chiming in on this. I have heard a lot of great things about you! I don't think that the boat was sunk because there are too many areas on the boat that seem to have not been penetrated by water at all, ie, engine, wiring, cushions, wood near port console. You will probably be able to see better from the new pics here: https://skydrive.live.com/redir.aspx?cid=d931de7aff3b5166&page=play&resid=D931DE7AFF3B5166!4466 .

Looking at the underside, there does not look like there has been an area there that is damaged or has been repaired. Can a bad rub rail really cause that much water penetration? It seems hard to believe! I was really trying to avoid having to take off the cap. I don't have the room to put it any where or the extra manpower to help lift it off. I believe the floor under the "box" under the port console is good and dry, the starboard side, can't really tell at this time. But, if it is good after digging a little deeper, I was considering going around them somehow. Glad you think the stringers are okay. That's a BIG bonus. Again, thanks for the response and the very helpful advice. I appreciate it very much. :D
 

sjohnson44

Petty Officer 2nd Class
Joined
Aug 30, 2011
Messages
186
Re: 2000 Bayliner Capri 1850 deck restoration project. I bought a can of worms, yikes

Hi sjohnson44, I like the oscillating tool. Can't beat it for 20 bucks @ Harbor Freight. Figured if I got a couple of uses out of it, it would be worth it. Still going strong! Yes it's very good with the fiberglass and it's easy to control the depth of the cut. As far as the foam is concerned, I've been carving it with a large knife (see pics) and popping the pieces out with a long,narrow pry bar. Regards!

Link to pics: https://skydrive.live.com/redir.aspx?cid=d931de7aff3b5166&page=play&resid=D931DE7AFF3B5166!4466

Good deal, thanks for the info! I got a drywall saw, pretty much just a sawzall blade with a handle on it and it works wonderfully.
I wanted to add to the small debate about whether or not your boat had been sunk.
After getting my floor out of my bayliner and looking at yours at the amount of water that was under the foam. I had the very same amount under mine, about 3-6 inches deep between bulk heads. I have cut all the way back to the last bulk head before the transom and found that my foam is soaked under there like yours, although all of the wood for the deck has been in fairly good shape, just some graying on the surface. I'm stumped at how that much water could get under there, plus the likely-hood of both of our boats being a bayliner and having the same problem to me sort of debunks the theory of being sunk. I guess there is a chance that both of our boats may had been sunk at one time, but not very likely. I have been trying to get to the bottom of the problem as to why exactly it took on that much water but to no avail. Keep up the good work, I'm right there with ya. lol

P.S Again I had just the same amount of water in my boat as yours and all of my strings are in good shape. No rot at all. I drilled samples everywhere and all are in good shape. From the looks of it, they did a pretty good job getting them sealed up. Yours may end up the same. Good luck!
 

sjohnson44

Petty Officer 2nd Class
Joined
Aug 30, 2011
Messages
186
Re: 2000 Bayliner Capri 1850 deck restoration project.

Re: 2000 Bayliner Capri 1850 deck restoration project.

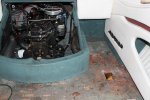
Lookin good, your making some progress. Its nice that your motor is open on all sides, or did you take some frame work out? You cant hardly even around the sides on mine. :p

Keep us updated would like to see what you do next.

BTW...sweet camaro :cool:
 

malo68

Cadet
Joined
Aug 22, 2011
Messages
10
Re: 2000 Bayliner Capri 1850 deck restoration project.

Re: 2000 Bayliner Capri 1850 deck restoration project.

Lookin good, your making some progress. Its nice that your motor is open on all sides, or did you take some frame work out? You cant hardly even around the sides on mine. :p

Keep us updated would like to see what you do next.

BTW...sweet camaro :cool:

Thanks, progress has been slow because I've been so busy with my boys' afterschool activites: football, cub scouts, etc. etc...you know how it goes. Yes it is good that I can get around the engine compartment. Now I have to figure a way to get under the consoles. I think I may have to cut the console sides sides, perhaps on a curve and remove them. Later I can re-glass the inside, fill the outside, and add a stripe to cover the cut line. We'll see how that goes...will keep you updated. Take care! George
 

oops!

Supreme Mariner
Joined
Oct 18, 2007
Messages
12,932
Re: 2000 Bayliner Capri 1850 deck restoration project.

Re: 2000 Bayliner Capri 1850 deck restoration project.

the consoles can just be lifter up.....the glass will flex.....dont get crazy and use a hoist or put tons of pressure.....but you can gently bend them out of the way.....chances are the deck wood is good under them....but bad up to the walk way. can we see more pics of the bow area?
 

malo68

Cadet
Joined
Aug 22, 2011
Messages
10
Re: 2000 Bayliner Capri 1850 deck restoration project.

Re: 2000 Bayliner Capri 1850 deck restoration project.

the consoles can just be lifter up.....the glass will flex.....dont get crazy and use a hoist or put tons of pressure.....but you can gently bend them out of the way.....chances are the deck wood is good under them....but bad up to the walk way. can we see more pics of the bow area?

Wow, so hard to find time these days...I was able to get the consoles to come up about 3", exposing the sections of the floor along the sides that were covered with the consoles in place. After a thorough inspection of the wood under the console "boxes", I have found you to be right. The wood was in pretty good shape with only a couple of punky spots near the edges of the walkway that I have already cut. To save a lot of time and trouble, I'm going to leave the good wood and patch around it. A friend was over and gave me a pretty good idea about how to support the floor where it will be patched. I'll try to draw a picture of the plan and post it. Maybe someone can think of something better? Here are some pics I took last week of the bow area, I have since removed all foam from the left and right sides except for the very back. Does anyone know if the piece of oak 2x4 supporting the 2 stringers across the gas tank is actually going through the stringers? I'd like to remove this, take out the fuel tank and clean up the area it is sitting in. Thanks, George

Here is the link for the new pics: https://skydrive.live.com/redir.aspx?cid=d931de7aff3b5166&page=play&resid=D931DE7AFF3B5166!4483
 
Top