1963 75hp Rebuild: Success!!! (Sort Of)

yorab

Ensign
Joined
Jul 6, 2002
Messages
958
Long post. Please bear with me.

More than 3 1/2 years into this, I've finally seen it run again! Here's a link:

http://www.flickr.com/photos/jmm741/5651463647/in/photostream

I eventually got it running relatively smoothly, but the camera battery died so no video of that. I did have a few issues though. First the minor issues.

It took many tries to get it started and I realized that I needed to hold the choke open for it to start. Even though the choke lever was set to "Choke Off", the choke was still closed. I had to manually hold open the choke arm. Should the spring over near the choke lever hold the choke open when in the "Choke Off" position? Is it normal for the engine to only start with choke off even when cold? Also, since it was getting a bit dark, I never had a chance to adjust the slow speed needles. I'll get to that next time.

Now, a big problem that I had, which required me to shut her down, was that the top of the starboard head was getting very hot. I didn't have a thermometer so I don't know exactly how hot it was. I could only touch that area for very short time. I couldn't hold my hand there for any length of time. The paint was even bubbling a bit. The bubbling thing could be from my inexperienced painting job or it could be from a too-hot condition. I did use PlastiKote Engine Enamal rated to 500 F.

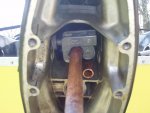
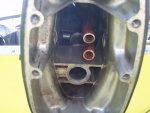
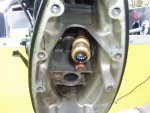
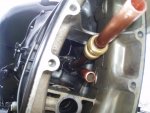
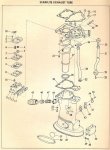
I was curious to find out if any water was flowing, so I disconnected the starboard cylinder-to-water-choke hose. There was plenty of water flowing through. However, I noticed something that I thought was odd. The water was flowing from the choke to the cylinder. Shouldn't this be the other way around? That way, the choke can react to changing temperatures of the water that comes directly from the cylinders instead of reacting to water that comes directly from the inlet water tube. I'm thinking that the water is flowing in reverse. If, for instance, the water is flowing through the exhaust cover plate and then into the cylinder bank, then I would think that would cause the cylinder bank to overheat. Is this correct? The only way this could happen, I believe, is that the inlet and outlet water pipes are switched at the adapter plate. This is something that I researched for a few weeks while I was reassembling everything, but I never found a good answer. I went with what the OMC Parts Catalog shows: the shorter inlet pipe on the port side of the adapter plate and the longer outlet pipe on the starboard side. With this configuration, the water comes up the inlet water pipe, into the adapter plate and then out the "Automatic Choke Adapter Nipple" (part #39 in the diagram). It would then go directly to the hot water choke through a hose. This would lead to the situation that I previously described in which the choke reacts not to water from the cylinder but water from the inlet pipe. I'm hoping that I don't have to completely tear apart the engine again in order to switch those two pipes. I hope that the diagram is correct. Can anybody please confirm the water flow path? I can post pics of any of the parts/systems that I have talked about if anybody wants them.
 

Attachments

  • Ex Tube Diagram.jpg
    Ex Tube Diagram.jpg
    145.2 KB · Views: 0
  • Ex Tube List.jpg
    Ex Tube List.jpg
    155.3 KB · Views: 0

yorab

Ensign
Joined
Jul 6, 2002
Messages
958
Re: 1963 75hp Rebuild: Success!!! (Sort Of)

I've been using a 1964 OMC FSM for my 1963 model. I believe that the only difference was that the 1964 went with an electric choke as opposed to the water choke used on earlier models. Perhaps the 1963 FSM talks a bit about the water flow through the choke, i.e. where it gets water from and where it dumps it to. Does anybody have that manual? I DON'T WANT TO BUY IT. Solicitation is not allowed on the forum. I would just like to ask that you read it for me and let me know if there is anything good in there about the water flow through the choke or the cooling system in general. I will also post this request in a separate thread. Thanks.
 

boldtr

Cadet
Joined
Mar 6, 2010
Messages
24
Re: 1963 75hp Rebuild: Success!!! (Sort Of)

Hello Yorab,

1. Choke Lever Action
a. In CHOKE OFF position, the plates should be held OPEN.
b. In AUTOMATIC position, the water coil should hold the plates closed. Hot water will make the spring expand and slowly open the plates.
c. In CHOKE ON position, the plates should be held CLOSED regardless of water temperature.

2. WATER FLOW

I remember the thread with the inlet/outlet pipe discussion. I know for certain, my pipes on my '65/60hp are opposite of what you and another gentleman had mentioned. I know mine are correct. Thus, I think you have it backwards. I did not mention anything because I though perhaps the older 75hp may be different. If backwards, you would be able to fill and pressure the motor with water, but it would not flow through the HEADS as the valves in the thermostat would not open as you would be pushing them closed rather than pushing them open against the springs. You would get backards flow from the choke to the head as water would be coming from the lower block near the exhaust, to the choke, and then to the head where it would be blocked by the thermostat. You may get a tiny bit of water flow because the vernatherm valve has a small vallley cut which allows some water to flow.

You may be able to simply pull the lower unit and bend the pipes to oppositve. Two caveats 1) The inlet tube may have holes to cool the exhaust. 2) The lengths may be different based on the extentions.

I would pull the lower unit. You can use a floor jack and a board to make it an easier one man job. Then I would connect a garden hose directly to the inlet pipe. You should be able to get full flow through the outlet tube when the garden hose is fully open. You will be able to tell when you open the "pressure valve" in the thermostat. You will hear/feel water flowing through your thermostat hoses from the heads.
 

yorab

Ensign
Joined
Jul 6, 2002
Messages
958
Re: 1963 75hp Rebuild: Success!!! (Sort Of)

Thanks for the info boltr. I must have that tiny wire spring routed incorrectly at the choke lever. I know all of the parts are there since I can account for them based on the parts catalog. I'll just need to get the spring on correctly.

Indeed, as it is now, the water comes from the lower block near the exhaust, to the choke and then to the head as you mentioned. So, it seems that the official parts catalog may be incorrect concerning the water tubes. I'm going to try like heck to correct this without completely disassembling everything. I'll take your advice and drop the lower unit. Then I'll hook up a garden hose to the inlet and hope for full flow out of the outlet pipe. This should work in one direction and not the other due to the thermostat pressure valve. Is this correct?

One pipe is longer than the other. If they are reversed, I can cut the longer pipe with small pipe cutter. I could also get a flexible dremel attachment into the housing and drill a cooling hole. I would then need to figure out how to extend the shorter pipe. I could use the piece that I cut from the longer pipe, but I'm not sure how to connect it. I have a flare tool, but the copper pipe has a relatively thick wall so I don't think my flare tool would work. It might though. Anyway, I'll cross that bridge when/if I need to.
 

ezmobee

Supreme Mariner
Joined
Mar 26, 2007
Messages
23,767
Re: 1963 75hp Rebuild: Success!!! (Sort Of)

Sounded like your battery was barely gettin' the job done also. Those things NEED to spin up to a certain RPM to start reliably. I recently bought a way overkill sized battery for mine at BassPro when they had a sale and man does that thing spin now!
 

boldtr

Cadet
Joined
Mar 6, 2010
Messages
24
Re: 1963 75hp Rebuild: Success!!! (Sort Of)

I have added three images. The first two images show the spring in the CHOKE OFF position.

The last image, shows the spring in the CHOKE ON position.
 

Attachments

  • IMG_7211 [1024x768].JPG
    IMG_7211 [1024x768].JPG
    116.3 KB · Views: 0
  • IMG_7209 [1024x768].JPG
    IMG_7209 [1024x768].JPG
    118.4 KB · Views: 0
  • IMG_7210 [1024x768].JPG
    IMG_7210 [1024x768].JPG
    135.3 KB · Views: 0

boldtr

Cadet
Joined
Mar 6, 2010
Messages
24
Re: 1963 75hp Rebuild: Success!!! (Sort Of)

COOLING PIPES

If backwards, you will be cutting, bending, and drilling the longer pipe to serve as the inlet tube. This should be doable and not impact performance at all. The outlet tube is less critical as it simply allows water to flow back to lake to be recirculated. If it is a little bit leaky, that is OK. Thus, don't worry about the cooling holes in this pipe they will also help cool the exhaust. You can get a piece of 5/8" heater hose and two clamps to serve as a coupler to extend the length of the outlet tube. I would apply a light coating of grease to the end of both pipes so they slip more easily back into the lower unit. You can use a floor jack to slowly lift every thing into place checking to make sure the tubes are aligned before completing the attachment.
 

stackz

Master Chief Petty Officer
Joined
May 29, 2008
Messages
830
Re: 1963 75hp Rebuild: Success!!! (Sort Of)

on the bright side at least it runs.

I'll have to remember about this when I finally get a chance to pull the starflite engine I have out of the woods.
 

yorab

Ensign
Joined
Jul 6, 2002
Messages
958
Re: 1963 75hp Rebuild: Success!!! (Sort Of)

ezmobee, I think that I'm having issues with the starter. The battery is a brand new, 900+ CCA marine dual purpose battery. After that video was shot, the starter began to work properly again. I posted in another thread last week about that starter. I was having problems with it so I disassembled it for inspection, re-lubed and reassembled it and it seemed to work fine. Very spotty problem that I'll need to get worked out.

I'm going to the place where I keep my boat now. I'll check out the choke spring and also the water flow and I'll post back a bit later.
 

Mas

Lieutenant Commander
Joined
Oct 3, 2006
Messages
1,656
Re: 1963 75hp Rebuild: Success!!! (Sort Of)

Awesome...keep at it. How about another video with it running smooooooth??

Mas
 

yorab

Ensign
Joined
Jul 6, 2002
Messages
958
Re: 1963 75hp Rebuild: Success!!! (Sort Of)

Okay, I've taken a second look at things. First the choke. I believe that I have the spring on the choke lever on correctly, but the choke doesn't open on its own when the lever is in "Choke Off" position. It will open manually so it's not stuck at all. I pulled off the hot water-actuated spring from the other side of the carb to be sure that it was not holding the choke closed, but it wasn't. The choke arm was free to rotate but it wanted to naturally remain in the closed position. What makes the choke arm rotate to a position in which the choke plates are open? I see no springs anywhere that would do that. Here's a video:

http://www.flickr.com/photos/jmm741/5655842057/in/photostream

As for the water tubes, they may be reversed. When I hooked up the hose to the shorter inlet tube, the water did come out the outlet, but there was some restriction and the water seemed to be spraying a lot. Here's the video:

http://www.flickr.com/photos/29072032@N05/5656451426/in/photostream

When I hooked up the hose to the longer outlet tube, the water seemed to flow almost unrestricted through the motor and back out the inlet tube. Here is the video:

http://www.flickr.com/photos/29072032@N05/5656447996/in/photostream

It seems that I need to reverse the tubes. Can anybody confirm that this is the correct thing to do based on my descriptions and the videos? Perhaps it would it be easier to verify simply based on water flow direction through the choke. Again, as it is now, the water that the choke receives comes directly from the inlet pipe. The water is then dumped into the top of the starboard cylinder bank. This seems to be wrong. Every time the thermostat would open and fresh, cool lake water was drawn into the circulating system, the choke would detect cold water and would close, even if the motor is completely warmed up. Is this correct?

I'm hoping that somebody can confirm that my pipes are indeed reversed so that I don't end up switching for nothing. Thanks for the advice.
 

yorab

Ensign
Joined
Jul 6, 2002
Messages
958
Re: 1963 75hp Rebuild: Success!!! (Sort Of)

I got a good answer from lookupsawya in another thread. He has a 1964 75hp and has some issues with his water pipes. I got a 100% confirmation that his shorter inlet pipe goes to the starboard side of the adapter plate. Our motors are nearly identical so my inlet pipe should also go to the starboard side. I've begun to switch the pipes and will finish tomorrow. I'll post back about it then.

As far as the choke, I just now noticed one thing that is different. I have my "Manual choke arm and pin" on backwards. It's the thing that mounts to the end of the choke shaft and has a screw to hold it in place. The flat area of that part mates up with the machined flat spot on the choke arm. I just have mine reversed. By turning it around, the wire spring may be able to act on it and hold open the choke when the choke lever is moved to "Off". I'll check tomorrow.
 

boldtr

Cadet
Joined
Mar 6, 2010
Messages
24
Re: 1963 75hp Rebuild: Success!!! (Sort Of)

CHOKE CAM

Yes. From your video, I can see your choke cam is on backwards. The cam needs to ride inside the loop. See my first pic above. Simply loosen the set screw and switch it around.
 

boldtr

Cadet
Joined
Mar 6, 2010
Messages
24
Re: 1963 75hp Rebuild: Success!!! (Sort Of)

WATER TUBES

On my '65/60hp Johnson, the shorter inlet pipe has two cooling holes that spray (cool) the inner exhaust tube. This pipe runs to the SB side. The longer outlet pipe runs to the port side.

Water should flow into the block, fill, and then flow out of the heads to the thermostat. Water should also flow from the BOSS in your head to your choke. From the choke it should return back to the lower block where it will exit the motor. You can pull the hoses from your heads and attach longer 5/8'' scrap hose to the heads to ensure the water is flowing out of them when sending water up the inlet.

The thermostat has two springs/valves. One is the vernatherm (SB side) which will open and stay open once the motor is warm. The other valve is the pressure relief (port side) which has a softer spring and opens whenever the pressure is high-enough.

If you choose to not use your hot-water choke, you can always use that BOSS to source water to a tell-tale. The outlet can be drilled to your lower motor cover. You can get the OMC PN from sticky file for the water discharge housing plug.
 

yorab

Ensign
Joined
Jul 6, 2002
Messages
958
Re: 1963 75hp Rebuild: Success!!! (Sort Of)

If I say out loud what I'm about to write, I'll probably get struck by lightning where I sit--twice. This was an easy and fast fix. I spent more time making trips to the store to get parts than I did actually doing the work.

I measured for the required length of the shorter inlet pipe and I cut the longer outlet pipe to that length. I was pleasantly surprised to find that a pipe cutter fit up in the housing with both pipes running through. I then drilled a hole in the new inlet pipe to allow for cooling of the shift wires. The original hole was 3/32" and I used a 7/64" bit because it was the smallest that would work with my Dremel attachment. I don't believe that the 1/64" will make a difference. I also slid a piece of heater hose up the former inlet pipe in order to cover the old cooling hole. I tightened a stainless clamp over the hose to hold it in place.

Then I used a copper push-fit union to lengthen the shorter pipe so that it could be used as the longer outlet. After lengthening, I made a final measurement and cut the longer pipe to length. Everything fit nicely.

When I put the lower unit on the first time, I should have known that something was wrong since the shift wire access plate would not go into place because one of the pipes was in the way. Now the plate fits into place without hitting the water pipe. Everything seems to be okay. I'll know for sure when I take it back to the lake for more testing and hopefully the break-in.

As far as the choke goes, it works now when in "On" or "Off" since I turned the manual choke arm around. I see now how the wire spring forces the choke to close when in the On position and the inside of the choke cam pushes against the choke arm to force the choke open in the Off position. However, I don't understand how the automatic position works. I think that I understand how it's supposed to work, but I don't think mine is working that way. When in Auto, the bi-metallic spring in the water choke housing forces the choke to close when cold. When the engine heats up, hot water heats the spring and it no longer pushes on the choke and the choke can open. This assumes that the choke moves to an open position by default when the bi-metallic spring is not pushing on it. I removed my choke spring and by default, my choke stays closed even when the choke cam is in the "Automatic" position. Does anybody know what holds the choke open when in the Auto position?
 

Attachments

  • 001.jpg
    001.jpg
    128.1 KB · Views: 0
  • 003.jpg
    003.jpg
    126.1 KB · Views: 0
  • 007.jpg
    007.jpg
    133.6 KB · Views: 0
  • 008.jpg
    008.jpg
    135.3 KB · Views: 0
  • 010.jpg
    010.jpg
    135.8 KB · Views: 0

yorab

Ensign
Joined
Jul 6, 2002
Messages
958
Re: 1963 75hp Rebuild: Success!!! (Sort Of)

The water pipes are now correct. The shorter inlet pipe needs to be connected to the starboard side of the adapter plate. I tested it out today and it's working like it should.
 
Top