Changing transom wood

Joined
Jun 18, 2010
Messages
19
Have any of you changed the wood at the transom? Any info would be useful. I have a 1964 Orion that I am restoring that will need new wood installed. I'll post some photos soon. The boat is in fairly good shape.
 

JoeMan

Petty Officer 1st Class
Joined
Jun 29, 2006
Messages
322
Re: Changing transom wood

Yes, I needed to change the wood on the Neptune, which is basically the same. Post pics, and then I'll re-post your pics with arrows and description of what you'll need to do.
 
Joined
Jun 18, 2010
Messages
19
Re: Changing transom wood

Joe I have attached the transom photos.

I also was wondering if anyone has installed canvas snaps on the alumminum frame of the original windshield. A half canvas top came with the boat, but there are only snaps on the sides of the boat for the rear of the canvas. I am afraid if I drill pilot holes and screw them in the windshield may brake.

Sincerely,
George D'Amato
 

Attachments

  • CIMG0029.jpg
    CIMG0029.jpg
    140.6 KB · Views: 0
  • CIMG0028.jpg
    CIMG0028.jpg
    137 KB · Views: 0

JoeMan

Petty Officer 1st Class
Joined
Jun 29, 2006
Messages
322
Re: Changing transom wood

You have 2 choices. Either remove the ENTIRE splash deck by drilling out and then replacing all of the rivets...which would be a tremendous job...or, you need to unscrew the decking from the transom wood underneath...and then make cuts into the aluminum on the lines I've drawn. If you go that route, you make the cuts and then bend the aluminum down so that you can pull the BOTTOM part of the transom forward...and then slip it down and out of the top aluminum channel. Do NOT cut into the aluminum channel, that is where a lot of the strength is.

Does this make sense?
 

Attachments

  • 123.jpg
    123.jpg
    122.5 KB · Views: 0
  • 456.jpg
    456.jpg
    79.9 KB · Views: 0

JoeMan

Petty Officer 1st Class
Joined
Jun 29, 2006
Messages
322
Re: Changing transom wood

Fortunately for me (or not), the splash decking on my Duratech was trashed and had holes in it already. Once I'd hacked it up as I'm telling you, I replaced the trans wood and then I used a home made break to bend up some aluminum which I used to cover up the entire splash decking...then painted this. It's a bit tougher of a decision if yours is in good shape...I'd be thinking about taking out all the rivets if I had the ability and time.
 

reelfishin

Captain
Joined
Mar 19, 2007
Messages
3,043
Re: Changing transom wood

I'm doing the same project to my Sport boat, the transom wood is toast. I've been knocking around two options, one is to notch the wood to clear the center stringer in mine, then insert the wood upward from the bottom, even if means laminating several thinner layers as I go.
The second, is to use fiberglass panels, laminate them in place to make a lifetime transom panel.
The way I see it, my current transom wood is gone about half way up, only the top 2 or 3 inches are solid, and the motor nor transom move even a fraction of an inch. Just about anything I put in there that won't rot the aluminum or hold salt residue will be a major improvement. My center stringer is shorter then the other four by about 3", it attaches to the transom wood via two angle brackets. I've also seen other similar boats, with far less aluminum built with wood panels that are similar but do not go to the bottom of the boat.
My take is that it would work fine if I were to run that panel down to almost the bottom, therefore not exposing it to as much bilge water, and attach it to the stringer via new aluminum brackets.

I will not cut my splashwell tray, if it came down to it, I'd have to remove all the rivets and reinstall it, but I'm leaning towards making mine more water resistant overall, maybe even doing an aluminum deck. Without a doubt, the floor supports will be aluminum, regardless of what decking I use.
 
Joined
Jun 18, 2010
Messages
19
Re: Changing transom wood

OK I removed the old transom which was rotted at the mid to lower portion.I cut an access hole in the floor to reach fasteners. I made 1 1/2" cuts at each side of the splash guard to allow the portion that screwed to the transom to be bent back to clear the old transom from the top.
The aluminum screws were difficult because the nuts were steel and they corroded solid. The screw heads would strip easily. I had to break the heads off all but 3. I decided that I was not running the transom wood all the way to the bottom of the boat due to the pooling water issue rotting the wood. I ordered aluminum hardware. Cut two plywood panels, Used gorilla wood glue to join them. Dry fitted the transom. Drilled fastener holes. Used epoxy to seal the wood. Installed the transom. Bent back the splash guard. Installed fasteners with sealer. The splash guard cuts mated well and I could just seal them when I add caulk around the wood splash guard seams. I will add photos later.

George
 

JoeMan

Petty Officer 1st Class
Joined
Jun 29, 2006
Messages
322
Re: Changing transom wood

Sounds good. Show your whole boat too. :)
 

reelfishin

Captain
Joined
Mar 19, 2007
Messages
3,043
Re: Changing transom wood

On my Sport Boat, the original transom wood was cut to fit around the center aluminum stringer. Sort of huge V notch. Only the lower corners were really rotted off. None of the rot would have been above the deck level.
Since I just found a super clean 70HP Johnson with Tilt and trim for my boat, I'm contemplating widening my wood panel a bit, as the later OMC bolt pattern falls nearly at the very edge of the OEM wood panel.

Just a thought, has anyone looked at maybe just unriveting the upper transom channel and pulling the wood straight out the top? it was mean removing far less rivets than pulling out the splashwell, and would make for a much neater job? On mine, that upper channel has only 16 rivets total, and stops just past the sides of the splashwell. The last rivet connects it to a rather heavy corner plate which appears to form the corner structure on which the upper gunwales and corner caps are attached. The sides of my splashwell at some point were remade with bolt in panels to cover the many cable holes from what I assume was rope cable and pulley steering. The center is attached also by the bolts that secure the transom wood. It's just a thought but I will surely take a closer look at the idea when I get back into doing mine. The way I was thinking was how they got the wood in there in the first place. On mine, it appears as if the splashwell was installed prior to the gunwales, meaning that even if I unriveted the splashwell, I'd have to pry it out of place to remove it. If I can remove that rear cap, it would most likely side to one side and come out pretty easy, leaving my only 16 rivets to redo, all of which are above the water line and wouldn't be very noticeable when done.

I also gave some thought about the aluminum screws, I think even though there could be some dissimilar metal concerns between SS and aluminum, I favor the greater strength of the SS screws. I feel that painting the SS screws with a good self etching primer and paint and installing them with some 5200 through the transom, they would no doubt most likely out last me. Just for information purposes, I pulled several SS screws out of another aluminum boat transom I did about 17 year ago, those screws are still in great shape. A few had nuts that had seized on but none were at risk of failing or had any corrosion, nor did the hull in that area.I did replace them since they were out and reseal them with modern sealer this time, but no other attention was needed after 17 years.
 

bsplit

Cadet
Joined
Aug 19, 2009
Messages
18
Re: Changing transom wood

I just sent George a Private message to ask about the transom repair on his Duratech Orion. I'm new to this board, and I'm not sure it went through.

Anyway, I just picked a 1964 Orion and I also need to replace the transom wood on mine. Any help will be appreciated.

Thanks
Jim
 

JoeMan

Petty Officer 1st Class
Joined
Jun 29, 2006
Messages
322
Re: Changing transom wood

Jim, consider doing what ReelFishin said...see if the rivets holding your top transom channel on look to be taken off rather easily. As suggested elsewhere in this thread or another here in the Duratech forum, it's either rivets coming out...or aluminum being cut. Mine was an easy choice since my aluminum splash well was already torn up...I did the surgery and then bent new aluminum to cover back over and painted that. If you can see to removing rivets to get the top channel off, you'll not have ripped up your metal.

I also just emailed George thru the Duratech site to check his PM here for your message, in case he's not visiting often.
 

Scrawny

Cadet
Joined
Sep 4, 2010
Messages
15
Re: Changing transom wood

When I replace the transom wood on my aluminum boat I put a lot of coats of linseed on it. Made it very water resistant.
Did 50:50 linseed oil and paint thinner for one coat
Then 75:25
Then 100% linseed with touched ups every now and then. Works great.
 

bsplit

Cadet
Joined
Aug 19, 2009
Messages
18
Re: Changing transom wood

I'm wondering if you could put one in without disturbing the aluminum. Make the replacement out of two or three pieces....glued together and fiberglassed after they're put into place.
 

reelfishin

Captain
Joined
Mar 19, 2007
Messages
3,043
Re: Changing transom wood

I'm wondering if you could put one in without disturbing the aluminum. Make the replacement out of two or three pieces....glued together and fiberglassed after they're put into place.

I messed around with that idea here on mine, its fine till you get to the last piece.
Maybe if you used 1/4" and could get the last piece to flex a bit it would work. You would also need a good way to clamp all the layers tight to maintain good strength when it was all done.

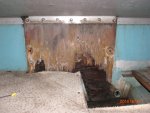
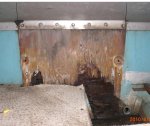
I also gave some thought to removing the top channel or cap, but once the new plywood is in place, you will not be able to re-rivet the area above the new wood panel. On top of that, it's nearly impossible to apply enough force with an inline rivet gun to properly crush the rivets which are located within the that top C channel. I suppose it could be put back with stainless carriage bolts though.

So far the only feasible method I see that don't entail cutting or damaging the original hull assembly is to pour in the transom panel using something like Nida Bond pourable transom material. If I did this, I think I'd bolt two C channel supports on both sides using the original transom bolt holes, then cover them with an aluminum panel. Then close in the top the same way, drilling a center pour hole in the top channel. It would take very little of the stuff, probably only a few gallons.

Another idea that crossed my mind after doing some work on an older aluminum bass boat which used only corrugated aluminum for it's transom core.
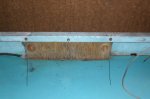
I was thinking of maybe just taking 1.5" OD thick wall square aluminum tubing and making the transom out of several vertical lengths, which would be easy to install, bolting the outer tubes to the original holes, and using metal epoxy to assemble the pieces. I know from my automotive experience that epoxy is more than capable of holding aluminum together in a structural application. The tubes could be put in place one at a time, they would be far stronger and more rigid than wood, they wouldn't require any cutting of the hull. I would pretty much coat each one with epoxy, as well as coat the final assembly. I could even fill the tubes with a pourable transom compound to prevent crushing when the bolts were tightened. (This would also allow using thinner tubing).
The screws attaching the splashwell to the transom panel, plus an added lower cross brace at deck level would tie them all together as well. This would no doubt make for a very long lasting solution, even the last tube would easily fit into place since the whole assembly could move about until the last tube was in place. I'd use a slow cure epoxy to give me plenty of working time and to allow getting them all in place and bolted up prior to the epoxy drying.

Since I'm leaning towards an all aluminum deck and supports, or possibly just aluminum under supports and a composite deck, it would make for a completely wood free boat and lessen the overall weight a good bit as well.
 

bsplit

Cadet
Joined
Aug 19, 2009
Messages
18
Re: Changing transom wood

Thanks for your input. I also thought about using the epoxy that you inject into the wood.....the wood soaks it up and it hardens.

Could I piece together some pieces of 3/4 plywood, and glue them in place with several screws holding them together while the glue sets? It seems like that would work. Plywood is just several layers of wood glued together.

Thanks,
Jim
 

JoeMan

Petty Officer 1st Class
Joined
Jun 29, 2006
Messages
322
Re: Changing transom wood

I believe that could work if done right.

I like all the ideas contributed here which avoid the cutting of metal or removing the cap since it seems it cannot be replaced with the same exact integrity as original.
 

reelfishin

Captain
Joined
Mar 19, 2007
Messages
3,043
Re: Changing transom wood

Thanks for your input. I also thought about using the epoxy that you inject into the wood.....the wood soaks it up and it hardens.

Could I piece together some pieces of 3/4 plywood, and glue them in place with several screws holding them together while the glue sets? It seems like that would work. Plywood is just several layers of wood glued together.

Thanks,
Jim

The problem with the 3/4" plywood is that the first piece goes right in place, the second layer won't make the bend at the splashwell tray from underneath. At last it won't on my Sportboat.

Maybe if you assembled it in four layers of 3/8" ply, then put the last layer in in linear pieces with lots of epoxy? The problem I saw with getting the wood in there in one piece was that if cut full length like the OEM wood, the last piece won't make make it unless it's cut in pieces. I'm leaning towards filled aluminum tubes. It will take 10 tubes in all and they will be prefilled with poured transom compound. All of the tubes get put in place loose, then the outer pieces get bolted in place and lots of epoxy will bond it all together. I don't think I even need to weld any of them. I may put an additional layer of 3/16" aluminum plate over them all for a smooth surface.

I have the wood out of mine now, it came out in pieces. The 1960 40hp motor is still hanging on the transom and the transom doesn't move a bit with no wood at all, so anything I add will only make it stronger.
An engineer buddy also suggested that all I need to do is to put a bead of urethane adhesive like 5200 between the aluminum tubes, I may do that plus coat the transom panel itself with epoxy.

I hadn't thought of doing the aluminum tube transom panel till I saw a few bass boats made that way. Only they use only corrugated aluminum between two aluminum skins for a transom. No wood and no filler at all. The one boat had a 70hp on it and was built in the early 80's and was holding up just fine other than a few spots where the bolts were overtightened and the corrugated core was crushed. Using the pourable transom compound will prevent that, as well as prevent the tubes from holding saltwater and corroding. A generous layer of epoxy between the tubes and the transom will also deter hidden corrosion.
 

bsplit

Cadet
Joined
Aug 19, 2009
Messages
18
Re: Changing transom wood

My transom wood is approximately 16 inches wide and 18 inches deep. I was thinking about using four pieces of 3/4 inch plywood cut to fit.

All measurements are approximate.

I would start with two pieces. One piece 12" X 16" and one piece 8" X 16".
I would glue/epoxy them together and fit them through from the bottom to butt up against the top transom channel. I would then cut two pieces, one piece 6" X 16" and and one 10" X 16". I would bond them together to complete the rest of the puzzle.

I would then mate these with the top half and secure in place with gorilla glue, epoxy, or whatever would be the recommended adhesive.

Do you think this would work?

Thanks,
Jim
 
Joined
Jun 18, 2010
Messages
19
Re: Changing transom wood

CIMG0075.jpg

CIMG0077.jpg


Remember that the upper 1" of wood is only 1 1/8" thick. This is so it can fit inbetween the upper aluminum channel. The rest is 1 1/2" so you can glue 2 3/4" pieces together to get the thickness and then machine the upper portion.

Here are a few photos with the old transom removed.

George
 
Top