liberator 211 restore, need help bad

GracieBell1

Petty Officer 2nd Class
Joined
Jan 8, 2010
Messages
152
I have an '86 four winns liberator 211 I am replacing the transom, deck and about 5 feet of both engine stringers. Four winns manual said the baot hwas built with encased stringer, NO! The engine stringers seemed to not be encased, especialy on the sides opposite of the engine. I am going to post some pics but my problem is that the top of the stringers have supports for the deck and are not encased. Should I encase or tab. If I do it like four winns I would not encase the whole stringer. I have pics in a previous post titled " liberator 211" Cannot get my pics to show up.
 

Attachments

  • 3.jpg
    3.jpg
    49.6 KB · Views: 2
  • 5.jpg
    5.jpg
    40 KB · Views: 2
  • IMGP0341.jpg
    IMGP0341.jpg
    142.5 KB · Views: 2

GracieBell1

Petty Officer 2nd Class
Joined
Jan 8, 2010
Messages
152
Re: liberator 211 restore, need help bad

I am wanting to do my transom and stringers this week end. I am planning on tabbing the stringer in. One layer on the motor mount side and to on the opposite side. Then glue the "L" shaped piece on top for the deck. Then glue and glass the motor mount to the stringer. This is how the facotry did it. They only glassed over top of the stringer on the motor mount side. The back looks like chop stand was sprayed on it. wan not even half way up the stringer. Four winns says that this is had layed roven but I do not see any wroven. I will post a couple more pics. PLEASE HELP. The last pic is of a Four Winns that has been redone, i think.
 

Attachments

  • IMGP0650.jpg
    IMGP0650.jpg
    145.2 KB · Views: 1
  • IMGP0331.jpg
    IMGP0331.jpg
    147.2 KB · Views: 1
  • IMGP0647.jpg
    IMGP0647.jpg
    148.6 KB · Views: 1
  • libtransom.jpg
    libtransom.jpg
    95.1 KB · Views: 1

GracieBell1

Petty Officer 2nd Class
Joined
Jan 8, 2010
Messages
152
Re: liberator 211 restore, need help bad

More pics. Thanks
 

Attachments

  • 1.jpg
    1.jpg
    47.2 KB · Views: 0
  • 4.jpg
    4.jpg
    60 KB · Views: 0
  • IMGP0332.jpg
    IMGP0332.jpg
    147.4 KB · Views: 0
  • IMGP0339.jpg
    IMGP0339.jpg
    148.2 KB · Views: 0

GracieBell1

Petty Officer 2nd Class
Joined
Jan 8, 2010
Messages
152
Re: liberator 211 restore, need help bad

I have attached my transom to the inside skin w/ pl premium. I am using 3 1/2 pieces of ply. It is very heavy so I glued two pieces together and pl'd them in first. THE PROBLEM.... I test fitted and it looked good. WHen I glued and clamped I noticed after that the new wood sat about an inch above the bottom of the boat bilge. It never even touched the pl bedding. I still have to put the third sheet on. Can I fill the voids w/ poly resin and chopped strand mix them put the third sheet in correct and cover over the filled void? WOuld this be OK? thanks stefan
 

HT32BSX115

Supreme Mariner
Joined
Dec 8, 2005
Messages
10,083
Re: liberator 211 restore, need help bad

Hi Stefan!

I don't hang out in this section much so I didn't see your original post last year....

I hope you're still working on your Lib..... It appears that FW didn't do a very good job on the Libs (or any other ones) Doesn't say much for FW quality does it??

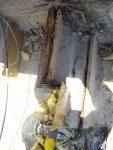
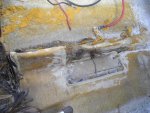
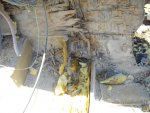
When I did my re-power, I noticed that the transom doesn't fit all that well. They left a gap below the transom-wood that could fill with water. (and mine did) When I drilled below it a fair amount of water ran out.

I was VERY lucky. I had no rot at all. It did take a few months to completely dry it out though.

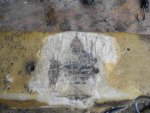
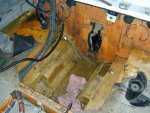
After I dried it out, I pressure-filled the void below the transom with MAS epoxy mixed with milled fiberglass.

My stringers were fine but I noticed that FW didn't seal the drain hole at all at the bottom of the transom (the source of my water intrusion in the transom)
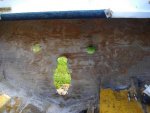
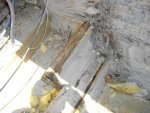
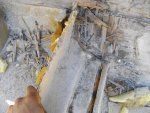
Before:
dscn0666.jpg


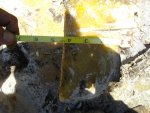
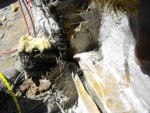
After: You can see here that I hadn't yet drilled the drain hole.

I also moved the bulkhead in front of the engine forward a couple of inches to allow for a little more room in front of the engine. The fuel tank fits pretty tight now though.

I re-glassed the entire engine compartment using MAS epoxy resin and painted it all with BilgeKote
new1.jpg


I hope you're coming along well. (or done!)

Sorry no one replied to your post!


Regards,


Rick
 
Top