Help with a new project, Please.

Dan_o

Seaman Apprentice
Joined
Feb 20, 2009
Messages
36
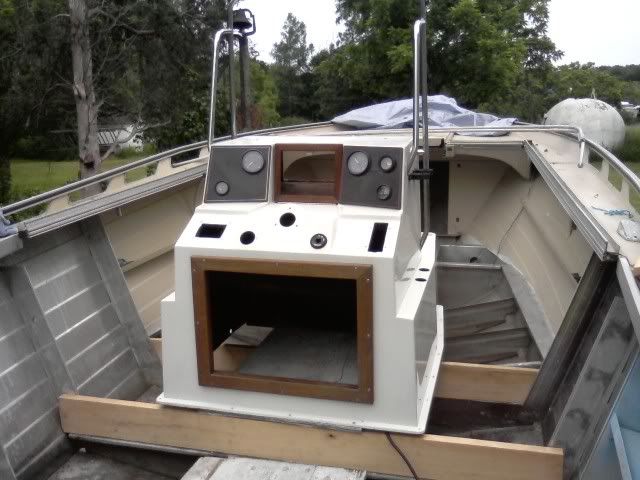
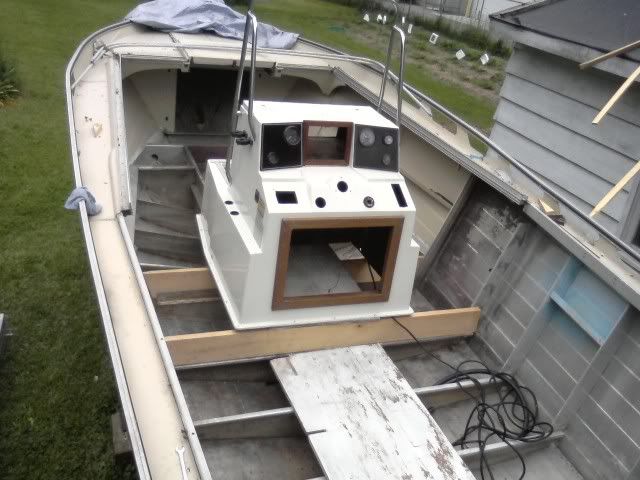
Hello, Im new here, but not to boating. I grew up on the western basin of lake Erie. I have built some small boats for duck hunting. I'm starting my first big project. I have a 24 foot Lonestar Cruise liner III that I have gutted and am going to make into a CC. I have a couple of questions. First is inreferance to placement of the gas tank. The one that was in it was steel. It is being replaced. I found for free, a 41 gal aluminum below deck tank. It's bigger than I wanted, but the price was right. I have two places that it can be placed. One is in the bow of the boat. In front of where we are going to place the CC. The other is partialy under the back of the CC, that we would have to build up a little to make it fit. I will not be keeping the gas tank full. Maybe 2/3's full. The question is: Will it be to much weight (180lbs) in the bow of the boat if its placed there. or would it be better if it was placed closer to the stern of the boat. Second question: As far as placement of the CC. How does one figure out the best placement of it so the boat rides right.
here is a couple of pictures that may help.
http://i187.photobucket.com/albums/x249/darkness_illuminated/0204091443.jpg
http://i187.photobucket.com/albums/x249/darkness_illuminated/0204091442.jpg
http://i187.photobucket.com/albums/x249/darkness_illuminated/CenterConsole.jpg
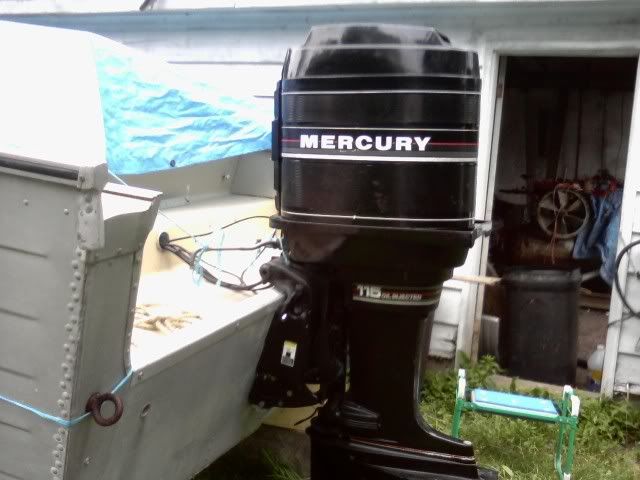
Im replacing the motor with a 115 merc and want it to float right. Is there any formula to figure it out. Or should I just set every thing in the boat where I want it and put it in the water. Thanks for any help you can give.

Dan
 
Last edited by a moderator:

a70eliminator

Captain
Joined
Sep 9, 2007
Messages
3,694
Re: Help with a new project, Please.

Welcome Dan, you came to the right place, though your questions would be better asked in the building and restoration section of the forum, a moderator may just come in a move it there for you.
Anyhow it's good to see another local I frequent the eastern basin of Erie. and I can sure relate to the snow in your pictures too.
If you end up staying around go and fill out a profile that way it will show where your from like mine does at the top of the page.
Very cool looking boat lots of potential there.
 

Bob_VT

Moderator & Unofficial iBoats Historian
Staff member
Joined
May 19, 2001
Messages
26,022
Re: Help with a new project, Please.

Wow.... welcome to iboats. PLEASE resize your pictures in photobucket to 640 x 480

Nice boat! Should be a good conversion.
 

drewmitch44

Lieutenant Commander
Joined
Jun 26, 2005
Messages
1,749
Re: Help with a new project, Please.

Is that a aluminum boat? I like that boat it has HUGE potential! Its going to make a great center console!!!
 

drewmitch44

Lieutenant Commander
Joined
Jun 26, 2005
Messages
1,749
Re: Help with a new project, Please.

Oh and i dont know if there is a rule about the picture size but i think your pictures are perfect size. I just dont like pics that make me have to scroll left and right in the browser. These pics fit nice into the window without being too big so that people have to scroll left and right to read your post. Welcome to Iboats!
 

Dan_o

Seaman Apprentice
Joined
Feb 20, 2009
Messages
36
Re: Help with a new project, Please.

yes it is an aluminum boat. Also feel free to move it to the other thread. I can't wait for spring to show up so my brouther and I can start working on it. I'll fix my profile asap. Thanks Dan
 

a70eliminator

Captain
Joined
Sep 9, 2007
Messages
3,694
Re: Help with a new project, Please.

I'm thinking the steering and control box length will be more of a factor in placement of the console than astetics and balance, anywhere midship would good give or take a foot or two, i wouldn't think balance would be too big an issue on a boat that size, as for the fuel tank, in the bow it's going take a pretty good beating again somewhere midship below decks would be the cats *****. I'm not qualified to give advise only voice my opinion.
 

Willyclay

Captain
Joined
Sep 8, 2006
Messages
3,240
Re: Help with a new project, Please.

I am not an expert but did have a 1965 Lonestar Medallion II 16.5ft aluminum boat for one of my five project boats. It looked very much like yours both inside and outside. In the process of replacing a rotten transom, I learned that in 1962 Lonestar began using what they called "Foam Pac" construction. This was poured or injected foam between the deck/floor and the hull. My boat had ZERO stringers because the foam was bonded to the underside of the plywood deck/floor and that provided the structural integrity. Good luck with your project!
 

Dan_o

Seaman Apprentice
Joined
Feb 20, 2009
Messages
36
Re: Help with a new project, Please.

I don't know what constitutes a stringer, but it does have aluminum pieces running from side to side and fore and aft. We are thinking about how we are going to foam it. I think we are going to use dry cleaning plastic in the different sections of the bottom of the boat to be able pull out the foamed areas after were are done. I also think we are going to put down some half round pieces running from side to side, so when they are removed, water has a place to run thru to the bilge. From the table in one of the forums, from what I understand, in boats that are 20' or longer you don't need to have foam. Is this right? We are still putting foam in, but wondered if that was right.
 

Dan_o

Seaman Apprentice
Joined
Feb 20, 2009
Messages
36
Re: Help with a new project, Please.

Well we don't have the steering system yet, so what ever we need we will buy. As far as the controls, we have thoses, but if we have to buy cables to get the CC where we want it, we will. We have some very nice salvage yards in our area. So we will be able to get what we want cheaply.
 

Bob_VT

Moderator & Unofficial iBoats Historian
Staff member
Joined
May 19, 2001
Messages
26,022
Re: Help with a new project, Please.

21' aand under require foam. Many aluminum boats use solid foam boards laid in place loose under the deck.

For your controls you can run them under the deck inside pvc pipe so they do not come in contact with the hull. a smooth tube allows for easy fishing of a cable through.
 

jonesg

Admiral
Joined
Feb 22, 2008
Messages
7,174
Re: Help with a new project, Please.

If you look at a lot of CC , they follow a general pattern, the console is placed just fwd of center of the deck deck with the tank starting just under or just back of the console, extending back to the bilge area.
I wouldn't put it in the front.

Looks like a super project.
 

Dan_o

Seaman Apprentice
Joined
Feb 20, 2009
Messages
36
Re: Help with a new project, Please.

Well it's been a while, but the boat that I'm working on is not in my back yard. I hope it will be soon. It's actually 2 1/2 hours away. Anyway, My brother and I worked on it this weekend. Which had brought up a lot of questions. We cleaned out the bottom of the boat. Then we power washed it. When we power washed it, we found that there were a lot of leaks. First I will tackle the worst problem I see. The boat is made out of four sheets of aluminum that were pressed in a huge press to form. Then they were riveted together. Well the seam that connects the side of the boat to the bottom section leaks. I mean the whole seam, front to back. It has a thin rubber seal in the seam. I believe that the rubber piece has shrunk over time. The boat is 40 plus years old.

I plan on getting a air rivet gun and tighten each rivet in the lenght of the seam. I have already bought a quart of Gluvit and plan on applying it to every rivet and the lenght of the seams on both sides. The keel of the boat seams to be pretty sound. (no leaks) All metal looks very good.

Here is a picture of the boat. The seam in question is where the red paint stops and the bear aluminum starts. The seam runs just under the edge of the side of the boat.

http://i187.photobucket.com/albums/x249/darkness_illuminated/0523091444a.jpg

There were approx. 16 rivets that had been replaces with SS slot head bolts and nuts. We removed them and drilled out the holes a little and replaced them. That project went pretty well. The next problem was where we removed the old engine. The holes didn't match up. I know, it was more than I should of hoped for. The problem was that the holes were very close to where they needed to be. Like they were off just by half a hole. I could see no way of drilling a new hole, without first doing something about the old holes. What we decided on was putting a wood plug in the hole with garilla glue on it. The plugs were cut so they would be only as thick as the transum wood. As it was drying we cleaned out the excess glue. When it was dry we used a puddy knife to put JB weld into the hole so it would be flush with the surface of the transum. This is not a finished picture. We will do two layers of JB weld.

Here is a couple of pics.
http://i187.photobucket.com/albums/x249/darkness_illuminated/0525091745.jpg
http://i187.photobucket.com/albums/x249/darkness_illuminated/0525091745a.jpg

Any coments on the hole problem would be appresiated.

Here are some pictures of the boat with the old and new motors. The new motor is just sitting on the transum. We thought it would be the best place to store it. Other pictures are of the cleaning process. (next post)

http://i187.photobucket.com/albums/x249/darkness_illuminated/0523091444.jpg
http://i187.photobucket.com/albums/x249/darkness_illuminated/0523092013.jpg
http://i187.photobucket.com/albums/x249/darkness_illuminated/0523092040.jpg

I had too many pictures so go to next post. Thanks for any input. Dan
 
Last edited by a moderator:

Dan_o

Seaman Apprentice
Joined
Feb 20, 2009
Messages
36
Re: Help with a new project, Please.

I'm looking for something to remove the oxidation around the rivets before we put the gluvets down. We wirer brushed them and used that stuff that is like a brillow pad. Someone on here posted that they used deluted acid. Where would I buy the acid at. We tryed aluminum naval jelly, but that didn't work too well. How well does the Gluvits work. I mean if I can't get the seam to seal, will the gluvits work. Or should I look for a new boat.

http://i187.photobucket.com/albums/x249/darkness_illuminated/0523091749a.jpg
http://i187.photobucket.com/albums/x249/darkness_illuminated/0523091750.jpg
http://i187.photobucket.com/albums/x249/darkness_illuminated/0523092040a.jpg

If anyone sees anything or thinks of anything please post up. Thanks for any input. Dan
 
Last edited by a moderator:

ezmobee

Supreme Mariner
Joined
Mar 26, 2007
Messages
23,767
Re: Help with a new project, Please.

Looking good. Love that all aluminum structure. Glass boat owners eat your hearts out!
 

erikgreen

Captain
Joined
Jan 8, 2007
Messages
3,105
Re: Help with a new project, Please.

Nice boat.

Honestly, while I think Gluvit is a good solution for the smaller aluminum boats out there, for a boat the size of yours I'd look at a higher end solution, like welding the seam to seal it.

The amount of stress placed on the seam will be proportional to the size of the boat in some ways, and while gluvit is a good sealant it strikes me as the "wrong" way to go... kinda like a patch more than a fix. It's on the inside of the joint instead of inside it.

Assuming you don't want to replace the rubber seal, I'd personally either remove the rivets from that joint (yep, all of 'em) and remove the old seal, then either weld it tight or else use something else to seal the edges like 3m 5200.. re-install the rivets with the 5200 wet and wipe off any excess, and you should have a watertight seal that'll last forever.

Personally I'd get it welded.. that hull is gonna last a long time.

Erik
 

Dan_o

Seaman Apprentice
Joined
Feb 20, 2009
Messages
36
Re: Help with a new project, Please.

When we power washed the seams, the water leaked out pretty good. Someone had put silicone along the edge of the seam, which I feel kept the water from just flowing thru. My point is that if I remove the silicone and force 5200 into the seam, then tap the rivets to tighten up the seam, followed up with gluvit over that. I hear you about welding it, but If I remove the rivets, then the rubber seal, what will I do with all the rivet holes. Get it welded, then replace the rivets? The rivets weren't leaking, the fact that the rubber seal had shrunk is what was leaking. Or at least that's my take on what I saw.

just thinking outloud. thanks, Dan
 

NoKlu

Senior Chief Petty Officer
Joined
Feb 23, 2008
Messages
786
Re: Help with a new project, Please.

If you can't get it welded,I would drill out the rivets and replace the seal, and put in new rivets. It needs to be done right the first time. With the added weight of the cc working on the structure of the hull you want it solid so you are not chasing leaks after you get the interior finished. If you do weld it you could get the welder to fill in the holes.
 

Dan_o

Seaman Apprentice
Joined
Feb 20, 2009
Messages
36
Re: Help with a new project, Please.

Got a little more done on the boat last weekend. Got the motor mounted and wired up, ( at least as far as the motor was concerned.) Got the gas tank in and mounted. Had to find some rubber to put ontop on the aluminum floor supports that the gas tank rests on. I used a rubber weather strip thats suppose to go under a garage door. used adheasive to keep it in place. then sat gas tank in place and bolted it down. here's a couple pics of the motor.

0616091939.jpg

0616091939b.jpg


We also sat the CC in the boat to see what it will look like. Not too bad, seams to take up more space than we wanted. It will work. we needed to extend the floor to mount the CC on. I went to the local Amish farm an ordered cusyom cut oak boards for floor joices. I got 1 that was 1.5" X 6.25" X 73", the second board was 1" x 6.25" x 76" the third board was 1.5" x 5" x 48" Board were very nice and clean, only one small knot in two of the boards. The guy had a bill of $ 6.70 for the wood and custom cutting it. I felt bad, so I payed him $10.00. You can see them in the pictures.

0616091851.jpg

0616091852.jpg


I also bought the fuel lines to the gas tank we are putting in. Talk about expensive $27 for a 10 foot piece of 3/8" $24 for a 6 foot piece of 5/8 and $30 for a 6 foot piece of 1.5" .

Most everything is ready, just need to finish up the rivets and foam.
 
Top