


jpmurphy
Petty Officer 1st Class
- Joined
- Jan 14, 2009
- Messages
- 358
TD:
Decided to take advantage of the warm temps today and got serious with the cleaning of my hull. Shop temp @ a balmy 62 degrees, only one set of long johns instead of the usual four, we're ready to rock and roll.
TD in response to you cleaning your toon, heres my "formula" so far. I have found that nothing is going to work but good ol elbow grease and stick with itness. Heres what we have so far.
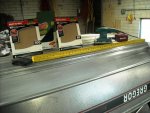
Pic #1 is after machine sanding with #60 grit and then again with #100 grit paper. All of the oxidation is removed and 80% to 90% of the pitting is gone.
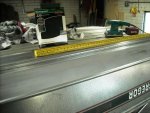
Pic #2 is after machine sanding with #220 grit paper. 99% of the pitting is gone. I used scotch brite pads to buff between each sanding phase.
You have to use a lot of sand paper, frequently replacing the used paper with new. I noticed that the sand paper will pickup residue which creates a clog effect that results in a burr on the paper. This will leave trails of scratches on the metal that have to be sanded out just like the original pits.
Using clean paper results in a cleaner/smoother end result.
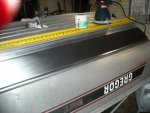
Pic #3 is after I made a pass over with #000 steel wool, applied 3M alum Restorer/Polish by hand and buffed out again by hand. There remains that 1% of pits in the metal.
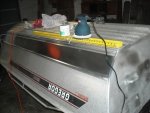
Pic #4 is after I made one pass over with #000 steel wool, hand applied the same 3M compound and machine buffed. There remains that 1% of pits.
Its hard to see in the pics #3 & #4 but the pits still show up. The more you buff, the more they show. Or at least it seems that way to me. Maybe I'm too much of a perfectionist, but I want a clean shinny finish.
Be prepared to spend a lot, a lot, I say a lot of time doing this. The section in the pics is 5 feet long by about 6 inches high. This area took me about 3 hours to do, and it still has to have the final polishing done.
So far this my formula as you requested. Unless lightning hits me between the ears, these are the steps of the process I'll follow. I spoke to the owner of my local boat repair shop and he suggested a 2-step compound that was totally cost prohibitive. My nephew who does auto body repair came and looked at the boat and his parting words were "sand it sand it sand it". So there I am, sanding it. Be sure to keep you paper clean, drink beer, dust the work area constantly, drink beer, don't play the music too load, drink beer.
After I have the entire hull cleaned and polished with the 3M restorer, I will most likely do a final buffing with an aircraft polish to get the high luster and protective finish I am hoping for. Hope this little bit helps you with your toon cleanup.
Decided to take advantage of the warm temps today and got serious with the cleaning of my hull. Shop temp @ a balmy 62 degrees, only one set of long johns instead of the usual four, we're ready to rock and roll.
TD in response to you cleaning your toon, heres my "formula" so far. I have found that nothing is going to work but good ol elbow grease and stick with itness. Heres what we have so far.
Pic #1 is after machine sanding with #60 grit and then again with #100 grit paper. All of the oxidation is removed and 80% to 90% of the pitting is gone.
Pic #2 is after machine sanding with #220 grit paper. 99% of the pitting is gone. I used scotch brite pads to buff between each sanding phase.
You have to use a lot of sand paper, frequently replacing the used paper with new. I noticed that the sand paper will pickup residue which creates a clog effect that results in a burr on the paper. This will leave trails of scratches on the metal that have to be sanded out just like the original pits.
Using clean paper results in a cleaner/smoother end result.
Pic #3 is after I made a pass over with #000 steel wool, applied 3M alum Restorer/Polish by hand and buffed out again by hand. There remains that 1% of pits in the metal.
Pic #4 is after I made one pass over with #000 steel wool, hand applied the same 3M compound and machine buffed. There remains that 1% of pits.
Its hard to see in the pics #3 & #4 but the pits still show up. The more you buff, the more they show. Or at least it seems that way to me. Maybe I'm too much of a perfectionist, but I want a clean shinny finish.
Be prepared to spend a lot, a lot, I say a lot of time doing this. The section in the pics is 5 feet long by about 6 inches high. This area took me about 3 hours to do, and it still has to have the final polishing done.
So far this my formula as you requested. Unless lightning hits me between the ears, these are the steps of the process I'll follow. I spoke to the owner of my local boat repair shop and he suggested a 2-step compound that was totally cost prohibitive. My nephew who does auto body repair came and looked at the boat and his parting words were "sand it sand it sand it". So there I am, sanding it. Be sure to keep you paper clean, drink beer, dust the work area constantly, drink beer, don't play the music too load, drink beer.
After I have the entire hull cleaned and polished with the 3M restorer, I will most likely do a final buffing with an aircraft polish to get the high luster and protective finish I am hoping for. Hope this little bit helps you with your toon cleanup.
")