fonthillhdtv
Seaman Apprentice
- Joined
- Jun 24, 2008
- Messages
- 41
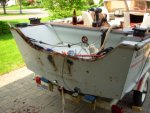
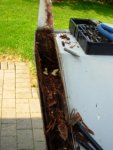
I?m well into the replacement of my transom on a late seventies alum. runabout.
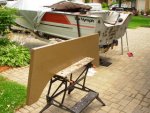
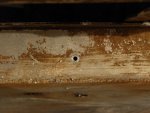
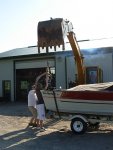
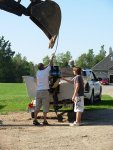
The 80 merc was removed with the help of a friends excavator. The wood in the transom was completely destroyed in some places but in others around the motor mount and tie down hooks the ply was as hard as concrete that the chain saw and auger bites would start smoking. Think maybe it was soaked in some kind of penetrating epoxy. It took about 4 hrs to remove it completely but it was about 95* outside that day. Since I did not get anything out I could use as a template, I clamped a piece of 1/8 ply to the back of the boat and traced it.
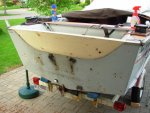
Then cut it and played around till it fit. Then I used that to lay out the pattern on the 2 pieces of 3/4 and 1 piece of 1/2 . I then cut them to size and epoxied them together with urethane glue like gorilla glue and alot of screws. I let that set up for a day then coated the whole thing in 3 coats of smith and co. clearPenetrating epoxy sealer then 4 coats of epoxy paint. I then used there epoxy filler to fill all the holes I had drilled over size. Then installed the the transom with pl construction adhesive and alot of clamps to keep the holes lined up. That's as far as I've gotten . My one problem I haven't solved yet is the drain tubes for the splash well. I cannot find any longer then 2 inches locally. I was hoping to find something I didn't have to flare on one end but no luck yet.
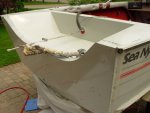
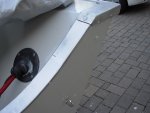
Yesterday I got most of the stainless steel screws in and sealed and the primer coat of paint on . The transom trim cap turned out to be full of pin holes when I tried to clean it up. A local shop is making up a new aluminum cap for about $60.00 expensive but it will keep the water out of the transom.
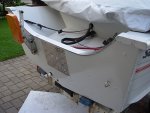
Got a coat of finish paint on the boat last night looks very good. I also tackled the left console last night the wood on the dash is old and cracked so I?m going to replace it will new .
The 80 merc was removed with the help of a friends excavator. The wood in the transom was completely destroyed in some places but in others around the motor mount and tie down hooks the ply was as hard as concrete that the chain saw and auger bites would start smoking. Think maybe it was soaked in some kind of penetrating epoxy. It took about 4 hrs to remove it completely but it was about 95* outside that day. Since I did not get anything out I could use as a template, I clamped a piece of 1/8 ply to the back of the boat and traced it.
Then cut it and played around till it fit. Then I used that to lay out the pattern on the 2 pieces of 3/4 and 1 piece of 1/2 . I then cut them to size and epoxied them together with urethane glue like gorilla glue and alot of screws. I let that set up for a day then coated the whole thing in 3 coats of smith and co. clearPenetrating epoxy sealer then 4 coats of epoxy paint. I then used there epoxy filler to fill all the holes I had drilled over size. Then installed the the transom with pl construction adhesive and alot of clamps to keep the holes lined up. That's as far as I've gotten . My one problem I haven't solved yet is the drain tubes for the splash well. I cannot find any longer then 2 inches locally. I was hoping to find something I didn't have to flare on one end but no luck yet.
Yesterday I got most of the stainless steel screws in and sealed and the primer coat of paint on . The transom trim cap turned out to be full of pin holes when I tried to clean it up. A local shop is making up a new aluminum cap for about $60.00 expensive but it will keep the water out of the transom.
Got a coat of finish paint on the boat last night looks very good. I also tackled the left console last night the wood on the dash is old and cracked so I?m going to replace it will new .