Re: 1975 25hp johnson question about waterpump
Awakening a Sleeping Outboard (with formatting):
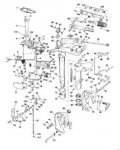
First get yourself a manual, there is a ton of help on this board but to be fair, and so that you can learn, a reference book is a must. They can be found for sale on many sites, a few of which are kencook.com, marineengine.com theoutboardwizard.bizhosting.com, maxrules.com, and iboats.com. Although some folks use Seloc or Clymer manuals, they cover a range of engines and sometimes details are omitted. The reprints of the original OMC manuals are the most specific to your particular engine. Get one of them.
If any steps prove challenging or if there are questions about any of the processes, post a question in the forum here. You will receive an answer from one or more of the many experienced veterans here. Another source of help might be the history of posts here. Your question or problem may have already been asked/answered. Use the search feature to locate those posts.
Let?s get started.
Lower Unit ? Remove the prop and any fishing line that may be tangled or wound around the prop shaft. If the shaft is splined, apply a coat of marine bearing grease to it before re-installing the prop. If an inspection of the prop indicates any damage that could cause a vibration or imbalance, replace it or have it repaired. The rubber bushing securing the hub to the prop itself may also need replacing, but that probably cannot be determined until boat-tested.
Remove the drain screw (bottom) from the lower unit and observe the quality of the lube as it exits. If it is milky, there has been water intrusion. If you observe metal shards, there may be gear damage requiring a re-build of the lower unit. If it is empty, there may be other problems. Remove the vent screw (top screw) to allow complete draining. Replace the vent/drain screw gaskets with new ones (OMC used three different types of drain/vent screws. One with a flat face that requires a fiber gasket, one that has a raised ridge on the sealing face that uses a nylon washer, and one that has a face groove that uses an o-ring.) If none of the above mentioned situations exists, fill with lube from the bottom screw hole until lube emerges from the vent hole. Insert and tighten the vent hole screw before removing filler tube from drain hole. Then install the drain hole screw. You may loose a few drops of lube, but there?s sufficient capacity in the lower unit that it won?t matter. Lube should be available from any oil outlet and labeled as suitable for outboard lower units.
Note: Electric shift lower units require different lube than manual shift units. You can use BRP Premium Blend or Sierra Type C. Do not use Sierra Type Premium Blendrent product and meant for manual shift units.
Water Pump ? Using your manual as a reference, replace the water pump ? if not the complete pump, by all means replace the rubber impeller. This is absolutely necessary on motors of unknown history or on motors that haven?t had a new one in a couple of years.
Cylinder Walls ? If not already, lay the motor so the sparkplugs are up. Remove them and put in a few squirts from an oil can filled with TCW-3 oil. Move the engine around so that the oil will contact cylinder walls. Allow it to soak for a day or two. By hand, rotate the flywheel a couple of times. If it resists rotating, allow to soak longer. When flywheel finally rotates freely, install new sparkplugs.
Spark ? Pull the plug wires from the sparkplugs. Your spark should jump a minimum of a 3/8" gap with a hot thick spark. If it doesn?t, you need maintenance on the ignition system. Check the sparkplug cables for cracked insulation. Otherwise, the needed maintenance will be determined by type and year of motor you?re working on. Refer to your manual. Replace the spark plugs with the manufacturer's recommended plugs, keeping the old ones as spares.
Wiring ? Check all engine wiring for brittle insulation or fraying. Brittle and cracking insulation is quite common on older motors. This would necessitate re-wiring or installation of a new wiring harness.
Lubrication ? Lube all moving parts including the throttle linkage (white lithium) and steering shaft if it has a grease fitting(chassis lube is OK).
Carburetors ? Remove and disassemble carburetor(s). Soak in carb. cleaner or spray with aerosol carb. cleaner, paying particular attention to all small passages and fuel-ways. Blow dry with compressed air, again, paying particular attention to internal passages. Reassemble using an appropriate carburetor rebuild kit. If kit doesn't include a new needle and seat, get one. If the float is cork, replace it with a plastic one. Some kits include them. If the float is plastic, make sure the integrity has not been compromised and it still floats with no fuel inside it. Re-install and link and sync according to your manual. Replace all under-cowl fuel lines.
Fuel pump ? Using your manual as reference, remove fuel pump and clean metal parts with carb. cleaner. Install a new fuel pump kit, or replace fuel pump entirely. Replace fuel filter and any vacuum hoses that may be connected.
Fuel tank ? Replace the fuel line along with the squeeze bulb (OEM bulb preferred). Note: on dual-line tank, there is no squeeze bulb. Drain fuel tank. With a flashlight, inspect for dirt, debris, or rust. If OK, rinse and refill with correct fuel/oil mix. If it?s not OK, steps will have to be taken to thoroughly clean/remove rust and buildup. Otherwise it must be replaced. If there are quick release connectors on the fuel lines, check the small o-rings at either end. Replace if necessary.
Controls - If remote control, check throttle and gearshift cables for proper operation. Mine were frayed and rusted and had to be replaced.
Carburetor Adjustment - For those small Johnson, Evinrude, and Gale motors with adjustable jets, adjust carburetor as follows per instructions of Joe Reeves:
(J. Reeves)
Initial settings are: Bottom high speed = seat gently, then open 1 turn out. Top slow speed = seat gently, then open 1-1/2 turns.
Setting the high and low needle valves properly:
NOTE: For engines that DO NOT have a shift selection, obviously there is no NEUTRAL position. Simply lower the rpms to the lowest setting to obtain the low speed needle valve adjustment.
(High Speed) Start engine (it will run pretty rough), shift into forward gear, take up to full throttle. In segments of 1/8 turn, wating for the engine to respond between turns, start turning in the bottom high speed needle valve. You'll reach a point whereas the engine will either start to die out or spit back (sounds like a mild backfire). At that point, back out the needle valve 1/4 turn. Within that 1/4 turn, you'll find the smoothest setting.
(Low Speed) Slow the engine down to where it just stays running. Shift into neutral. Again in segments of 1/8 turns, start to turn the top needle valve in. Wait a few seconds for the engine to respond. As you turn the valve in, the rpms will increase. Lower the rpms again to where the engine will just stay running. Eventually you'll hit the point where the engine wants to die out or it will spit back. Again, at that point, back out the valve 1/4 turn. Within that 1/4 turn, you'll find the smoothest slow speed setting.
When you have finished the above adjustments, you will have no reason to move them again unless the carburetor fouls/gums up from sitting, in which case you would be required to remove, clean, and rebuild the carburetor anyway.