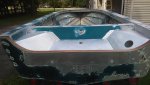
First, that is an AWESOME looking splashwell!!! Really nice work.
As for the 5200, not sure how you plan to apply it to your transom, if you can create a small gap between the transom and the splashwell so you can squeeze a thick bead between the two and then screw together to get squeeze out, that would give you a great seal. As for the aluminum parts, I think I would still stick with squeezing 5200 between the two pieces and then securing them together for a good seal. IMHO As
Watermann has pointed out to me in my thread, its better to clean up 5200 as soon as you apply it for a nice clean look. Hope to use my grinder with wire brush to clean mine up, but then again, my just leave it...