Head gasket installation and potential water flow problems.

fire7882

Petty Officer 2nd Class
Joined
Jul 15, 2008
Messages
172
This is a little long but I thought I would include as much info as possible. I think there is some head gasket installation confusion that prevents proper cooling of the lower starboard cylinder on Evinrude/Johnson V4 powerheads. My service manual(Clymer. Yea, I know) doesn't give very detailed head installation instructions so I thought I would throw this out there as well as ask a few question. I just got into boating and I've acquired 3 90 hp v4 motors in the process of trying to get one good one and all three had problems with the lower starboard cylinder.

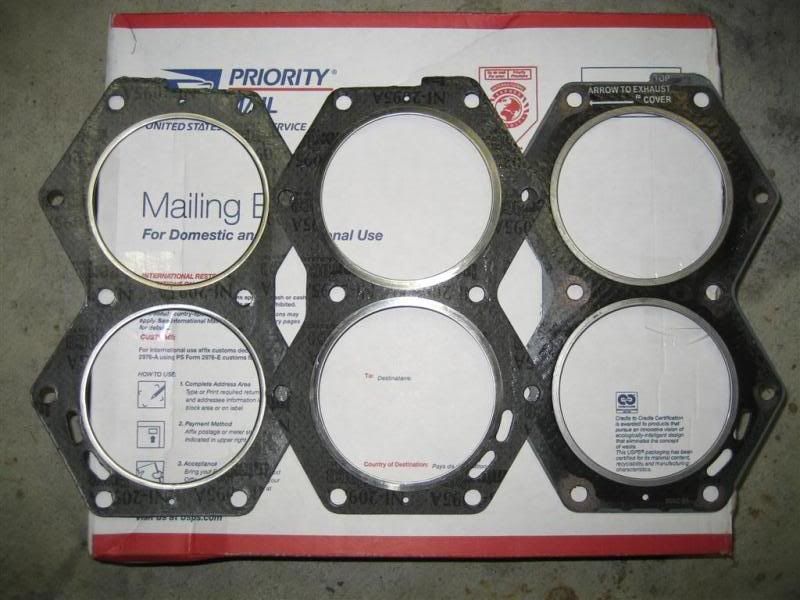
I just got finished assembling the block I have been working on in this thread.Block Damage Thread Since this block has had its problems, I have been checking and rechecking everything as I go along. I stopped by the marine parts store today and grabbed a couple head gaskets so I could go ahead and finish things up. I'm now having trouble deciding how these thing are installed. I have 2 new, never installed Mallory 9-63828 head gaskets(replaces jonny/rude # 318358) and one new but previously installed Sierra 18-2956 (also replaces jonny/rude # 318358). This powerhead is from a 1988 90 hp V4, model # E90TLCCA.

The first gasket is a Mallory with the thin side of the metal ring facing up. The second is the other Mallory with the wide side of the metal ring facing up. The last one is the Sierra with the wide side up. All gaskets are the same symmetrically.
IMG_2405Large.jpg


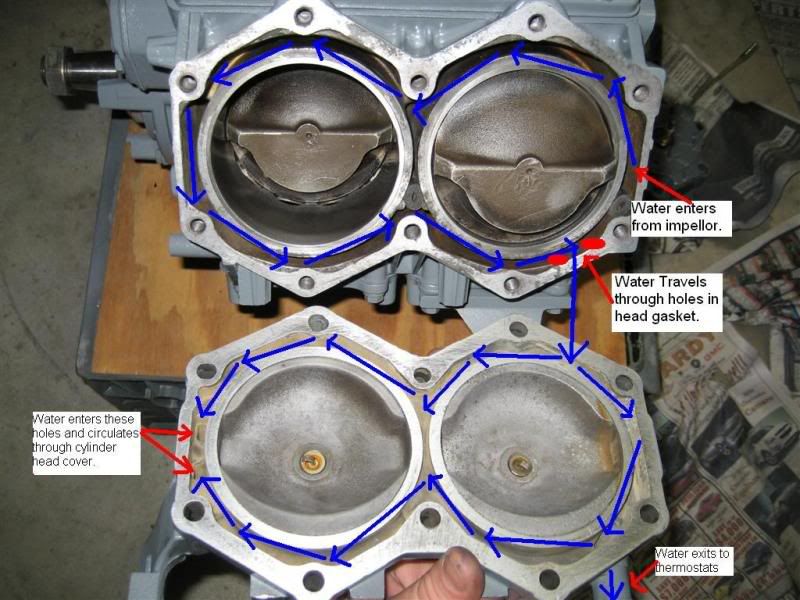
Below are a few pictures showing how I think the water should flow through both the port and starboard side of the engine. First I'll discuss the port side.

This is how I believe the flow of water should travel through the head.

IMG_2416Large.jpg


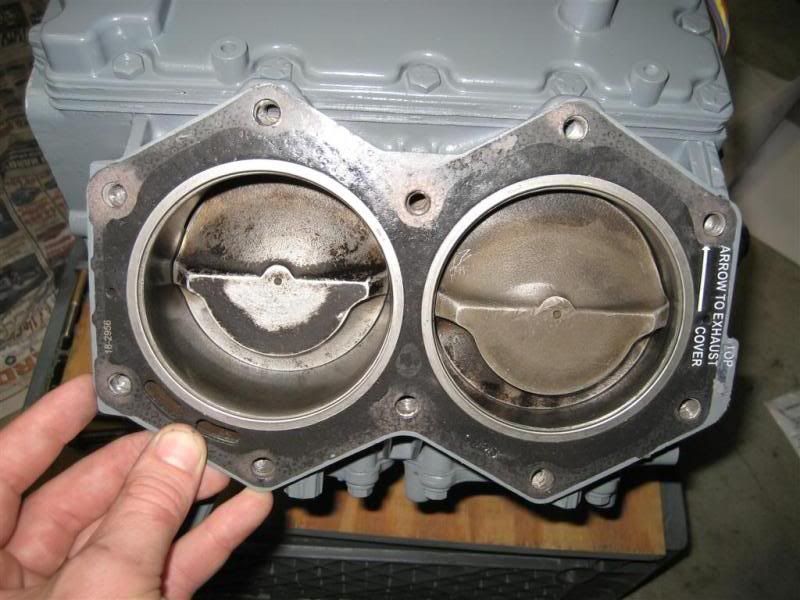
This is how the head gasket would need to be installed for the holes to end up in the correct location. The notation on the tab of the head gasket (left side in this picture) reads "Top, Arrow to Exhaust cover" You can see this wording in the picture of all the gaskets. I assume top means the top side of the block and not facing up toward the head. Also. notice that the metal cylinder sealing ring has the thin side contacting the Head.
IMG_2410Large.jpg


Now, on the starboard side, I believe the water should flow like this.

IMG_2415Large.jpg


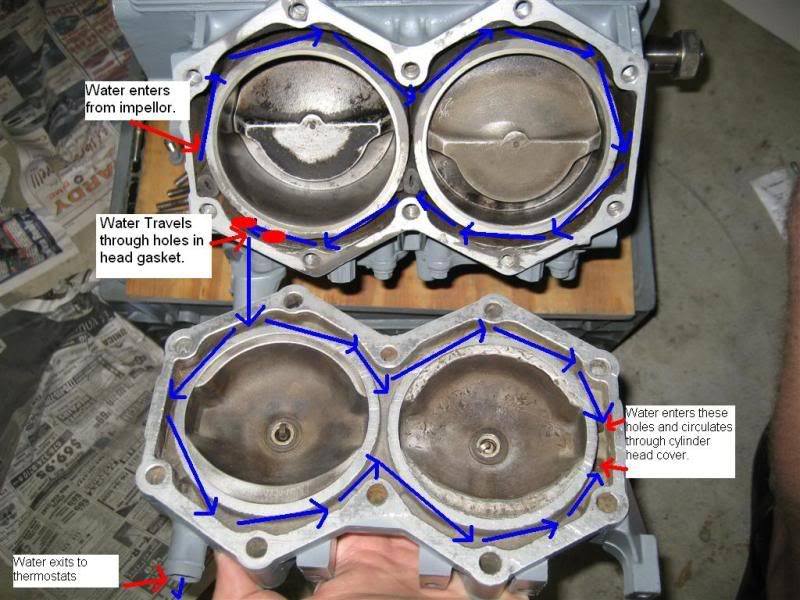
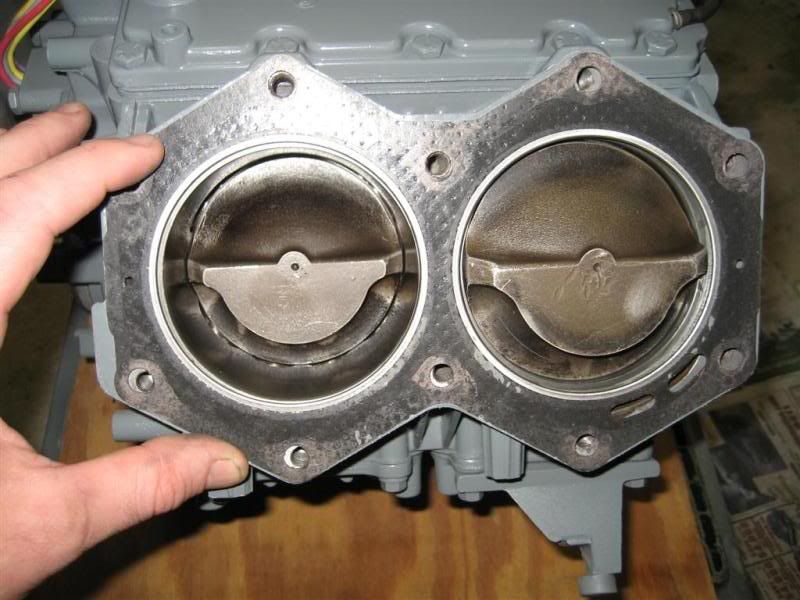
With the holes in the proper location, the wide band is now facing up. The gasket is also installed properly according to the notation on the tab.

IMG_2413Large.jpg


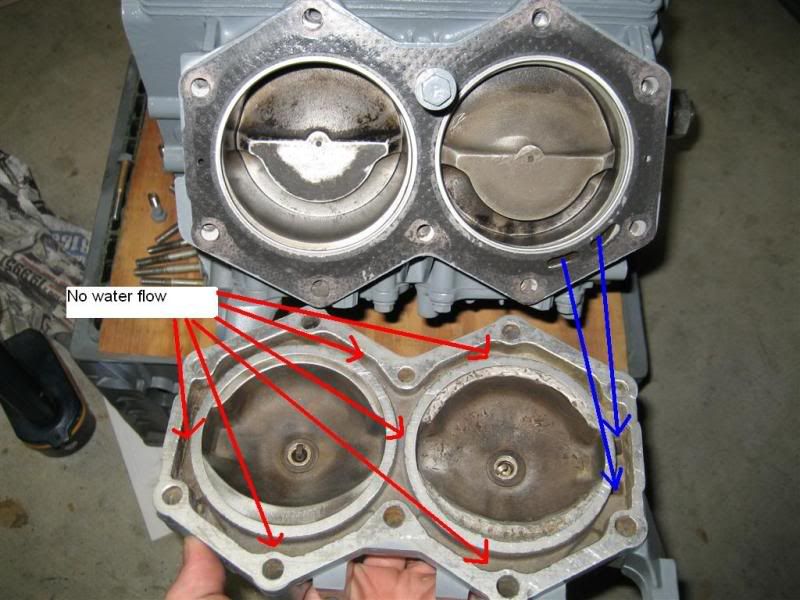
If you put the thin band up like the other side, the holes position would prevent the lower cylinder from getting proper cooling. As you can see, water would also bypass most all of the passages in the head before it reached the cylinder head cover. Here you can also see that this upper cylinder also suffered some damage.

IMG_2417Large.jpg


The Mallory gaskets I bought today didn't have any kind of installation notes on them like the Sierra gasket did. I would think this could cause some confusion to someone who hasn't worked on these motors before(like me). It wouldn't be hard to assume that the similar sides of each gasket should be making contact with the same surface, either head or cylinder.


Now a couple questions.

Does it matter which side of the metal sealing ring makes contact with the head? I assume it doesn't and the most important thing is to have the water passages in the correct place.

Have my assumption be correct? Any advice, suggestions, or additional info?
 

daselbee

Commander
Joined
Jan 20, 2009
Messages
2,765
Re: Head gasket installation and potential water flow problems.

Hi...very interesting post. I personally do not know the answer to the gasket question, but I want to warn you about that starboard head.
I would not use it, as the dings and nicks can create hot spots causing pre-ignition and detonation.
If it were mine, I would get a good used head.
 

fire7882

Petty Officer 2nd Class
Joined
Jul 15, 2008
Messages
172
Re: Head gasket installation and potential water flow problems.

Hi...very interesting post. I personally do not know the answer to the gasket question, but I want to warn you about that starboard head.
I would not use it, as the dings and nicks can create hot spots causing pre-ignition and detonation.
If it were mine, I would get a good used head.

I'm keeping an eye out for one on ebay right now. Haven't found any at a reasonable price yet but thanks for the heads up. It will be a while before I'm done so I should have a head by then.

Edit: Just went on ebay to have another look and I found both heads but guess what? The lower starboard cylinder has light damage.

http://cgi.ebay.com/ebaymotors/ws/eBayISAPI.dll?ViewItem&item=230380551289
 

fire7882

Petty Officer 2nd Class
Joined
Jul 15, 2008
Messages
172
Re: Head gasket installation and potential water flow problems.

After thinking about this, I don't see why it would matter which side of the gasket faces the cylinders. The sealing surface is the steel cylinder liner so only the very inner part of the metal ring is used.

Anyone have any input. I'm sure there are people on here who could rebuild one of these with their eyes closed. How have you installed the head gaskets?
 

northernmerc

Chief Petty Officer
Joined
Apr 6, 2009
Messages
401
Re: Head gasket installation and potential water flow problems.

What you say makes sense. If you block off the cooling passages in the head, overheating seems likely.

Who disassembled the three motors? If you did so, did you make a note of the head gasket placement? Had the motors been apart before, or were they still as assembled in the factory? One would think that the factory did it right.
 

fire7882

Petty Officer 2nd Class
Joined
Jul 15, 2008
Messages
172
Re: Head gasket installation and potential water flow problems.

Who disassembled the three motors? If you did so, did you make a note of the head gasket placement? Had the motors been apart before, or were they still as assembled in the factory?

I took them apart but I didn't take note of the gasket placement. I know two of them had been taken apart/rebuilt previously. I'm not sure about the other one but I'll look this weekend.

One would think that the factory did it right.

I agree. Believing these gaskets should be installed with the same side facing the cylinders could be an easy assumption to make. Hopefully we'll have some veterans chime in soon.
 

emdsapmgr

Supreme Mariner
Joined
Dec 9, 2005
Messages
11,551
Re: Head gasket installation and potential water flow problems.

An interesting question. Never had a problem with head gaskets and cooling, but I've always used the factory ones. As you note, the markings on the factory ones clearly denote how they are to be installed for normal cooling-they look like the Sierra, with the arrow. It is pretty foolproof to install them correctly with the arrow stenciled on the top. Likely the engine would run fine with the head gasket reversed, but would quickly overheat. With the head gasket reversed, most of the cooling water would take the path of least resistance, and flow into the crankcase at the bottom then quickly through the holes in the (reversed) head gasket directly into the head, then out the exit pipe of the head, directly into the thermostat housing-most cooling water would mostly bypass the circular flow through the block and the head. If this is what happened, likely the top cylinder would be the one most starved for water and would fail before the lower. If the original head gasket was correctly in place, an idle overheat failure could be caused by either a stuck (closed) thermostat, or the hole(s) in the thermostat valve body is/are plugged. The rubber water diverters are always suspect when this happens, and yours appear to be in good shape. You probably already took the head covers off and checked these head passages for debris-what did you find? Agree with daselbee on the head replacement.
 

ezeke

Supreme Mariner
Joined
Sep 19, 2003
Messages
12,532
Re: Head gasket installation and potential water flow problems.

The gaskets should be positioned so that the tab is located on the sides farthest away from the exhaust cover and at the top of the cylinder banks.

Your gasket with the wording on it should have the same directions printed on both sides.
 

fire7882

Petty Officer 2nd Class
Joined
Jul 15, 2008
Messages
172
Re: Head gasket installation and potential water flow problems.

You probably already took the head covers off and checked these head passages for debris-what did you find? Agree with daselbee on the head replacement.

I didn't find anything under the head covers. They were free and clear. I will also be replacing the head, just haven't had any luck finding one yet.
 

fire7882

Petty Officer 2nd Class
Joined
Jul 15, 2008
Messages
172
Re: Head gasket installation and potential water flow problems.

The gaskets should be positioned so that the tab is located on the sides farthest away from the exhaust cover and at the top of the cylinder banks.

Your gasket with the wording on it should have the same directions printed on both sides.

Thanks for that clarification. It was a little confusing at first because a different side of the gasket was making contact with the cylinders when installed properly. Could be more than a little confusing for a beginner with no guidance printed on the gaskets.
 

bob johnson

Rear Admiral
Joined
Feb 25, 2009
Messages
4,304
Re: Head gasket installation and potential water flow problems.

does this apply to the 60 degree looper motors??

I think i have a little water passage cooling issue..

one head runs hotter than the other 170 ish vs 130 ish

I can see that the head gasket has been previously replaced

do Tstats use gaskets?

or are they rubber on the edge???

because i want to take the T stats out, but I cant find gaskets locally and i want to make sure I can reinstall the same day

bob
 

fire7882

Petty Officer 2nd Class
Joined
Jul 15, 2008
Messages
172
Re: Head gasket installation and potential water flow problems.

does this apply to the 60 degree looper motors??

I think i have a little water passage cooling issue..

one head runs hotter than the other 170 ish vs 130 ish

I can see that the head gasket has been previously replaced

do Tstats use gaskets?

or are they rubber on the edge???

because i want to take the T stats out, but I cant find gaskets locally and i want to make sure I can reinstall the same day

bob

I'm not sure if the looper would be the same. The 170 temp sounds about right. At 130, you either had a thermostat stuck open, mechanical problems, or gauge problems. From your other thread, it looks like you fixed things after changing thermostats.

You said you now have about 165 on both now after changing thermostats. These temps seem right to me because the sensors are reading the temp of the metal, not the water. It takes a little time for the heat energy to transfer from the metal to the water, which is always flowing. This accounts for the different temps.
 

fire7882

Petty Officer 2nd Class
Joined
Jul 15, 2008
Messages
172
Re: Head gasket installation and potential water flow problems.

did you make a note of the head gasket placement?

I looked at one of the heads from the latest blown motor i bought last night. It was clear that the gasket had wasn't installed properly. I could see where the gasket side with the thin metal ring made contact with the head on the starboard side resulting in the situation below.

IMG_2417Large.jpg
 

bob johnson

Rear Admiral
Joined
Feb 25, 2009
Messages
4,304
Re: Head gasket installation and potential water flow problems.

I looked at one of the heads from the latest blown motor i bought last night. It was clear that the gasket had wasn't installed properly. I could see where the gasket side with the thin metal ring made contact with the head on the starboard side resulting in the situation below.

IMG_2417Large.jpg


from what I am looking at in the last pix, it looks like water can get in around that head with no problem.

there is an opening in the gasket so water can go from the block to the head...once in the head were it enters, it just travels around in the passage all around the cylinder.. there even seems to be a small hole in on end to allow more water....

am i not seeing that right?

bob
 

fire7882

Petty Officer 2nd Class
Joined
Jul 15, 2008
Messages
172
Re: Head gasket installation and potential water flow problems.

there is an opening in the gasket so water can go from the block to the head...once in the head were it enters, it just travels around in the passage all around the cylinder

The problem is that the water won't flow across the head because it exits at approximately the same place it enters(shown by the long blue lines from cylinder to head). the lower cylinder also doesn't get as much flow because the water exits the cylinder passages about 6 inches before intended. The picture below shows what the proper flow should be.

IMG_2415Large.jpg


there even seems to be a small hole in on end to allow more water...

The small hole might provide a very small amount of flow, but nothing substantial. If an area the size of a pin head gets hot enough and the water vaporizes, heating within the block will increase exponentially.
 

petryshyn

Commander
Joined
Oct 3, 2001
Messages
2,851
Re: Head gasket installation and potential water flow problems.

IMG_2415Large.jpg


fire7882
I would advise you to change out that center deflector. It doesn't look OEM and it appears to be squeezing out towards the bolt boss. It will restrict the flow and case overheating. I am working on a overhaul that suffered from that and scuffed up 2 pistons. Also be sure the water passage just behind that deflector (approx 1/8" hole) is free and clear. I had to drill the sediment out to remove the blockage.

Cheers....:)
 

fire7882

Petty Officer 2nd Class
Joined
Jul 15, 2008
Messages
172
Re: Head gasket installation and potential water flow problems.

fire7882
I would advise you to change out that center deflector. It doesn't look OEM and it appears to be squeezing out towards the bolt boss. It will restrict the flow and case overheating. I am working on a overhaul that suffered from that and scuffed up 2 pistons. Also be sure the water passage just behind that deflector (approx 1/8" hole) is free and clear. I had to drill the sediment out to remove the blockage.

Cheers....:)

Thanks a ton. New deflectors are in the mail. :) I also found a head for $35 shipped and it should be here next week. I sure don't want any overheating issues down the road.
 
Top