Round one. Fiberglass: 28 Bear: 0

bear_69cuda

Commander
Joined
Oct 10, 2008
Messages
2,109
Gang,

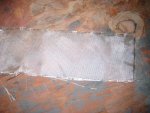
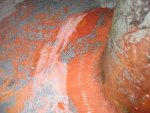
My first trial glassing wasn't the greatest. From the looks of things my grinder is gonna get a workout. Having never done this, I wanted to try on a few seams that opened up on my engine compartment while grinding and removing adhesive. I purchased a small container of Bondo brand poly resin and hardener. And also same brand fiberglass cloth. I cut the glass with scissors, and immediately noticed the ends of the cuts starting to fray, and the weave starting to come apart. (see example of cut piece attached) I figured the resin would help the ends lay flat. I then painted on a layer of resin (maybe too much?) over repair area, then positioned the glass over the resin, and proceeded to wet the glass with brush additional resin, soaking any dry areas, and at the same time pushing out bubbles. While doing this it seemed like my gloves and everything was sticking to everything. A few stands of fiberglass separated from the cloth, so I tried to pull them. Big mistake! I had to walk away and re-group. The resing started to gel-up It now seems like the frayed ends of the glass wouldn't sit down to the substrate. All the edges stick up. I was thinking about trying CSM first, then using fiberglass tape since all the areas I'm glassing are seams, and edges. As I'll be painting Durabak over everything. I don't need things to be perfect smooth, but could use some advice.... The pics show edges and the glass cloth I'm using.

Thanks for any advice in advance.

I've been reading Opps Hull extension pages 83 and 84 about fiber-glassing the deck, and any other threads regarding this process... But think I need more of a 101 how to on the process itself...
 

Attachments

  • jse_transfer_28OCT08_770.jpg
    jse_transfer_28OCT08_770.jpg
    73.2 KB · Views: 0
  • jse_transfer_28OCT08_769.jpg
    jse_transfer_28OCT08_769.jpg
    75.4 KB · Views: 0
  • jse_transfer_28OCT08_766.jpg
    jse_transfer_28OCT08_766.jpg
    71.8 KB · Views: 0

ondarvr

Supreme Mariner
Joined
Apr 6, 2005
Messages
11,527
Re: Round one. Fiberglass: 28 Bear: 0

From your description I thought it might look like a mess, but it looked OK, about normal. Using mat as the first layer will help, it will bond better and the cloth will lay down easier.
 

jonesg

Admiral
Joined
Feb 22, 2008
Messages
7,174
Re: Round one. Fiberglass: 28 Bear: 0

If you think that looks bad, just wait til you really make a mess.

I prefer to place the cloth down dry first and flow the resin into it with the brush, work from the center out gently to prevent the cloth from pulling.
Resist the urge to go back and forth with the brush.
Some guys apply masking tape to the edge of the cloth then cut on the centerline of the tape but if you handle it gently theres less fraying.
 

Bondo

Moderator
Staff member
Joined
Apr 17, 2002
Messages
70,538
Re: Round one. Fiberglass: 28 Bear: 0

Ayuh,... Welcome to the world of Fiberglassing,..:D

That don't look so bad,....
I think the only thing I may have done differently is,...
Create a fillet with peanut butter in the corner,+ fill those Holes seen in the 2nd picture 1st,+ of course a layer of Mat before the cloth...
 

a70eliminator

Captain
Joined
Sep 9, 2007
Messages
3,698
Re: Round one. Fiberglass: 28 Bear: 0

Looks good to me too. My technique is to mix up the resin in plastic bowls (saved from consumable goods) When it comes to little jobs like what you have there, I'll just lay the cloth in the bowl and let it soak up completely, then carefully lift it out and between two fingers wipe off the excess, then just lay it down into position, sometimes I lay a couple strips of ductape along each edge then when cure pull it off and it makes a nice feathered edge.
 

salty87

Commander
Joined
Aug 12, 2003
Messages
2,327
Re: Round one. Fiberglass: 28 Bear: 0

you think it's hard to handle now, wait for the csm. you'll end up with sasquatch hands.

sharper scissors might help with the ends fraying a little. try not to let the piece hang away as you cut it off, flat as possible.

the glass will start to melt into the resin, too late to move it much at that point. get your piece down good and leave it. any loose strands are super-easy to knock off with the grinder once they've set.
 

Bob_VT

Moderator & Unofficial iBoats Historian
Staff member
Joined
May 19, 2001
Messages
26,023
Re: Round one. Fiberglass: 28 Bear: 0

My resin mixing trick is to use a 2 liter soda bottle. You slice it open and you have an instant light weight disposable bowl. Well okay it does cost me a nickle when I do not return it for a deposit.
 

bear_69cuda

Commander
Joined
Oct 10, 2008
Messages
2,109
Re: Round one. Fiberglass: 28 Bear: 0

Thanks for the great advice and kind words!

A few questions.

If I lay down a second layer, do I need to sand surface of first layer?

Should I use a tad less hardener to extend cure life of resin? Or will this greatly reduce total cure? Or inhibit strength?

I'll get some CSM today. I understand this is easy to work in corners, and lays down nice.

I think this process would be easier with out gloves....

I dig the pre-soak and duck tape idea!

I may also make some Oops brand peanut butter... I did think about that when I went over the holes! The glass seems very strong though...

I'm looking forward to Sasquatch hands! :D

Thanks again for the great tips!

This helps greatly and gives me better confidence!
 

Bob_VT

Moderator & Unofficial iBoats Historian
Staff member
Joined
May 19, 2001
Messages
26,023
Re: Round one. Fiberglass: 28 Bear: 0

Probably one of the biggest errors made by people using resin is failing to properly stir it.

The local dollar store is a great place for cheap gloves and cheap brushes. Use once and toss into the trash.
 

salty87

Commander
Joined
Aug 12, 2003
Messages
2,327
Re: Round one. Fiberglass: 28 Bear: 0

if you used laminating resin you won't have to sand what you've already put down. wipe liberally with acetone first. if it was waxed, you'll need to sand before adding another layer.

going forward, pre-cut all your glass for however many layers and lay them all one after another so it all sets as one. goes alot quicker and results should be better too.

you can cut back on the hardener a little, not too much. you might need to work in smaller batches of resin if it's gel'ing too fast.
 

bear_69cuda

Commander
Joined
Oct 10, 2008
Messages
2,109
Re: Round one. Fiberglass: 28 Bear: 0

How do I tell if it's laminating resin? I do know there is no wax... Resin container said it can be painted... Maybe I should scuff up with scotch brite pad?

So your sayin I can lay resin down... Then CSM, wet that out, then directly add the cloth on top of wet CSM?

10-4 on the mixing! Thanks Bob!
 

Utahboatnut

Senior Chief Petty Officer
Joined
Jan 15, 2009
Messages
785
Re: Round one. Fiberglass: 28 Bear: 0

Yes, you can do almost the whole build up if you are quick about your work, as stated before have all of your pieces pre cut and ready to use. I have used the bondo brand before, you can lighten the mek a bit to get a longer work time just don't get crazy or it will never cure right. The cooler the temp the better for working time. I always start with the mat and alternate from there. Also the dollar store gloves,brushes etc are the only way to go yoyu can get like a five pack of wider nylon brushes for like 3 bucks then toss when finished, disposable roller trays work well to especially if you want to pre wet. If you are doing a large area use a roller(very short nap) it goes much faster or use a jonny roller(4-6") with a foam cover. double clean everything with acetone it can never be too clean. I repaired a snowmobile hood with the bondo stuff (damage was right around hinges) and it has held tough for almost 4 years now.... You first attempt looks fine to me you can grind those little hairs off easy and quick and continue on. Real good sicissors and cut on a piece of cardboard then leave it there until you are ready to use, the mat gets even trickier to cut so be prepared...
 

Bondo

Moderator
Staff member
Joined
Apr 17, 2002
Messages
70,538
Re: Round one. Fiberglass: 28 Bear: 0

you can cut back on the hardener a little, not too much. you might need to work in smaller batches of resin if it's gel'ing too fast.

Ayuh,...

Another Trick for extending your Workable Time is to put your Resin Bucket into a larger bucket that has Ice in it...;)
 

Mark42

Fleet Admiral
Joined
Oct 8, 2003
Messages
9,334
Re: Round one. Fiberglass: 28 Bear: 0

Hey! Thats pretty darn good glass work for a first try. You got some great advice here, just keep it up and you'll be a pro in no time!
 

bear_69cuda

Commander
Joined
Oct 10, 2008
Messages
2,109
Re: Round one. Fiberglass: 28 Bear: 0

Round two:

Fiberglass: 6 Bear: 3

I picked up some CSM, 4" tape and a gallon of resin at West Marine, along with some cool cups that hold 250 mL. that are graduated on the side. Also have some graduated syringes to measure MEKP. This help cuz I'm working in mL. not Oz. Now I can make small batches of resin, and not stress about cure time.

As you all stated CSM is fun to work with! :eek: But I did start to get in a groove... Starting with CSM and covering with 4" tape. The CSM sure soaks up the resin! Yes I did seem to resemble Sasquatch! I had some issues with a small rectangular opening in my engine compartment. (access for fuel gauge sender or front motor mount.) I wanted to glass the edges for a clean finish. I'll be mounting a stainless plate on the front for better ease of access... It was obvious the edges and back side were poorly prepped as the glass would not lay down. So I had to bail on that, clean with acetone, and try again later... BTW. A grinder makes short work of the frayed ends I spoke of earlier... I also assume since gel-coat is basically resin with pigment, that properly scuffed and cleaned, it can be glassed over correct?


My bilge area is now super dirty and my engine even covered, has sanding debris all over... Hell there is dust coating my entire garage!:( I hope it's cool to hose the engine down at the end, and rinse out the bilge area, ski storage locker, and let everything go out the drain plug?


Man I have so much respect for folks that glass boats and cars, and end up with mirror finishes.

All the iboat advice was invaluable at the least! I'll post pics of my progress on my 1999 Bayliner project thread. Thanks again for everything! I could not have attempted any of this without you extraordinary folk here on iboats!
 
Top