How do I do this

drewpster

Commander
Joined
Oct 17, 2006
Messages
2,059
I need to build out the edge of the plywood deck in the picture to flush with the edge of the hull in the pic below. I am going from a damaged and ruined aluminum rubrail to a rubber one so the edge needs to be uniform and flush to make the rubber rubrail look right. I considered making some sort of form and building the edge out with epoxy and glass but I am not sure. I need to build out about 1/2 inch for this to be flush. Any ideas?

102_2672.jpg
 

gcboat

Lieutenant Commander
Joined
May 29, 2007
Messages
1,822
Re: How do I do this

You'd think that the deck and the sides of the hull should be screwed together first before the rubrail is attached. I've never seen one that had the rubrail screws being used as the actual securing screws for the deck.
I dunno' about the build-up, but if necessary it would definately be epoxy / cabosil. My $.02
 

erikgreen

Captain
Joined
Jan 8, 2007
Messages
3,105
Re: How do I do this

If your old rubrail was such a big part of the joint between the cap and hull, it's not a good idea to replace it with a rubber rubrail. You should reconnect the joint with an aluminum rail then you can apply the rubber over it if you want to.

If you just use the rubber it probably won't be strong enough to resist twisting and cracking whatever you use to fair under it, and it'll look wrong in short order anyway.

You don't necessarily have to use an aluminum rub rail, but you should reinforce/seal the cap/hull joint strongly before you put the rubber on.

Erik
 

drewpster

Commander
Joined
Oct 17, 2006
Messages
2,059
Re: How do I do this

The picture is a bit deceiving. The gap you see in the picture is actually where the manufacturer was a bit loose in their idea of a finished fit. The deck is secures to the hull via framework inside the hull sides. The rubrail is simply applied using screws to the outside edge you see in the picture. When the deck ply was cut, it was under cut slightly in this area. (stoned worker I assume) The screws for the rubrail actually run into this gap and screw into the wood the deck is secured to. I was planning to fill the gap with 5200 just as an added precaution but I have never had trouble with trapped water here. This boat has allot of freeboard.
I just need to build out the plywood edge for cosmetic reasons. IF I run the rubber rubrail over this area the way it is now it will look twisted as the hull side and the edge of the ply are not flush.
 

maxum247

Lieutenant
Joined
Sep 18, 2007
Messages
1,363
Re: How do I do this

I need to build out the edge of the plywood deck in the picture to flush with the edge of the hull in the pic below. I am going from a damaged and ruined aluminum rubrail to a rubber one so the edge needs to be uniform and flush to make the rubber rubrail look right. I considered making some sort of form and building the edge out with epoxy and glass but I am not sure. I need to build out about 1/2 inch for this to be flush. Any ideas?

102_2672.jpg

Cut a 1/2" filler strip from a peice of plywood the thickness of your deck mix up some thickened epoxy and glue and screw the filler strip in place and fair the strip in. That will fill the void and give something to screw through when you put your rub rail back on, be sure and pre drill all of your screw holes when screwing into the edge grain of plywood.
 

Mark42

Fleet Admiral
Joined
Oct 8, 2003
Messages
9,334
Re: How do I do this

I think using epoxy and thickening it to a paste using wood flour or some other thickener is your best bet. Hard to tell how much you have to fill from the photo, but it is more than 1/4" or so, then I agree with maxum247 and use a small wood filler strip and then smooth with thickened epoxy if needed.

BTW, this resto is a nice project. I remember it from last year or so. You should start a single thread about your project and keep adding to that one thread. People will remember it and keep an eye out for it. You can even add it to your favorites in your web browser so you can find it even if its not updated for a while.
 

Woodnaut

Chief Petty Officer
Joined
Jul 4, 2007
Messages
634
Re: How do I do this

Drew, I think that Maxum247 has the right idea. But since I like to do things in the most complicated and expensive way possible, I would probably use strips of Phillipine Mahogany to fill up the corner area. (Mahogany is very rot resistant, and the Phillipine species is lighter in density and easier to bend than Honduran Mahogany. I also built my boat out of Mahogany, marine plywood and fiberglass, so I obviously favor these materials.)

If you took the Mahogany strip approach to fill the gap, it would make a good, rot-resistant cap for the edge of that plywood. You would attach it in the exact same manner that Maxum has suggested.

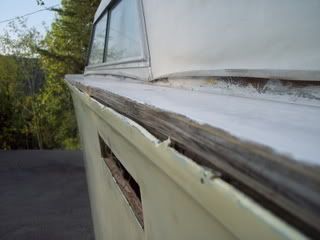
It looks like you have already dressed the edge of the plywood with a belt sander so you probably have a smooth, evenly curved surface to deal with. I would continue by carefully cutting to size and fitting up each strip of wood. Like Maxum said, I would pre drill them, attached them, and pretty much get them fitted in. I would then pull them off and coat the edge of the existing plywood and back side of the Mahogany with thin epoxy to get maximum penetration. I'd then immediately follow with a liberal amount of thickened epoxy to fill any gap and quickly reattach.

After it hardens you can go back with the belt sander (my favorite tool) and use your artistic skills to blend the corner piece in with the deck (on top) and the hull (on the sides). I'd then go back over with another coat of epoxy on the exposed surfaces of the mahogany just to make sure all is covered. Again, this Mahogany approach might just be expensive overkill. :rolleyes:

By the way, are those cabin surfaces canvas covered? I had an old boat back in the 70's like that.
 
Top