Dan Schmidt
Cadet
- Joined
- May 2, 2008
- Messages
- 9
Probably better to start a new thread....
Oh boy. Now I'm up to my elbows in this project..... I did what you guys suggested and took my holesaw to several areas of my deck. You called it --- wet foam.
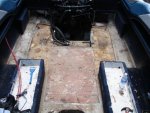
So out came the skillsaw. I cut out the aft deck sections that you can see in the below photos. What I noticed:
1) The foam in the far aft was VERY soaked with wood rot above it.
2) The foam just to the aft of the seat bases was damp but not soaked.
3) This is OPEN CELL foam????? I can't believe it. Why would Bayliner use open cell foam? Seems crazy to me.
4) I found what seems to be foam fill holes used by the factory in the far aft of the deck. Seems Bayliner did their filling here, and then just epoxied over. This epoxy cracked and the rest is wet history....
5) There is another layer of plywood over the fuel tank area. This is very solid (and dry) wood. Clearly no foam beneath and I don't plan to rip this up. Let me know if you disagree.
6) There was a small (~5" x 5") square pc. of plywood floated to the top of the foam on either side of the engine area as you can see in the first picture. What is this for?
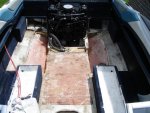
Then, I removed what I could of the foam. This came out pretty easy with a 3" wide scraper.
7) From what I can see of the stringers: they are a nice amber color and show absolutely no signs of rot.
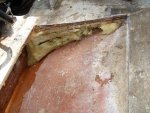
8) It's clear that the far aft of the deck will be more difficult to get up because of the vertical wooden structure behind the rear seats. I need to pull all of this out and rebuild it I guess. Urg..... No other way to get the deck up and the foam out.
9) Further to the bow, I really don't want to mess with the seat bases. These look to be a real pain to tear out and rebuild. I'm tempted to replace the foam in the rear only and call it done. Again, the foam is MUCH more dry in this area (slightly damp, not wet).
I would appreciate any and all constructive comments.
Oh boy. Now I'm up to my elbows in this project..... I did what you guys suggested and took my holesaw to several areas of my deck. You called it --- wet foam.
So out came the skillsaw. I cut out the aft deck sections that you can see in the below photos. What I noticed:
1) The foam in the far aft was VERY soaked with wood rot above it.
2) The foam just to the aft of the seat bases was damp but not soaked.
3) This is OPEN CELL foam????? I can't believe it. Why would Bayliner use open cell foam? Seems crazy to me.
4) I found what seems to be foam fill holes used by the factory in the far aft of the deck. Seems Bayliner did their filling here, and then just epoxied over. This epoxy cracked and the rest is wet history....
5) There is another layer of plywood over the fuel tank area. This is very solid (and dry) wood. Clearly no foam beneath and I don't plan to rip this up. Let me know if you disagree.
6) There was a small (~5" x 5") square pc. of plywood floated to the top of the foam on either side of the engine area as you can see in the first picture. What is this for?
Then, I removed what I could of the foam. This came out pretty easy with a 3" wide scraper.
7) From what I can see of the stringers: they are a nice amber color and show absolutely no signs of rot.
8) It's clear that the far aft of the deck will be more difficult to get up because of the vertical wooden structure behind the rear seats. I need to pull all of this out and rebuild it I guess. Urg..... No other way to get the deck up and the foam out.
9) Further to the bow, I really don't want to mess with the seat bases. These look to be a real pain to tear out and rebuild. I'm tempted to replace the foam in the rear only and call it done. Again, the foam is MUCH more dry in this area (slightly damp, not wet).
I would appreciate any and all constructive comments.