


BoatDrinksQ5
Petty Officer 1st Class
- Joined
- Feb 11, 2012
- Messages
- 377
Well thought I would try to shed a little light on my install to help other with a similar transom/hull style. I know there are a lot of other good threads out there (here and at other forums...) but nice to see your particular boat IMO.
One of the biggest concerns with a Q5 is the sloped transom creates an issue with the 'natural hang' of 25° as instructed in the guide. You need to follow more of the install instructions of the stainless steel version. Using a printed protractor on cardboard, taped to the bottom of the boat as a guide. This post on another forum was great to visualize it.
http://forum.chaparralboats.com/inde...howtopic=12422
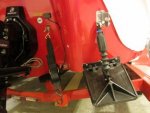
I had the biggest issues with the curve of the transom vertically and horizontially when installing the brackets and upper mounts (PR500). Also i wanted to avoid hitting the weird contour where the white meets the red. Didn't think it would be good to mount right there (which is kind of right where it 'should' go). I found taping the bracket to the boat, and then attaching the tab/actuator was helpful in testing good locations for the PR500 while watching the cardboard protractor.
Also felt like i had to have the tab attachment brackets a little bit inwards to help have a little bit flatter of attachment surface. Otherwise it really starts to curve where the last screws are. With the help of PrinceValiums thread/video (iirc) , on my second tab i attached middle two screws, and then bent bracket to match hull, and then drilled through partially through bracket holes. Not only did this help account for change in hole location from curve, but also really helped make sure the holes were drilled at the perfect angle to match angle of transom and bracket.
Big key when mounting is to make sure the holes drilled match the angle of holes on bracket (should be 90° from transom), but since transom is angled at like 25°-15° it makes it kind of tough to tell if it is perfect...until you notice you screws are off just a hair. Used approx a 1/4 drill bit (in reverse at high speed, very light) to sort of counter sink the hole, to prevent cracks and allow good bed or sealant.
Used 3m 5200 on the holes and made a bit of a gasket as well around the holes(good amount)/bracket plate(sparingly). Was able to wipe extra off pretty well with many paper towels if it squished out.
Later followed up with a little clear sealant (silicone marine) at the bottom edge of bracket to seal it a hair (probably not needed...)
Careful the angle and location of the upper attachment point on the actuator..... some how i screwed up my other side and am off quite a bit from 25°...gonna test it before i decide on moving it or just adjusting pressure setting... :-/
One of the biggest concerns with a Q5 is the sloped transom creates an issue with the 'natural hang' of 25° as instructed in the guide. You need to follow more of the install instructions of the stainless steel version. Using a printed protractor on cardboard, taped to the bottom of the boat as a guide. This post on another forum was great to visualize it.
http://forum.chaparralboats.com/inde...howtopic=12422
I had the biggest issues with the curve of the transom vertically and horizontially when installing the brackets and upper mounts (PR500). Also i wanted to avoid hitting the weird contour where the white meets the red. Didn't think it would be good to mount right there (which is kind of right where it 'should' go). I found taping the bracket to the boat, and then attaching the tab/actuator was helpful in testing good locations for the PR500 while watching the cardboard protractor.
Also felt like i had to have the tab attachment brackets a little bit inwards to help have a little bit flatter of attachment surface. Otherwise it really starts to curve where the last screws are. With the help of PrinceValiums thread/video (iirc) , on my second tab i attached middle two screws, and then bent bracket to match hull, and then drilled through partially through bracket holes. Not only did this help account for change in hole location from curve, but also really helped make sure the holes were drilled at the perfect angle to match angle of transom and bracket.
Big key when mounting is to make sure the holes drilled match the angle of holes on bracket (should be 90° from transom), but since transom is angled at like 25°-15° it makes it kind of tough to tell if it is perfect...until you notice you screws are off just a hair. Used approx a 1/4 drill bit (in reverse at high speed, very light) to sort of counter sink the hole, to prevent cracks and allow good bed or sealant.
Used 3m 5200 on the holes and made a bit of a gasket as well around the holes(good amount)/bracket plate(sparingly). Was able to wipe extra off pretty well with many paper towels if it squished out.
Later followed up with a little clear sealant (silicone marine) at the bottom edge of bracket to seal it a hair (probably not needed...)
Careful the angle and location of the upper attachment point on the actuator..... some how i screwed up my other side and am off quite a bit from 25°...gonna test it before i decide on moving it or just adjusting pressure setting... :-/
Attachments
Last edited: