Putting a transom in a 1987 Islander Outboard

Chinewalker

Fleet Admiral
Joined
Aug 19, 2001
Messages
8,902
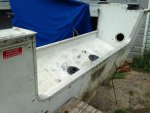
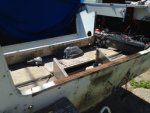
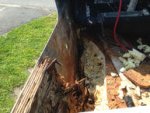
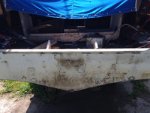
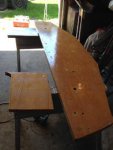
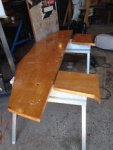
Just so y'all don't think I'm only into the glass Starcrafts, I have been knee deep in a lummie project for the past few weeks. My old college roommate called me to say the transom in his Dad's Islander was a little punky. A bit of an understatement...

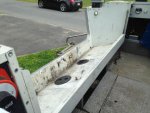
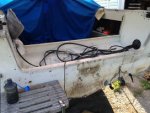
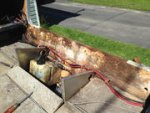
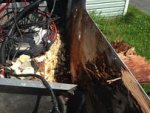
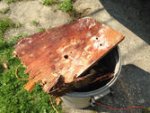
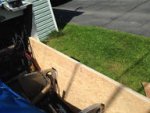
So, much rivet drilling, bolt turning and floor cutting later, I got the transom well out, followed by the transom core. Hard to believe the 235 V6 they had hanging on there didn't just fall off in the road.
 

Attachments

  • photo225914.jpg
    photo225914.jpg
    15.4 KB · Views: 5
  • photo225915.jpg
    photo225915.jpg
    15.4 KB · Views: 5
  • photo225916.jpg
    photo225916.jpg
    11.1 KB · Views: 5

Chinewalker

Fleet Admiral
Joined
Aug 19, 2001
Messages
8,902
No Title

The core came out in three large chunks, and a thousand tiny pieces.
 

Attachments

  • photo225958.jpg
    photo225958.jpg
    13.8 KB · Views: 2
  • photo225959.jpg
    photo225959.jpg
    10.9 KB · Views: 0
  • photo225960.jpg
    photo225960.jpg
    13.7 KB · Views: 1
  • photo225961.jpg
    photo225961.jpg
    12.7 KB · Views: 3
  • photo225962.jpg
    photo225962.jpg
    11.6 KB · Views: 3

Chinewalker

Fleet Admiral
Joined
Aug 19, 2001
Messages
8,902
No Title

Using a combination of measurements and the intact pieces for contours, I drew up the new transom on a piece of 3/4" marine plywood. I laminated the two pieces together to achieve the 1.5-inch thickness.
 

Attachments

  • photo225963.jpg
    photo225963.jpg
    10.1 KB · Views: 0

Chinewalker

Fleet Admiral
Joined
Aug 19, 2001
Messages
8,902
No Title

The new core was test fitted. I had to undo the rear deck from the side and transom to allow clearance, but only in one corner.
 

Attachments

  • photo225964.jpg
    photo225964.jpg
    14.5 KB · Views: 2
  • photo225965.jpg
    photo225965.jpg
    10.5 KB · Views: 2
  • photo225967.jpg
    photo225967.jpg
    18.7 KB · Views: 2
Last edited:

Chinewalker

Fleet Admiral
Joined
Aug 19, 2001
Messages
8,902
No Title

Once fitted, I pre-drilled all of the through-holes, and then sealed the entire core in epoxy. I also ran epoxy through all the holes with a brush to seal them as well.
 

Attachments

  • photo225969.jpg
    photo225969.jpg
    13.6 KB · Views: 0
  • photo225970.jpg
    photo225970.jpg
    13.2 KB · Views: 0

Watermann

Starmada Splash of the Year 2014
Joined
Jan 12, 2013
Messages
13,753
235 HP hanging onto mulch? :eek: 
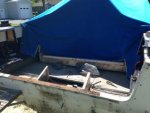
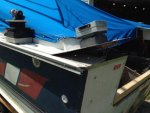
Luckily that motor didn't fall off is right! Is that Islander a 21'r?

I know it's a bit late now but it would've been best to make the transom one piece rather than the separate wings, especially with that much HP.
 

USMotorHead

Seaman
Joined
Oct 15, 2012
Messages
52
Im in the middle of replacing a transom on my '71 Offshore. What epoxy did you use?
 

dozerII

Admiral
Joined
Oct 25, 2009
Messages
6,527
Glad to see a Glasser Guy working on tin:D;), looking good Cw. By the looks of the old transom they might have been able to gat another twenty minute out of it.:eek:
 

Chinewalker

Fleet Admiral
Joined
Aug 19, 2001
Messages
8,902
Watermann - talked about it with the owners and figured it had worked just fine for 30 years - err, maybe 20 of them - doing it as original would be fine for another 30. Improvements made to core - sealed now - should make it last just fine.
 

Chinewalker

Fleet Admiral
Joined
Aug 19, 2001
Messages
8,902
USMotorhead - I sealed it all in West System, 105 and 206.

Watermann - yes, it is a 21footer.
 
Last edited:

Chinewalker

Fleet Admiral
Joined
Aug 19, 2001
Messages
8,902
No Title

Okay, made some progress on the 220V, haven't updated the thread....

Two weekends ago I got the transom trimmed and fitted. Didn't bust out the camera, unfortunately. This past weekend, I reset the motor well and began the process of bolting/riveting/screwing it all back together. It was a whole lot easier pulling this all out than it was putting it all back in! I did get smart, though, and bought myself an awning to set up over the work area - the sun was relentless!

In any case, I'm calling this one done!
 

Attachments

  • photo226474.jpg
    photo226474.jpg
    20 KB · Views: 3
  • photo226475.jpg
    photo226475.jpg
    17.1 KB · Views: 3
  • photo226476.jpg
    photo226476.jpg
    15.7 KB · Views: 3
  • photo226477.jpg
    photo226477.jpg
    17.9 KB · Views: 3
Top