1973 SS 16' Resto & Fishing Conversion

Crusader002

Cadet
Joined
Dec 19, 2011
Messages
23
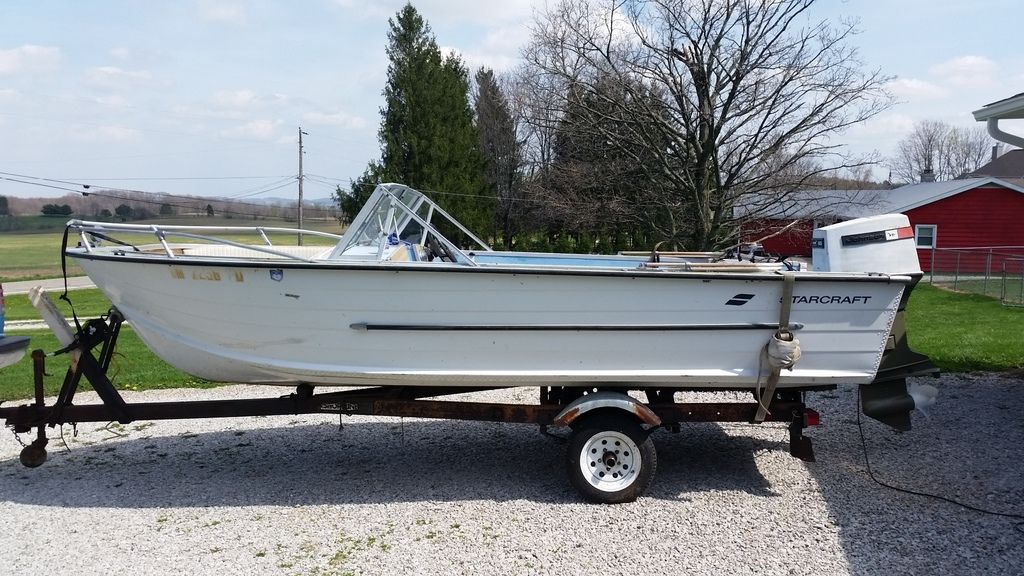
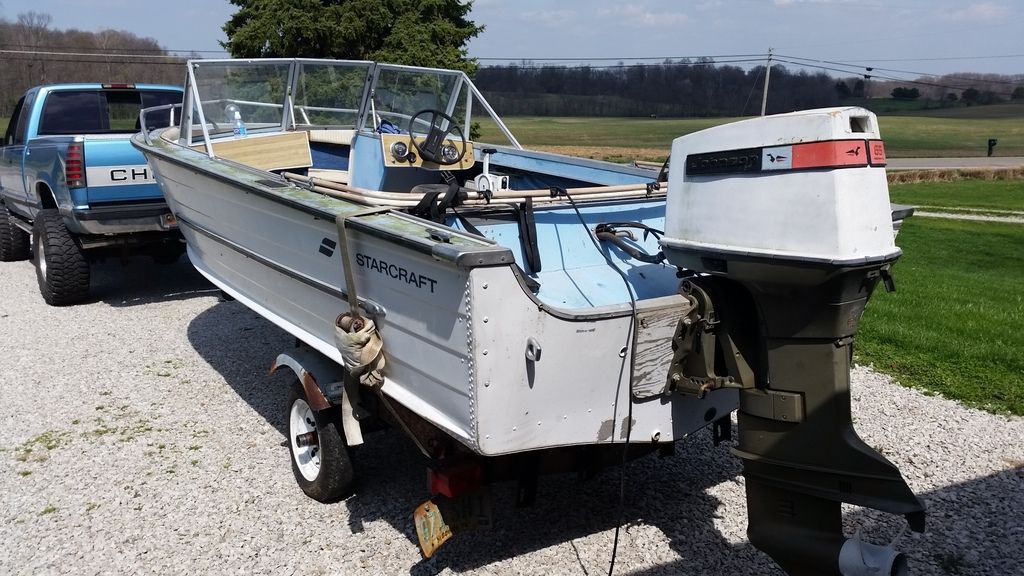
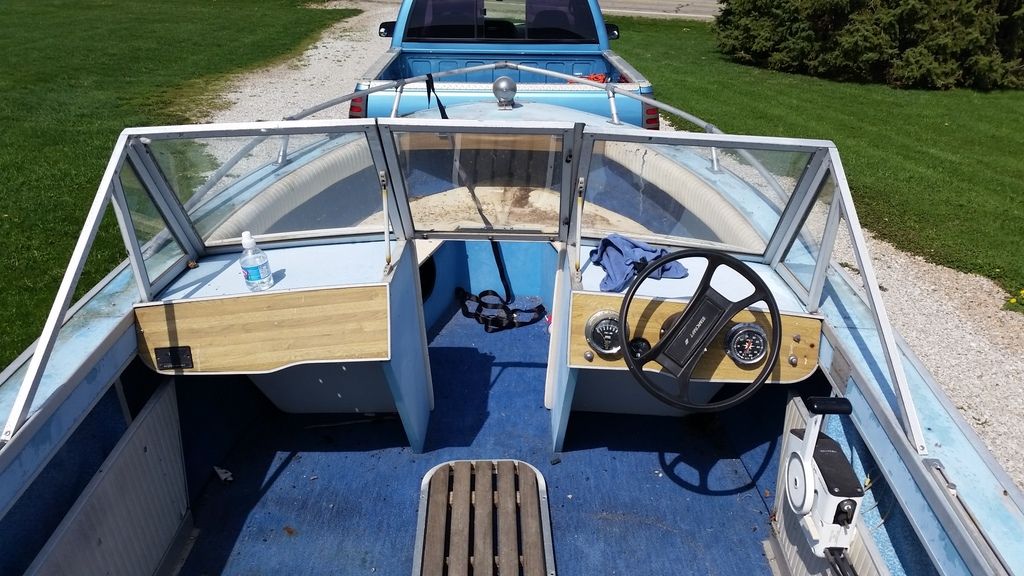
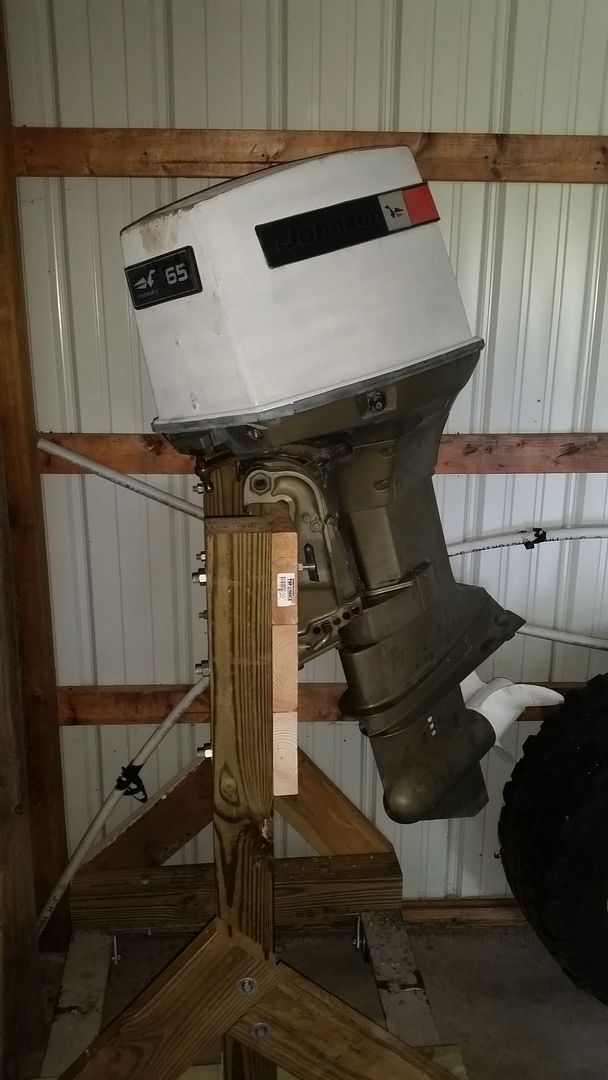
Long timer lurker, first time poster here. So glad you all could take my call! Ahem... down to business. Below is the beauty. A 1973 Super Sport last registered in 1989. She sports a matching model year Johnson 65hp and sits on a trailer that is in serviceable shape but likely destined for a swap with another member of the fleet.


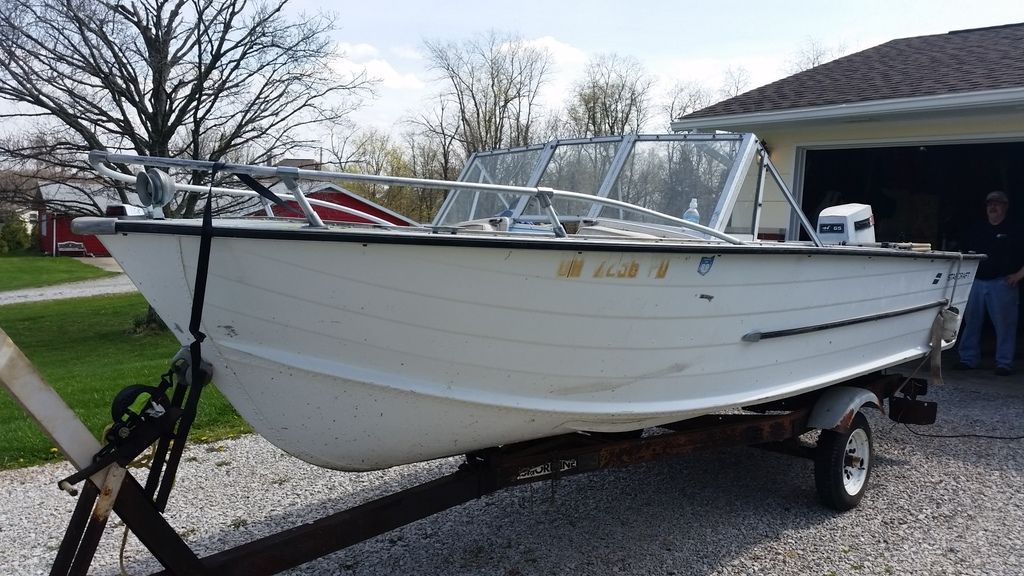
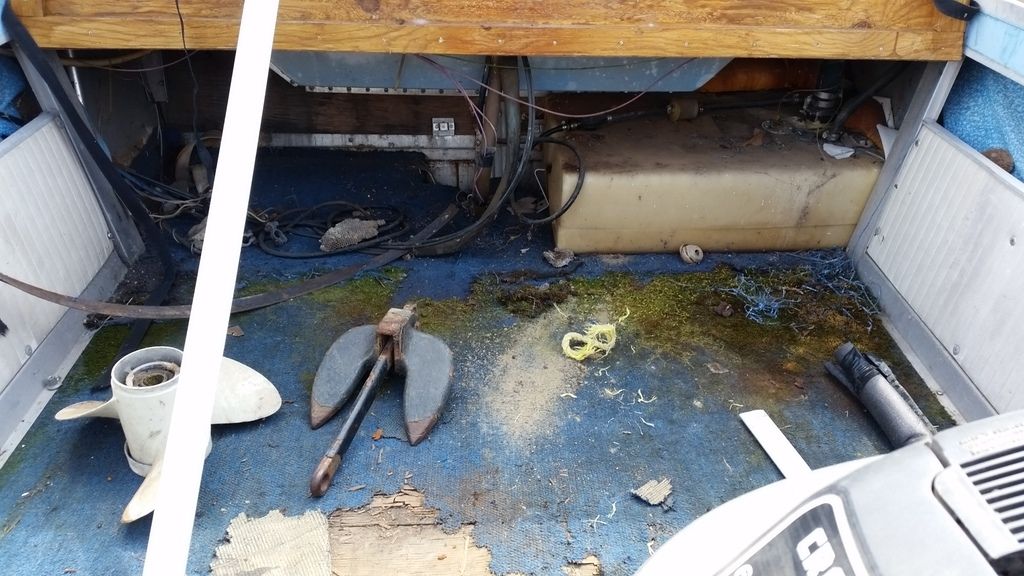
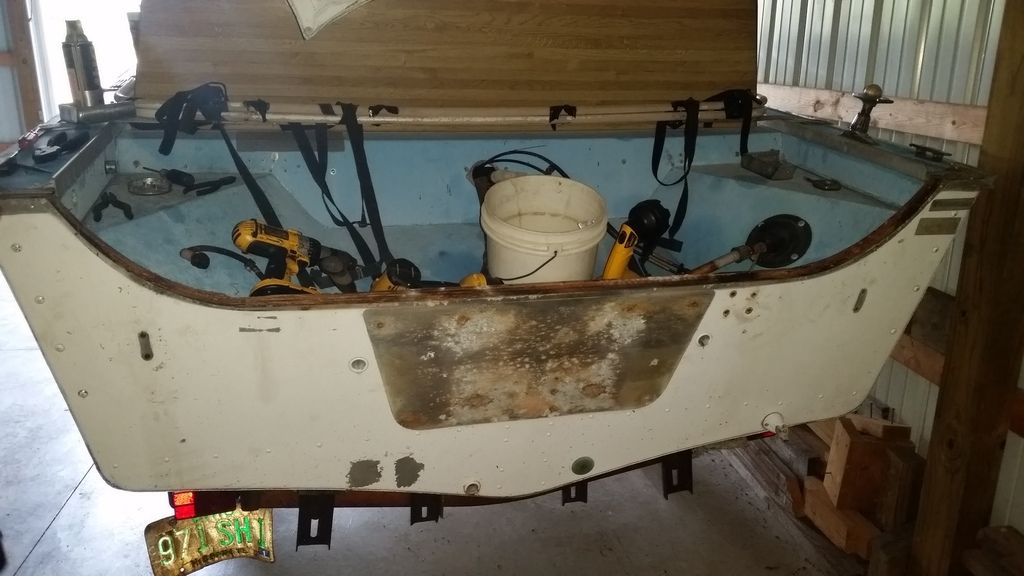
The boat came from a friend of mine who was the second owner and his brother owned it before him. He takes good care of his toys, but 25+ years of sitting outside (even under a heavy duty tarp) will do some damage. The old girl needs some new timber and a good cleaning. Thankfully, Scott and I have killed most of the wasps and other stinging insects that have taken residence in the boat over the years leaving behind the signs of their people. Aside from the bees, water has managed to infiltrate the wood in the back third of the boat. Its new home inside a garage and a hot summer left uncovered allowed it to dry out, but it left behind dry, spongy wood in the floor and transom. And quite a few mushrooms...


Currently, the plan is to replace the transom, get the motor running again, get the floor sorted out and take it for a spin before I add any weight or make changes so I have an idea of how I am impacting how the vessel handles in the water. The plan is to keep the SS as "original" as possible, but make it more fishing friendly.

Progress thus far:
  • Exterior of the boat and interior vinyl thoroughly cleaned with a soap/bleach solution to remove quite a bit of black mold, dirt, and algae
  • Controls disconnected from the motor. Began disconnecting the control box and navigating the wiring that has been added to it over the years
  • Motor stand built and the Johnson has been relocated. Let's just say that plan A did not go as anticipated and a bear hug and some swearing later the job was done.
  • Started removal of transom trim pieces and any hardware bolted on or through the transom in preparation for removal of the mulch within (see below)


Still have a ways to go, but progress is progress on a project like this. Ultimate goal is to add a livewell (or two), trolling motor, depth finder, fore and aft fishing platforms, seating (still deciding exactly how I want to accomplish this), mount my 9.9 Evinrude, add a CNC TNT unit, and rod storage underfloor (similar to Huron Angler). I have been scrounging as I go and have quite a few parts and pieces already. Now I just need to finish up that demo!

The good news is the Admiral approves and has been helping get the craft back on the water. And to the mob out there, don't worry... I have plenty more pictures taken and coming. I'm sure I'll have questions as I go and some pictures to showcase my backwoods ingenuity. Until then, I can think of the day this picture is taken on the water and not in the barn.


Tnstratofam

Commander
Joined
Aug 18, 2013
Messages
2,679
Looks like you've got a nice SS. We use ours for fishing and cruising the lake and have been very happy with her. Looking forward to your resto. One word of caution remember no pressure treated wood as it will eat through the aluminum.
 

Watermann

Starmada Splash of the Year 2014
Joined
Jan 12, 2013
Messages
13,753
:welcome: to the Starmada Crusader!

Good start on what looks to be another very worthy 16' SS. Glad you rescued her from being a derelict vessel. :thumb:

One thing to think about is the old Rude is if one of the electric shift models of that era? If so you might want to consider an upgrade to a later mechanical shift motor for the sake of reliability and parts availability.
 

dozerII

Admiral
Joined
Oct 25, 2009
Messages
6,527
Great looking SS, welcome to the Starmada, I will be following along with your rebuild.
 

Crusader002

Cadet
Joined
Dec 19, 2011
Messages
23
Thanks for the reminder tnstratofam. I have been searching for signs of a PO that used pressure treated in a previous resto, and thus far I appear to have dodged that bullet. Once I get the first pieces of the floor and transom out I should know more, but the piece of wood on the outside of the transom only had minor pitting on the aluminum. The worst problem so far has been digging the gas tank out of the gallon of pour foam they used to seal it to the transom and, I assume, keep it from squeaking over every ripple.

I also seem to remember that 73 was the first year post-electric shifting lower units so I should be good there with my various OMC products. I have read a few articles on here about the trouble others go through with those once they break and I wanted to avoid it altogether is possible.

Appreciate the words gentlemen. Do you all recall any iBoaters adding a removable deck piece to the front of their bow structure like on this Smokercraft?

http://www.smokercraft.com/showroom/fishing-boats/ultima/172

I like the idea of keeping the general shape of the bow seating, but adding a removable deck that only fills that gap for easier fishing sounds appealing. I seem to recall seeing something similar on Lunds and Trackers, but I can't find it right now. Simply curious if others have attempted this before me so I don't reinvent the wheel. Thanks again!
 

Tnstratofam

Commander
Joined
Aug 18, 2013
Messages
2,679
I just finished adding a removable casting deck to the bow of our Starcraft that allows us to use the bow seating and gives me a place to fish from and control the trolling motor. I'll see if I can post some pics tomorrow. I can't figure out how to post pics with my new tablet yet so bare with me:smash::facepalm:
 
Last edited:

smacd11

Seaman
Joined
Aug 26, 2012
Messages
72
I would love to see pics of that removable casting platform, that's exactly what I plan on doing to mine to keep it more versatile.
 

Crusader002

Cadet
Joined
Dec 19, 2011
Messages
23
I greet you with progress and a twist in my restoration journey. Currently the spashwell, starboard console, controls, and stern 1/3rd of the floor have been removed. The side panels were also pulled out in short order and will likely be recovered since the vinyl on them was a bit cut up to begin with. Still deciding on what will recover them, but the Admiral and I have an idea on colors for the resto that will inform that decision. The transom was rotten as expected, but held together for a template later on upon removal. Big win there. And it appears there is minimal corrosion on the skin behind the transom so I avoided the PT bullet it seems. Here is to hoping that the corrosion bug stays away as I remove more structure. :rolleyes:


The bad news is someone used a fair bit of that spray/pour foam on this boat (should have known with the amount of the junk helping hold in the gas tank). Well the space outside the stringers that should be mostly air voids was filled at some point with this foam. :crazy: I wouldn't necessarily be opposed but it essentially glued the rotten floor to the boat making having a template of that portion impossible. Unsure how much of the boat was modified with the stuff, but I'll assume the whole thing until I proceed further. The foam (both spray and white board) was also water logged and full of various bugs crawling about once I stripped off the flooring. Hopefully with this newly found ventilation some of that water will disappear before I have time for removing more of the old structure.


Note the foam and bits of wood left behind to the bottom of the picture that needed some extra encouragement to leave its home.

Removing the consoles revealed several loose or broken fasteners (consoles were misaligned with the gunnels so this wasn't a surprise) and a decent bit of corrosion that made removing pieces interesting. The corrosion did require me to break off the bolts holding down the windshield so I'll need to cruise through the forum to see how those come apart so I can replace that hardware at some point. I seem to remember a few of the ones I followed previously covering this in detail (HA's resto comes to mind) so it is a matter of remembering which of the many restos here it was. Unless someone has a link handy that saves me so much looking :D


Front view with the starboard console removed. Hoping to reuse much of the hardware on the bow once it has a run through the buffing wheel (minus the nav light which will likely go LED).


My progress so far. Starboard console (mostly intact once I cut it free from its birds nest of wiring) still needs disassembled to make another pattern).


I did also get the original stern light removed along with a few of the cleats. Some of the corner pieces by the transom have responded well to polishing so I may see what magic the old buffing wheel can provide in rehabbing this great piece from the 70s. I don't have a picture at this time, but those pieces will look better than new after a few hours at the wheel. I did note that removing the wheel from the rack was going to be a bear as several attempts with a breaker bar yielded no progress. I was able to get behind the trim plate and get the last bolt loose, but hopefully the WD40 rust gunk I sprayed on will do some good when I try again. If anyone has encountered this your insight is appreciated. :encouragement:

In other news, I did get a chance to fire up my old 1961 5.5 Evinrude and the 1978 15 Evinrude that will make its way onto the craft at some point as a kicker. The 5.5 fired up on the first or second pull, but my guess that the water pump was junk was proved in the barrel. It ran weird last time out, but I babied it back thinking that she might be getting a bit hot. The 15 on the other hand started like junk (per usual) but once running was a champ. It will need a going through once I get some time to redo the seals and rubber on the unit to clean up the steering feel (bit stiff at the moment) and address some leaks and gunk that shouldn't be present. I bought it at a decent price for a 15hp in Ohio (damn things are a mint for a decent one with the limited hp lakes and people putting 9.9 stickers on them) and I expected a project.

I hope everyone has a great Labor Day. :usa2:Should have some progress to post about in the coming months before the weather becomes cold enough to bust out the kerosene heater in the garage.

tnstratofam I'd love to see that casting platform when you find those photos. This post has "refreshed" once since I started typing so I get the computer trouble :laser:
 

Tnstratofam

Commander
Joined
Aug 18, 2013
Messages
2,679
Here is the picture of my casting deck installed. I designed it to fit under my bow seating so I could both stand and troll, and allow the use of the bow seating.


I used 3/4 exterior grade plywood and coated it with spar varnish. Then glued and stapled exterior carpet I picked up at Lowes. It has held up pretty well this summer.
 

Tnstratofam

Commander
Joined
Aug 18, 2013
Messages
2,679
The casting platform doesn't cover the openings under the bow seating. It rests on the lips about 2 inches around. I used some strips of plywood on the bottom to form a sort of key that locks it in place so it wont move. If I lift up the seat cushions I still have full access under them. It also creates a small storage area under the casting deck where I keep tackle boxes as well as my tool bag.

Here is a pic of the underside with the key. Not a great pic, but I think you can see the idea.


I'll try to get a better pic of the bottom.
 

64osby

Admiral
Joined
Jul 28, 2009
Messages
6,799
Back the nut on the wheel off but not all the way. Put a shim behind the wheel to the bezel. Hit nut with a large hammer. Shaft should pop off the wheel.

Nice project. Sorry to see the foam mess. Good luck and have fun.

Welcome to iboats and the Starmada. :welcome:
 

classiccat

"Captain" + Starmada Splash Of The Year 2020
Joined
Dec 20, 2010
Messages
3,405
Late welcome to the Starmada! :welcome:

Very nice rig and very few hacks (besides the weird foam job)

Your controller indicates mechanical shift....so dodged another bullet there!
20150417_151443_zpswdp6cqkl.jpg~original
 

Watermann

Starmada Splash of the Year 2014
Joined
Jan 12, 2013
Messages
13,753
Nice work on the deconstruction! What a mess to have both pour in and Styrofoam to deal with. :grumpy:

There's a couple different ways guys deal with replacing those windshield t bolts.I found an easy for for mine on the Chief. I'll have to take a look through my thread for the post I made.
 

Crusader002

Cadet
Joined
Dec 19, 2011
Messages
23
Back the nut on the wheel off but not all the way. Put a shim behind the wheel to the bezel. Hit nut with a large hammer. Shaft should pop off the wheel.

Nice project. Sorry to see the foam mess. Good luck and have fun.

Welcome to iboats and the Starmada. :welcome:

Thanks for the tip. Until the nut moves, I'll be soaking it to free up the corrosion on threads. I would imagine the BFH will come out to persuade it the rest of the way as you noted above. Here is to hoping other methods of nut removal are not needed.

Thanks tnstratofan for the update. Looks like what I was considering, so I'm glad it has worked well for someone else. I have an ambitious plan B that is quite a bit more complex, but I'll navigate that as we get to deconstructing the front seating area to see what might work.
 

Crusader002

Cadet
Joined
Dec 19, 2011
Messages
23
Good news everyone! The final steps of deconstructing the vessel have been completed over the last two months. All of the flooring is out and thankfully I was able to save all but the very back piece of the floor for a template. Dodged a real bullet there. No surprise for those following along, but the PO did fill the entire length of the boat with spray foam, but it was much drier as I got toward the front which likely saved those boards from the fate of its stern comrade.

Thankfully the port console and most of the bow seating structure came apart with relative ease and was stored away to provide some guidance on the rebuild as weather warms. The big surprise was found under the front bow seating. I thought I had removed all of the bee nests from the SS (and there were quite a few) but now I understand where they all started to build their palace. After a quick moment of a palpitating heart and listening for buzzing/movement the nest was tossed into a nearby pine tree and the associated carpet underneath was ripped free from the boat.


Oh hey there mister bee... I see I found your home.


After nearly all of the flooring was removed I noticed that one of the stringers appears to be completely detached from the ribs of the boat. I have not had a chance to inspect if there is any more damage than a broken rivet or 10, but I'm hoping that it popped free from the deconstruction process and due to the amount of water/foam rather than damage that will cause me more work long term... This major piece of the puzzle being done did give me a chance to work up and down the gunnels removing all of the snaps, tracks, and clips associated with the old cover and bimini top to clean up the top side in preparation for paint and potential hole filling in the future. I'm assuming these tracks and other bits won't be reused, but one never knows so off to the parts corner they go for storage!


I was also able to remove the last of the wiring, the front bow nav light, horn, vinyl padding, and railing. I do love taking apart someone's old project. You find funny things used as backing plates like a piece of an old yard stick reinforcing the horn :D When removing the front rail I did find something that I will need to be creative with going forward. I was hoping (assuming really) that the rail was in several pieces and the set screws on the supports held them together. I was clearly wrong as each side is one piece that connects at the bow of the boat. Since I do want to put a trolling motor on the front of the boat I'll need to re-engineer that rail to keep it (doing some cutting and capping) or loose it altogether. It is quite pitted so I may 86 that specific rail for another unit, but I'm hoping some polishing will bring it back to serviceable condition for my purposes.

After removing the final pieces of the front seating substructure the last pieces of the floor were removed. The hardest was the small piece furthest to the bow because that spray foam glued the entire piece down quite well. A few well placed thwacks from a hammer and a long pry bar helped free it from the old girl. Once the job was wrapped up, all items removed were bagged and tagged for reuse or disposal at a later time. Quickly waning light and a desire to grab some grub resulted in throwing all of the "soon to be" discarded foam and carpet back into the boat before closing the barn for at least a little while longer.


Until the next time that I get some time to wrangle with the beast, I'll be trolling the interwebs to determine my parts list, finalizing my intended wiring diagram, and figuring out exactly how I want to finish out the hull of the boat with paint, etc. I'm thinking something similar to what dozerII did on the Naked Lady painting the top side and consoles a crimson red and polishing out the rest of the hull. Only time will tell if the aluminum under the paint is in as good of condition as I think it is. Look forward to having some more updates on this gem as I progress and if anyone has thoughts feel free to post below. Thanks to those that have commented thus far!
 

jbcurt00

Moderator
Staff member
Joined
Oct 25, 2011
Messages
24,871
Great progress, and its often a 50/50 split between projects stowed for the winter and those that get pulled into a heated space for work thru the winter.........
 

Watermann

Starmada Splash of the Year 2014
Joined
Jan 12, 2013
Messages
13,753
Nice progress on the tear down! :thumb: Part of the fun is seeing what a PO left behind.

Seems that someone had done some work before you, it should have only had the white Styrofoam and no pour in until the 80's models.
 

hayko1971

Starmada Splash of the Year 2015
Joined
May 24, 2013
Messages
448
Tear down was an exciting time for me. I kept everything that came off the boat but didn't reuse much. I have drawers full of old boat stuff now lol. The stringer that came loose is likely no big deal, in my boat they were just riveted to the rounded part of the ribs. I had to replace a few rivets there too.
 

Crusader002

Cadet
Joined
Dec 19, 2011
Messages
23
Howdy y'all! I've had enough progress to get back to posting. Still no floor, but the inside is nearly ready for foam and new ply. The real trick now will be finding gulvit at a decent price and getting the junk ordered in time to work on it again:greedy_dollars: I do love my hole in the water that I toss money in though.

The cleaning has been more time consuming than imagined and I'm learning how much of a pain those rivets can be to clean up if you don't drill them cleanly. I did learn a center punch and a big hammer were my best friend when removing those remnants from the ribs in the hull. The rest in the thinner pieces of aluminum (like the metal strips between floor boards or in the front box) were best suited to set of side cuts or bolt cutter to massage the rest of the old out.


Quite a bit of corrosion on the transom skin with a few holes showing daylight once I cleaned it up with a red fiber wheel...
censored.gif
so out came the JB weld. Not exactly surprised, but I was hoping the transom (being original) would have avoided that particular problem. Such is the life! While I was at it, I went after a few of the holes in the gunnels that I don't intend to use again so hopefully I don't find any more spots for water to come in as we keep going.
facepalm.gif
I have faith that she will float based on the amount of water it held in that bloody rainstorm...


A good shot here of some of the mess I encountered (holes the worst near the mounting pad and toward the far edges of the skin) along with the conduit I intend to use for electrical. I'm hoping that makes life easier someday when chasing wires...


The old man and I also had some time to get the trailer cleaned up a bit and in primer. It will still need new bunks, rollers, tires, etc. but it is now nearly one color! This trailer will likely be put under my 12' jon and the rather oversized trailer it sits on will be placed under the SS. Short of the tires that my buddy nearly ran to the belts, its a good base for future use. Combine that with some bargain bin LED lights for the rear and we have a sweet deal on our hands.


A few projects have kept me busy and away from the SS (rebuilding my 61 5.5hp and 78 15hp Evinrudes), but my hope is to get after it every couple months until I can get her on the on the road for the 4 hour trip to my current homestead. I'm hoping the most recent purchase will help make that easier once the trailer and boat are a bit more sorted. I found this little gem in northern Indiana for just over a grand. The old guy used it for a construction truck and short of a few rust issues and the desperate need for new tires, and a few other odds and ends... its in great shape for a 1981 that has lived any time in the rust belt. I suppose having an old T-18 4 speed and 300 straight 6 help with the longevity of this old rig. The admiral approves of the purchase and has named it White Lightning so thankfully spending money on another project won't catch me too much hell. And it makes a great transport for our two kayaks as my friend and I discovered a few weeks ago thanks to that rack and a solid topper.


I hope everyone is staying cool out there. I'm going to head out and wrench on the truck with my new fishing buddy and see what trouble I can get in until I can get the tin itch again!


oldhaven

Chief Petty Officer
Joined
Aug 30, 2015
Messages
568
I know how you feel finding that corrosion in the transom skin, but you can find many cases of that problem being solved effectively right here. Everything from filling pits with a marine repair compound to covering with an exterior patch. I did a bit of both. Just keep on going and ask questions if you need to.

Ron
 
Last edited:
Top