Falcon transom replacement

Joined
Jun 26, 2015
Messages
13
Found out the transom is rotted wood wise in my Falcon, the single knee brace is ok, no issues there. What all is involved to slide that wood panel up and out. Looks like, other than the engine coming off, the corner cap rails, the alum cap over the top of the transom wood area and a few other rivets and screws need to come out and the wood panel will slide up and out, then I can use it for a pattern to cut a new one from marine grade wood.
 

Watermann

Starmada Splash of the Year 2014
Joined
Jan 12, 2013
Messages
13,753
Sounds like a good plan to me, time for some tear down :nod:
 
Joined
Jun 26, 2015
Messages
13
Yep, found an nice thread here on doing one on a SS 16' SC. looks very similar to my transom. Once we get the engine off, we will start the tear down. Atleast my engine wont be as heavy as his was. Still heavy though.
 

Tnstratofam

Commander
Joined
Aug 18, 2013
Messages
2,679
I agree sounds like you're on the right track. If you have a splashwell I'd recommend removing it. I didn't on our SS and it made the transom install a little harder. What I learned was that replacing rivets are easy, and removing the transom would have gone somewhat smoother had I removed my splashwell. Good luck and post up some pics when you get a chance.
 

classiccat

"Captain" + Starmada Splash Of The Year 2020
Joined
Dec 20, 2010
Messages
3,405
I believe every restoration thread here has a transom replacement buried in it....its almost a right of passage :lol:
 
Joined
Jun 26, 2015
Messages
13
It has begun! Engine is off, transom top rail is off, all the massive amounts of caulk in the splash pan is gone, got all the bolts pulled above the pan, now to climb in the boat and go under it while the admiral handles the duties outside the boat. Transom is very soft along the top other than right where the engine was. Hopefully it will come out in somewhat one piece so I have a template for the new wood we will get in a few days. My wife and I were able to lift the 40hp outboard off and just lay it on the floor(with its fiberglass top removed!), one benefit of the smaller engines, they can be manhandled. I plan to rewire the boat as well, electric choke wasnt working when I test fired the engine, it ran ok for short spells on the stale fuel but wouldnt stay running. A good carb cleaning, maybe a new fuel pump and fresh fuel will be the order of the day once she is all back together. I did stick my new bow light that I saved from our old boat up in place, looks so much better now. Mike and Michele (pics coming as soon as the cam battery recharges!)
 

g0nef1sshn

Lieutenant
Joined
Feb 24, 2015
Messages
1,291
(pics coming as soon as the cam battery recharges!) [/QUOTE said:
They still make those camera things? :eek: Excuses excuses......:laugh: Looking forward to the build! Dont do like I did and seal two seperate pieces then sandwich! I think the glue will hold better to the wood.
 
Joined
Jun 26, 2015
Messages
13
Im going to do it like he did in the write up, glue them first then seal them as a one piece unit. Plan to leave it unpainted, just sealed with the spar varnish, I like the look of real wood accents here and there. In time I will redo the dash with the same treatment, and a few other wood accents. Probably going to put LED rope lighting up under the gunwales to help in moving around inside the boat at night. We enjoy evening cruises, so that will help, along with getting that spot light working. Since these pics were taken, I have the helm controls removed, the PO's kicker motor mount removed, along with both rear grab handles. My rear splash tray doesnt have some of the same features of the SS in the write up, I think I can deal with it being left in place, if not, out it will come. Transome is so water logged its probably gonna come out in pieces, but I will try to walk it up from below with the big cat's paw first. Hopefully by this evening it will be out! Mike

 
Last edited:

g0nef1sshn

Lieutenant
Joined
Feb 24, 2015
Messages
1,291
nice bow light! Its like a fender light to the catwalks on some bridges down in FL. Did your transom have an aluminum cap on it?

Gettin it out in piece is nice, but I couldnt. I used cardboard pieces to get it close, And trimmed as needed after that.
 

Watermann

Starmada Splash of the Year 2014
Joined
Jan 12, 2013
Messages
13,753
Mike, here's my advice on that transom repair, it's not just a replacement. You really should remove the splashwell like suggested above. Reason being is there are always issues to be addressed through repairs and cleaning. Galvanic corrosion loves that wet soggy transom skin and it will need to be cleaned off to reveal pitting that should be filled. It's also a good idea to prime and paint the inside of the transom skin too. The knee brace can also be properly inspected too for any sign of cracks.
 
Joined
Jun 26, 2015
Messages
13
I checked the knee brace, its good both on the keel and the mount to the transom. I will be cleaning and painting the inside of the transom area, paint is coming from Amazon, along with the 5200 to seal up the new stainless fasteners when we reassemble. I think it rotted out while the boat sat. I havent found and real damage due to running it with a soggy transom. we have the top two corner pieces of the transom out, going to get the big lower part a shot coming out later tonight. Mike
 
Joined
Jun 26, 2015
Messages
13
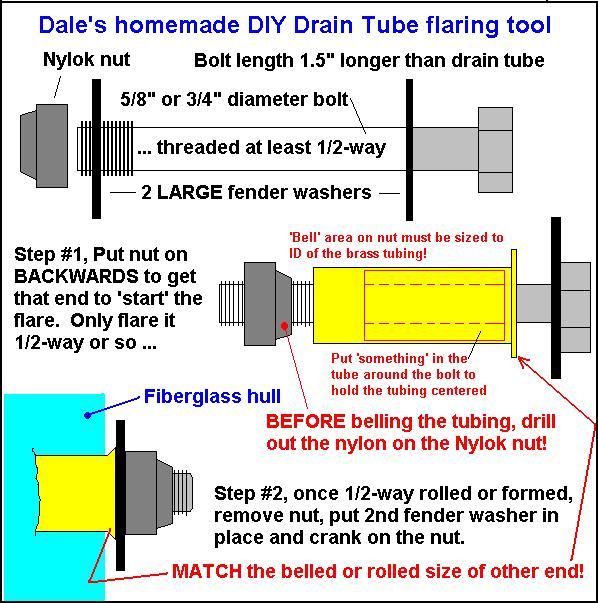
Quick update, we got the old transom out, as mulch! It was so bad and swollen that we had to dig it out in pieces. I made a cardboard template and we made a new transom from 2 pieces of 3/4 marine ply. Its glued together and clamped till atleast tonight. Then its time for spar varnish then I can reassemble. Where do I get new brass drain tubes for the splash well. He was using one of them for the bilge pump drain tube. With the condition of the transom and lack of any knee brace damage, I am of the thinking that this old girl has sat for a long time without use. Just made my job easier thankfully, she will be in a good home now, either covered or in my garage. I repainted the inside of the transom with the zinc paint along with all the other steps done in the thread on the replacment. Will be going to Harbor Freight this week for all new Stainless hardware for the reassembly. Cheers Mike and Michele T
 

Watermann

Starmada Splash of the Year 2014
Joined
Jan 12, 2013
Messages
13,753
Hopefully the boat wasn't ran much with the transom being mulch.

Don't use brass, use aluminum drain tubes. http://www.iboats.com/Drain-Tube/dm/cart_id.040130278--session_id.411754840--view_id.39188

The tool

FlaringTool.jpg
 
Top