I have returned... with a Starcraft this time!

Watermann

Starmada Splash of the Year 2014
Joined
Jan 12, 2013
Messages
13,753
Yeah bow/stern eyes, the 3/8" SS like above is what's on both of my boat sterns. What you have on yours is a bow eye.

Yeah all of the AL trim is anodized, it comes off pretty easy with stripper or oven cleaner.

y4mHccMHHJFbOU7wWuVZd84DePQLhHqsqMcvYh_m5xPfgRTKwTLg9RTK_QLDQyYYJQb5J3dgg0L92CdROCHn7IyVU2ZM_JhFW1XhW9jojdxiqdc5f6MGBaAYTeVw7xdkhyh-BpSwJLeSW4fzAbCFL_K73LRyjmrUYGWRh_cTi8Bmz7mqbfhf69xPNZBU1cu6qJUJI7s_8dTQtbGv7Pze7Tndw
 

BWR1953

Vice Admiral
Joined
Jan 23, 2009
Messages
5,846
Got it.

I'm not a fan of the chromed Zamak eyes either. Even if they do have stainless screws. I will check into the U-shaped eyes.

The boy just finished cutting in the edges. I've been thinking of color schemes. Took more pix and will photo edit and post those later, when we're done painting for today.

Time for me to do some actual work! LOL
 
Last edited:

BWR1953

Vice Admiral
Joined
Jan 23, 2009
Messages
5,846
Change of plans!

I stood up to get to work and immediately got sleepy. It's my normal time of day for a nap, so I'm gonna go do that instead! :sleep: :lol:
 

BWR1953

Vice Admiral
Joined
Jan 23, 2009
Messages
5,846
So when I went back into the house this afternoon I got sidetracked and didn't get my nap, afternoon coffee or any more boat work done. Ah jeez. :facepalm:

This evening I did get some photo editing done though. I've decided that I'm going to paint the aluminum trim glossy black just like Lakelover64 did on his Jetstream. His boat looks fantastic! While my KF won't be a gem like his boat, the black trim should work fine with the gray and white of the rest of the boat.

The trim is 42 years old and really shows the age and wear and tear. I have no interest in trying to clean it back to bare aluminum and shining and polishing, etc. Cleaning and painting is the way to go!

Some color scheme concept pix.

1.jpg

2.jpg

3.jpg
 

Pusher

Lieutenant
Joined
Sep 2, 2014
Messages
1,273
I like the black trim look. If you use gloss you might end up with a dull swath where passengers climb in and out treading over the top coat.

I hope the cardiologist gets everything figured out for you.

Keep up the good progress!

Oh, and tell your Co captain he's doing great work! You might need to order up some captains hats for your maiden voyage :)
 

BWR1953

Vice Admiral
Joined
Jan 23, 2009
Messages
5,846
I like the black trim look. If you use gloss you might end up with a dull swath where passengers climb in and out treading over the top coat.

I hope the cardiologist gets everything figured out for you.

Keep up the good progress!

Oh, and tell your Co captain he's doing great work! You might need to order up some captains hats for your maiden voyage :)
Thanks! Any progress, boat or otherwise, is good news from my point of view! :lol:
 

BWR1953

Vice Admiral
Joined
Jan 23, 2009
Messages
5,846
Well, we did a little "drip and glob" sanding yesterday morning and then got the second coat of light gray porch paint onto the insides of the hull. That's the good news. :joyous:

The tougher part has to do with that T-brace at the bow. Got the screws out and the interior and exterior brackets removed. The boy worked at it quite a bit but struggled mightily. I finally had to get in the boat myself and remove the screws from the back side of the brace using "The Force" to guide me by touch alone. :D

Finally, all the screws and brackets were completely removed.

But it still won't come out!! :mad:

Looking at the pictures that the boy took underneath the bow, I can see that there's a wire pair that go to the nav lights which may be preventing removal. Will check into that.

But my first thought was that the T-brace was "trapped" between different pieces of the gunnels and topside bow piece. If that turns out to actually be the case, I'm hosed as far as replacing that brace. I'd have to remove the top cap and aluminum trim pieces far enough back to get the wood out. Sorry guys, I simply can't do that. :grumpy:

I'll try again to figure out how to get it out without disassembling the boat, but if I can't, I'll have to make repairs on that T-brace, clean it up and paint it and move on. And you'll see in the pix that the brace has been repaired at least once by a PO sometime in its life. There's a glued and screwed crack on the starboard side. Don't have good enough pix of the port side to see if there are repairs there.


14.jpg

11.jpg

12.jpg

13.jpg

1.jpg

4.jpg

5.jpg

7.jpg

8.jpg


Here's a better view of the holes in the bow. Might need to buy stock in JB Waterweld! :lol:
9.jpg
 

Attachments

  • 6.jpg
    6.jpg
    117.2 KB · Views: 3

Watermann

Starmada Splash of the Year 2014
Joined
Jan 12, 2013
Messages
13,753
Having a look at it that bow area has been cobbled together poorly, especially to have the weight and torque of a bow mount motor up there along with occupants entering from the bow it could get sketchy. I flattened out the arch in my SS bow deck with 3/4" ply backer and secured the AL skin with LF rivets in the center and an AL plate underneath. Knowing that an 80# 24v motor would be mounted there with 250 Lb guys stepping on the bow cover it had to be strong.

You're right though to do the repairs you'd have to remove the bow cap, rubrail and bow cover. Having the helper on the inside with a wrench on the nut you could run the cordless driver on the outside to get the RR bolts out.

On the black trim idea, I really like that idea, it sure adds a nice touch. I didn't paint the RR though, the black insert was enough.

y4mPg6DDB0Mq8_yEMcbIg_UujUxfPHeTjeJPJ7jGZ6av-PTenOpm22jazfcl76_4awy1W5uuGlbTew6qBNzitcJKJbVXNZmVImPHIr-wj9AwVa66YYc7c2JNlDKAqEkGGTsp9yXQnClbCPRTJZ-H1zPcJMWn9qQ-64p5lN2oBWA9jIxyDldqnwSayPxq8boxQWVGuyJp1qo53j_sBqOGBiQZw
 

BWR1953

Vice Admiral
Joined
Jan 23, 2009
Messages
5,846
Got some more pix this morning and have a better idea of what I'm up against.

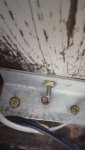
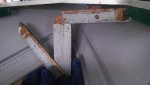
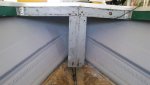
The T-brace is composed of 4 pieces which can be disassembled. The vertical upright has two sections. The rear section is longer and is the part that bolts to the top two horizontal cross pieces. It's not the best solution but does work since the vertical upright is also attached to the deck and provides pressure to keep the horizontal pieces in place. The horizontal pieces are attached to the fore/aft wood braces under the top cap.

In my case, we never walk on the bow and my trolling motor is only 28 lb. thrust so not all that torquey. And it doesn't weigh as much as a larger unit either. My primary concern is due to upgrading from the 8HP Johnson to the 50HP Mercury. The increased power is going to increase speed and subsequent "pounding" even though I don't fish in waters that have much boat or wave action.

As I see it, I have three options:
  1. Completely remove the cap a la WM's projects and do it right.
  2. Remove and disassemble the existing four part T-brace and replace the sections with new components made from fresh 3/4" plywood. Treat them with OTF, then paint when ready.
  3. Put the existing base back together, make minor repairs, clean and paint, then press on. I could also fashion an aluminum brace connecting the two horizontal sections which would add more strength.
Option 1 is just too much for me to handle for this project and I have no interest in putting that much effort into a boat I'm likely to sell.**

Option 2 is what the boy voted for! Surprised the heck outta me. But I'm sure proud of him! That said, it would probably take me a week or more just to form the parts, treat them with OTF and paint, then reassemble.

Option 3 is the lazy way but is fastest. And it was the boy who labeled it as the lazy way! However, it is a very tempting option which I must realistically consider.


**Likely to sell? It used to be definitely sell, because of my wife's complaints. But after she saw the fresh paint inside, she said "Baby, it doesn't look like crap anymore!" And then she went on about how nice it's going to look when it's all done. Maybe she'll fall in love with it if it's pretty. :rolleyes: :lol:


1.jpg


2.jpg
 

BWR1953

Vice Admiral
Joined
Jan 23, 2009
Messages
5,846
Well guys, my #1 helper started back to school yesterday. That's gonna slow me down even more. Sigh.

Haven't made up my mind about the T-brace option yet.

And I still haven't ordered rivets yet either!
 

Pusher

Lieutenant
Joined
Sep 2, 2014
Messages
1,273
If you did remove it, you would have a template ready to trace out upon removal. It is tough to decide what is important to your use and what isn't though. We all take shortcuts.... It just depends on our needs
 

BWR1953

Vice Admiral
Joined
Jan 23, 2009
Messages
5,846
Hi guys. Sorry I haven't replied. Had a big time medical scare a couple days ago and it took the wind out of my sails. Looks like it was a false alarm but I have an appointment on 12Sep17 to be absolutely sure. Scared the crap outta me though! :eek:

Anyway, I've decided to go with Option 2 from post #1009 above. I'm hoping to get it done in the next couple of days. Maybe. Home chores need to be done too. :rolleyes:


QUESTION: For the new parts, should I use 3/4" plywood, which I have on hand, or a piece of 3/4" lumber, which I'll have to buy?

I'm not sure if I'll be able to move the gunnel brackets to the inside or not. That will require a closer inspection.

I'm thinking of using 1/4" stainless bolts with washers and aircraft nuts on the inside to reassemble and secure the 4 sections. That will make it easier to disassemble if needed later on in the boat's life. I'd put 4 bolts on each horizontal piece.

Sorta like so:

1a.jpg


For the inside section of the vertical piece, I'll increase the length per the new gray area in the pic.
1a.jpg
 

Watermann

Starmada Splash of the Year 2014
Joined
Jan 12, 2013
Messages
13,753
I used 3/4" ply, no screws are held by it, I actually used LF rivets and brackets. Also when you replace the bow support, use a hole saw drill bit to make a hole near the end up under the gunnel for the bow wiring to pass through so it doesn't hang down under the bow support. I have a hole on either side for wiring pass through.
 

BWR1953

Vice Admiral
Joined
Jan 23, 2009
Messages
5,846
Thanks WM. I'll use the 3/4" ply.

And now I can actually move forward!

That stubborn T-brace just wouldn't come apart, no matter how much we tried by using screwdrivers, vice grips and whatnot. So the boy suggested drilling the screws out. Tried that too and only got the heads torn up.

BUT! With a SINGLE APPLICATION of the BFH, that T-brace finally complied! :D
1.jpg
 

Attachments

  • 1.jpg
    1.jpg
    17.6 KB · Views: 1

BWR1953

Vice Admiral
Joined
Jan 23, 2009
Messages
5,846
Had to use the hole saw to get the screws out one of the pieces. And a prybar with the BFH! The boy really liked doing that part. ;)

We're all done for today. We now have templates for the next step. I call it good progress even though it isn't much.

We also got the Gravely fixed and advertised it online, used granular pest control around the house and then finally sprayed pesticide around the house and inside as well. Feeling protected here! :lol:

And we did some shoreline fishing last evening. Very nice.
2.jpg


Tomorrow I'm down the road again so it's unlikely that we'll get anything done. But I'm open after that until the 26th and have one appointment on the 29th.

With any luck, we'll make more progress this week. :)

2.jpg
 

BWR1953

Vice Admiral
Joined
Jan 23, 2009
Messages
5,846
The boy dinged a couple of places on the hull insides while trying to get the T-brace out. Later, while I was in the boat myself, trying to get that thing loose, I noticed that not only were there a couple of small dings, but that some areas need another coat of porch paint. That's something easy to do this week as well. :)
 

BWR1953

Vice Admiral
Joined
Jan 23, 2009
Messages
5,846
Well, I've been working on the T-brace since yesterday. Several hours each day. And yet I remain frustrated! :mad:

Yesterday I worked by myself. I put the templates in place, traced around them and got them cut out. But I just couldn't get the angles on the pieces to match up after several attempts at trimming. No joy, so I let it sit overnight.

This morning I went back out and tried again... several times. I ended up making a couple of new pieces but couldn't get it done. I suck at woodworking, period.

Then my buddy came over and we worked together and I still cut wrong. So my bud took over, measured carefully and made the cut. No joy! :mad2:

He says my saw sucks (that same circular saw I got a few months ago.) I agree. But I have to do SOMETHING! As it is now, I have several extra pieces which are scrap. And still no joy on getting the angles matched up. Sigh. :blue:

Right now, I'm back in the house and done for the day. It's 92 out there and I've had enough. Maybe tomorrow I'll be able to figure something out.

1.jpg
 

BWR1953

Vice Admiral
Joined
Jan 23, 2009
Messages
5,846
I'm planning on putting an aluminum brace over the joints in the wood T-brace sections to connect them together better and add strength. I can use either 3" or 4" wide aluminum stock, 1/8" thick. Whatever fits best.

Two options for the aluminum brace:

An aluminum T over the wooden T-brace, something like so.
2.jpg


Or a straight piece over the 2 horizontal sections.
3.jpg
 

Attachments

  • 4.jpg
    4.jpg
    79.4 KB · Views: 1

Watermann

Starmada Splash of the Year 2014
Joined
Jan 12, 2013
Messages
13,753
Why duplicate that hodge podge the PO made of the bow arch? It should just be one piece and need no upright for support.
 
Top