starting my 22 ft v5 holiday project....question

Watermann

Starmada Splash of the Year 2014
Joined
Jan 12, 2013
Messages
13,753
You've got lots of stuff going on there Bob!

I'm not understanding the purpose intended for the bushings in the transom wood? I can see however that the bolt heads and nuts won't be tight against the wood rather just around the bushing.
 

bob johnson

Rear Admiral
Joined
Feb 25, 2009
Messages
4,304
I want to seal the wood from water that might seep down the bolt shaft....most water is absorbed into plywood through an EDGE... where the layers are exposed!!

its probably over kill, but in any case the bushings are not as long as the wood is thick!!....they are flush to the outside( the side that touched the aluminum skin.) they are about a 1/16th" shorter than the thickness of the layered transom wood.

bob
 

BWR1953

Vice Admiral
Joined
Jan 23, 2009
Messages
5,852
I thought about that when I was trying to decide where to put the plastic bushings vs the ss bushings.. because sometimes sealants do stick as good to some plastics. these are delrin( acetal). I have applied a LIBERAL amount of wood glue to keep water from getting under the bushing, into the wood... I don't care as much if water came through the bushing hole ever so slightly and fell into the bilge...I see guys with exposed wood showing on the inside of the boats. water constantly gets inside boats and can fill up to the wood... soooo I installed the plastic ones up high!!

I really regret going to wood route....

1: cost of plywood 2 sheets......., maybe $60...fancy marine plywood $150
2: cost of varnish-epoxy sealants to waterproof plywood.... anywhere from $60 to $150

tehn you STILL have a wood transom that may or may not rot in 10 years

or you can buy the non wood transom board for about $400

MY LOWE has a COMPOSITE solid transom insert..thats 1.5 " thick and it slides into a pocket that has .100 " thick aluminum on BOTH sides of the insert!!

I don't know whats it is made of or how much it costs

bob
I'd be interested in a non-wood transom board myself.

But with my little boat, the transom is only 10" x 60" x 1.5" and I have no idea where I could get such a small piece. I surely don't want to spend money on a 4'x8' sheet of marine plywood and related accoutrements if don't need to. So far I've purchased fiberglass cloth for $30. The epoxy and tools needed to lay the cloth is going to be quite a bit more than that.
 

bob johnson

Rear Admiral
Joined
Feb 25, 2009
Messages
4,304
well, I have been off and on with this project, but I think I am on a continuous path now...

it seemed everytime I looked the boat over I found a rivet I didn't like... and that takes two people to buck rivets!!

I sold off that monster caravan dual axle trailer...it was a 6800 lb capacity trailer that would have just beat my boat to death.

we are going to rebuild a current trailer with a torsion axle. but right now she sits on a temporary dual axle.

here the rivets were thought to be done and so I flipped the boat over for paint.. at this point I just installed the transom wood( just a set) and one gas tank....

took every bit of paint off the boat and sanded the complete boat..then acid treated the aluminum, then prepped with a conditioner. then washed and dried the boat.

I ended up priming with Transtar( I think) two part epoxy primer... then painted with PPG OMNI, and cleared with a two part clear that also had a flattening agent in it... thus the paint went on shiny, but the clear killed it!! I wanted a flat paint job!! its a mostly open water duck hunting boat. so I picked a gray blue( I had to mix at home because the color I picked was way to dark blue!! I added two quarts of silver metallic and a half pint of white!!) got exactly what I wanted.

t6rpfs.jpg


in primer:

2yxhp4j.jpg


in color:

2metxc7.jpg


front view( deeeeeep V)

2zxm5n5.jpg


I only flat cleared the sides, and the cutwater up till it levels off( what might be seen while the boat is in the water) because it was VERY exspensive for the clear-hardener-flattening agent combo!!

then I flipped the boat back over and retrailered it...

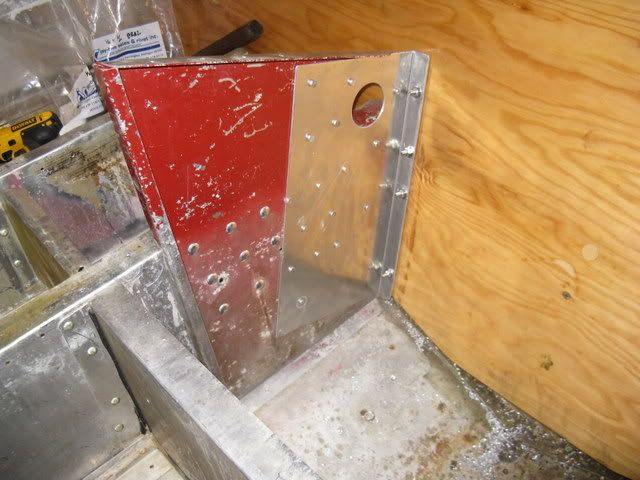
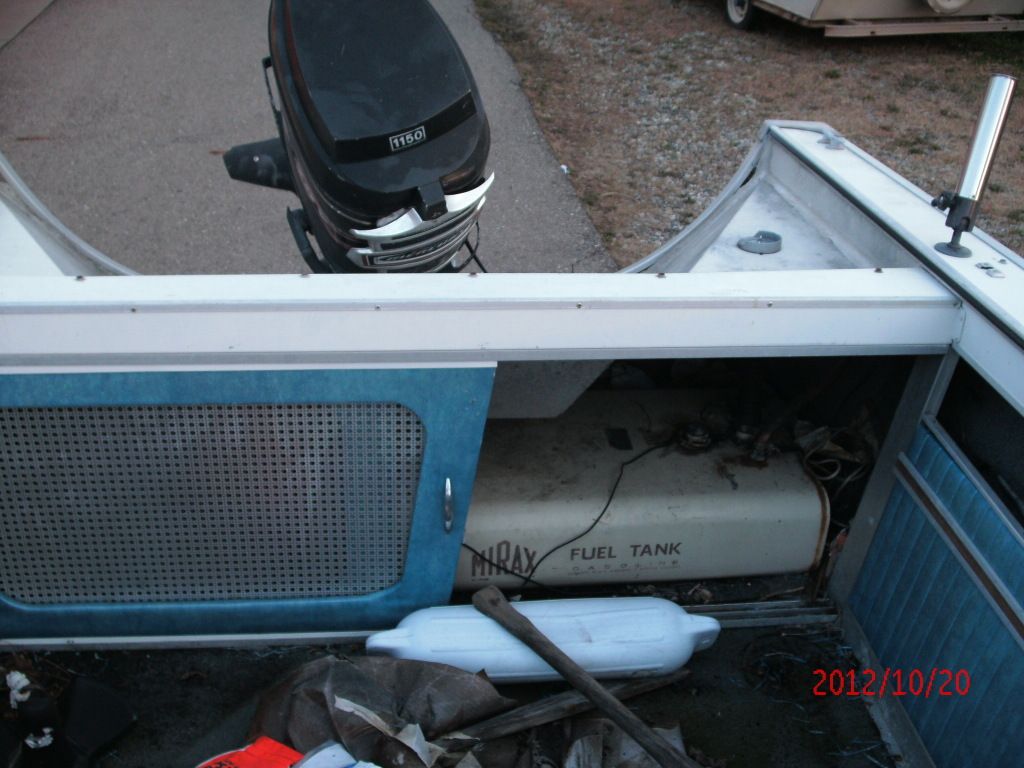
then I started on a second gas tank and the transom fixtureing

bob
 

bob johnson

Rear Admiral
Joined
Feb 25, 2009
Messages
4,304
xnffbq.jpg


this is a 1/4" sheet of anodized aluminum that will allow me to connect the back of the stringers to the splashwell frame to the transom via two rows of 1/4-20 machine screws, AND the four 1/2" engine mount bolts!


I cut a similar plate for the outside and I 5200 ed it to the outer skin,

3/8th " thick 6 x 6 aluminum angle!!!! it tying everything together!!


25jdrvs.jpg


2mxmvn.jpg


of course this provided me with a delima I hadn't planned... the splashwell would fit because it JUST covers the thickness of the transom wood and out skin!!

so I cut out to clear the inside aluminum plate , and will weld a stepped plate on...so the nuts for the 1/2" bolts will still be sandwiching the splashweel to the transom!!

nv2xhu.jpg


I also added a second 54" gas tank!!!...running wires and hoses now...


bob
 

64osby

Admiral
Joined
Jul 28, 2009
Messages
6,799
You paint job is so dull.......... Nice Job!:D

That transom ought to hold just about any motor you throw on it.
 

bob johnson

Rear Admiral
Joined
Feb 25, 2009
Messages
4,304
that's the problem with getting "projects" that are already started... I didn't get a lot of pieces the boat originally had , and some of what I did get, was already disassembled. Thought that verticle support for the splashwell....was installed when I got the boat and it was pop riveted!!! I will say that this boat looks to have been done over SEVERAL times based on the amount of holes in the stringer tops.

I was going to through bolt those pieces before I laid the floor......I can solid rivet them as well...
 

Watermann

Starmada Splash of the Year 2014
Joined
Jan 12, 2013
Messages
13,753
Hey you're moving right along Bob :thumb:

Getting the paint on is a huge leap and you're going to get that hull and support repairs knocked out pretty quick by the looks of it.
 

djpeters

Lieutenant Commander
Joined
Jun 9, 2010
Messages
1,824
Here's what I did to add a little extra.....

IMG_3019.jpg


Also, not sure if you seen my thread lately, but I posted a pic of the bottom of my gunnels.
 

bob johnson

Rear Admiral
Joined
Feb 25, 2009
Messages
4,304
Here's what I did to add a little extra.....

IMG_3019.jpg


Also, not sure if you seen my thread lately, but I posted a pic of the bottom of my gunnels.

thanks... I put 5 solid rivets in each side... and four bolts through the 6x6 L bracket to the splashwell support!.

you gunnels are totally different than mine..i have a one piece L shaped gunnel with a decent radius coming over the side and down into the boat!!..and I don't have those little stepped pads to attach the side panels to!!

bob
 

bob johnson

Rear Admiral
Joined
Feb 25, 2009
Messages
4,304
how far apart are your rivets??

how far apart are you guys placing the floor to stringer rivets???

thanks

bob
 

dozerII

Admiral
Joined
Oct 25, 2009
Messages
6,527
If I recall correctly and that's a big if, I put them 10 inches apart.
 

GA_Boater

Honorary Moderator Emeritus
Joined
May 24, 2011
Messages
49,038
I put one over each rib and two between. No idea what the actual spacing worked out to.
 

bob johnson

Rear Admiral
Joined
Feb 25, 2009
Messages
4,304
spent three straight days on the Holiday, Over the holidays!!

I replaced the bow wood with welded aluminum square tube...the biggest chore was trying to get the right width when I added the brackets that attach to the hull from the home made arch supports.

I eventually assembled the two halves of the bow together and affixed them in their old holes along the gunnels... and my guide to where to fit the supports... that worked out good, but I HAD planned to weld the running supports between the arches after I installed the arch supports....BUT now the bow was covered!!!!


soooo I measured and welded the running supports that go between the arches outside the boat and went under and riveted ... that was labor intensive!!!

but it all worked out, now I have a super strong bow and no wood to rot or get loose...

ao7rbl.jpg


this is what it used to be:

xayjav.jpg


9a4kyh.jpg


bob
 

bob johnson

Rear Admiral
Joined
Feb 25, 2009
Messages
4,304
I have been pretty busy lately...got the floor installed except for the last 2 feet up in the bow. I put the splashwell in and the gunnels and the bow sheet metal...there were a ton of issues with all the sheet metal at the transom...the side panels to the splashwell didn't fit, but that's a story for another day!.
today id like to ask what you folks think the extra holes were for in the splashwell.

midxli.jpg


I know the side hole is for control cables and steering...and the middle hole is for the electricals and maybe gas line to the outboard...but what is the hole to the left of the center one?? what could that have been for????

also does anyone know where to buy the small T-Nuts that hold the windshield to the bow???

thanks
bob
 

GA_Boater

Honorary Moderator Emeritus
Joined
May 24, 2011
Messages
49,038
If she had a Merc with TnT, the hole could be for the hoses coming from the pump under the splashwell. But usually the hoses are centered in front of the motor. This is my only guess.
 

Watermann

Starmada Splash of the Year 2014
Joined
Jan 12, 2013
Messages
13,753
The hole on the starboard side is for the steering cable, speedo pitot line, transducer cable. The hole in the center is for the fuel line, rigging of shift/throttle cables so they don't have to bend 90 degrees and for the wire bundle. The hole more toward the port side looks like a PO mounted something else there.
 

jbcurt00

Moderator
Staff member
Joined
Oct 25, 2011
Messages
24,871
The hole on the starboard side is for the steering cable, speedo pitot line, transducer cable. The hole in the center is for the fuel line, rigging of shift/throttle cables so they don't have to bend 90 degrees and for the wire bundle. The hole more toward the port side looks like a PO mounted something else there.

At this length, even as an OB, I'd bet the port side SW hole is the fuel fill for a permanent fuel tank. Similer to this on my Holiday:
GEDC0407_zps92b44645.jpg
 

bob johnson

Rear Admiral
Joined
Feb 25, 2009
Messages
4,304
I am thinking someone stuck a rod holder there. The boat had 6 places for rod holders besides that one!!( just checked and the hole pattern doesn't match any of the holders that I got with the boat in a box! maybe they had the oil tank on that side and had a boot over the opening.. the boat had a gas tank fill opening on the side of the hull midship.
 
Top