1981 18 SS

Watermann

Starmada Splash of the Year 2014
Joined
Jan 12, 2013
Messages
13,753
Looks like you went with the new parts route rather than a donor boat. Man a new alternator too! Smooth runner and purrs like a kitten, those are good tough little motors. So has that transom been replaced before? It's not the normal SC flakey white

You're going to love those Clecos, looks like you've got a bunch of the 3/16", i got a sampler platter of them with some different sizes.

Glad to see old man winter loosened his grasp on you a bit.
 

classiccat

"Captain" + Starmada Splash Of The Year 2020
Joined
Dec 20, 2010
Messages
3,405
vroom vroom sounds :madgrin: ...nice!!!!

Hopefully just gumbed-up rings for those compression/leak #'s.

I got my 1st taste of lapping valves this winter on 2 of my snowblowers (I have to work on something over the winter...eh? :p).
 

dozerII

Admiral
Joined
Oct 25, 2009
Messages
6,527
Looks like you went with the new parts route rather than a donor boat. Man a new alternator too! Smooth runner and purrs like a kitten, those are good tough little motors. So has that transom been replaced before? It's not the normal SC flakey white

You're going to love those Clecos, looks like you've got a bunch of the 3/16", i got a sampler platter of them with some different sizes.

Glad to see old man winter loosened his grasp on you a bit.

Hey Rob, yup the donor boats are few and far between up here, figured the new parts were going to be used on the replacement when it come anyhow. Transom and floors are original and in excellent condition. Clecos I'm gonna love them.

vroom vroom sounds :madgrin: ...nice!!!!

Hopefully just gumbed-up rings for those compression/leak #'s.

I got my 1st taste of lapping valves this winter on 2 of my snowblowers (I have to work on something over the winter...eh? :p).

CC, the motor hasn't run for at least four years, so I'm thinking some run time and Seafoam will make a big difference.
 

dozerII

Admiral
Joined
Oct 25, 2009
Messages
6,527
I remounted the fuel tank In the SS today. I have used a number of different methods on previous builds, from metal clips to ratchet straps, and not real happy with any of them. This time I tried something new and I really like how it worked out. I used stainless steel banding that is used in the process of making industrial hoses, the banding is used to clamp the hose to the aluminum cam-lock ends, and can be picked up really cheap at a local shop, I got 8 feet for zip, zero, nada. It ia available in 1'2 and 3/4"widths and comes in 100 rolls.


The mounted tank.


I used 1/2 x 1/2" 1/8"aluminum angle for the mounting plates the fasten the straps to the deck.


The gunwale side is fastened solid to the deck and the engine side uses a "T" with a fiber lock nut to tighten the straps.

Continued.
 

dozerII

Admiral
Joined
Oct 25, 2009
Messages
6,527
? used 1/2"x 1/4"foam tape too insulate the strap from the tank. once you locate and mount the strap brackets take the screws back out an place a couple drops of super glue in the holes and is will strengthen the treads in the wood so they won't tear out.


On the engine side I used a spade bit to bore a 1/8"recess for the head of the strap tightening bolt to sit in the aluminum angle sat flush on the deck. The fitted strap.


One other problem I have had with fuel tanks in the past is getting that stiff wire reinforced hose to make a bend without flattening, or kinking, I played around a bit with this today and got it to bend real nice with the aid of a little heat from the heat gun. Just hold it in the desired shape til it cools.


GA_Boater

Honorary Moderator Emeritus
Joined
May 24, 2011
Messages
49,038
Good looking solid tank mounts, Dozer. Super tip on forming the hose. :thumb:
 

Tnstratofam

Commander
Joined
Aug 18, 2013
Messages
2,679
That tank strap looks solid. I would add a stop at the front and rear of the tank to keep it really locked in place. Something like a piece of aluminum angle just to act as a brace to keep it from moving forward or backwards.
 

dozerII

Admiral
Joined
Oct 25, 2009
Messages
6,527
Good looking solid tank mounts, Dozer. Super tip on forming the hose. :thumb:

Thanks GA

That tank strap looks solid. I would add a stop at the front and rear of the tank to keep it really locked in place. Something like a piece of aluminum angle just to act as a brace to keep it from moving forward or backwards.

Thanks tns, I don't think it will go any where as there is four strips of foam tape under the tank as well, but putting an angle in front would be added insurance, it can't go back as there is a block there.
 

Tnstratofam

Commander
Joined
Aug 18, 2013
Messages
2,679
Ah I didn't think about the foam tape.:facepalm: That will hold it in place nicely. Really a nice looking setup for the tank.:encouragement:
 

Watermann

Starmada Splash of the Year 2014
Joined
Jan 12, 2013
Messages
13,753
About the only thing that would cause that tank to shift forward would be a frontal collision, boat brakes just don't work well enough. :lol:
 

dozerII

Admiral
Joined
Oct 25, 2009
Messages
6,527
The original fuel tank installation had no water separating fuel filter, and just a rubber 3/8" fuel hose draped over the motor rubbing on the steering arm and the wiring. I thought it was best to clean that up a bit. I used stainless steel 3/8" tubing, you can pick up in lengths from pretty much any industrial controls outfit.


classiccat

"Captain" + Starmada Splash Of The Year 2020
Joined
Dec 20, 2010
Messages
3,405
About the only thing that would cause that tank to shift forward would be a frontal collision >with some 4' swells<, boat brakes just don't work well enough. :lol:
>added something<

Tank mounting & line routing is top-notch as usual Glen! For the crap that I plow through, a forward retainer would be necessary...or use the same stuff that keeps my fillings from flying out :lol:
..
 

Bobee

Recruit
Joined
Sep 26, 2013
Messages
1
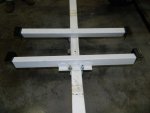
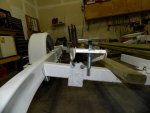
I am wondering where did you get the center keel brackets you added to the trailer? Did you make those leveling mounts? I enjoy reading through all of your boat building threads. Excellent work!
 

Attachments

  • image.jpg
    image.jpg
    96.6 KB · Views: 0
  • image.jpg
    image.jpg
    122.9 KB · Views: 0
Top