"New" '69 Offshore 18ft redo

classiccat

"Captain" + Starmada Splash Of The Year 2020
Joined
Dec 20, 2010
Messages
3,405
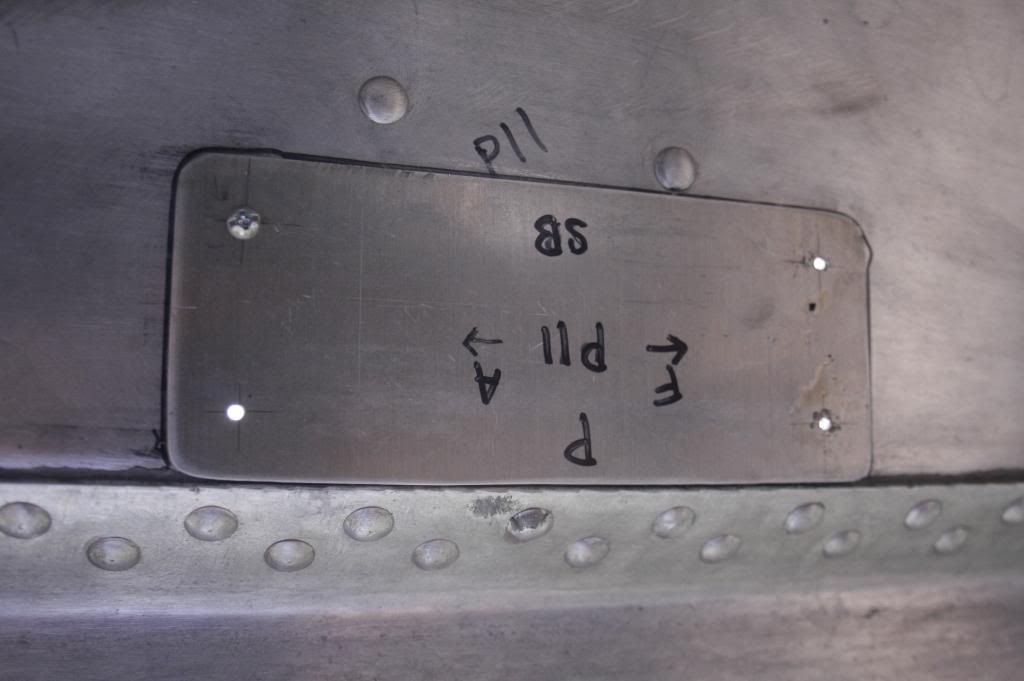
With root-causes addressed, a bullet proof solution to covering a stress crack is an external patch buttered with 5200...and lots of rivets :madgrin:


Watermann

Starmada Splash of the Year 2014
Joined
Jan 12, 2013
Messages
13,753
My advice is to follow along with some of the threads where those stress cracks have been repaired and the cause eliminated oh and to loose the orbital sander and use paint stripper and then a fine wire wheel to clean the surface.

I only had 2 of the rib ends with stress cracks on my Chief. The cause is simple, guys running the boats with compromised/rotten decking, side panels and loosened fasteners for years after they were in need of being replaced.

What I saw...


What I did to repair it was to drill a small hole at the end of the cracks to stop them, fashion a patch and rivet it back on to the hull with the patch back buttered in 5200. Here's a shot of the patches being held on by clecos before riveting.


Eliminating any future cause of the stress cracking by tying the bottom of the hull into the sides is what the hull stiffeners are for. I didn't go to the extremes others have and stayed away from drilling out the seam rivets.


Buckeye72

Cadet
Joined
Nov 14, 2014
Messages
20
Thanks h2o.........Thanks Cat, I read ur whole resto from start to finish last night loved it!!!!!!!! The cracks don't scare me as much now :)

However, I thot I would get away with just a sand job and re-paint, cause things looked pretty good, but know I'm set on a complete strip for close inspection and at least some hull stiffness like in the Cheif.

Thanks all!!!!!!

Scrap tin on a trailer with trees growing on inside.........$200
Hauling it home 500 miles.......$300
Crap we take from Admiral...........free
Cost of bringing them back from the dead.......$$$$$$$$
The ideas and support we get from other tinners..........PRICELESS!!
 

64osby

Admiral
Joined
Jul 28, 2009
Messages
6,799
Scrap tin on a trailer with trees growing on inside.........$200
Hauling it home 500 miles.......$300
Crap we take from Admiral...........free
Cost of bringing them back from the dead.......$$$$$$$$
The ideas and support we get from other tinners..........PRICELESS!!

:D Nice
 

Buckeye72

Cadet
Joined
Nov 14, 2014
Messages
20
Well me and the oldest stripped half the haul today..........and thank goodness still only have that one stress crack. Have a rivet hammer coming in the mail!!!!!!! New toy. I'll be fixing all kind of rivets that prob don't even need replaced, but it's all in fun
 

Watermann

Starmada Splash of the Year 2014
Joined
Jan 12, 2013
Messages
13,753
Good times right there, you got half of the worst job behind you now. :encouragement:
 

dozerII

Admiral
Joined
Oct 25, 2009
Messages
6,527
She is coming a long real nice, what are you using for stripper? Some real good advice from Cat and H20.
 

classiccat

"Captain" + Starmada Splash Of The Year 2020
Joined
Dec 20, 2010
Messages
3,405
You didn't waste any time stripping it down! Looks awesome!

Great news on the cracking! You saved this boat...just in time!! :D
 

Buckeye72

Cadet
Joined
Nov 14, 2014
Messages
20
Thanks all..........zipstrip and a very fine SS wire brush (stole it out of the kitchen). Was using a plastic puddy knife for scraping but was very slow. We switched over to brush and finished that half in about 3 hours. Thank goodness for child labor or I'd still be at it!!!!!!!!
 

Watermann

Starmada Splash of the Year 2014
Joined
Jan 12, 2013
Messages
13,753
... and give thanks for only 1 coat of paint, some of us have 2 or 3 to peel off!

I've had good luck using the orange label klean strip and covering it with a plastic drop cloth for 20 or 30 min depending on temps before scraping.
 

Buckeye72

Cadet
Joined
Nov 14, 2014
Messages
20
Hey guys....... I know I'm a little away from paint. But any recommendations on primer and finish paint. Brands types etc

I know I've seen so many types thru the threads. But thot it would be handy to have them in my post when I need to order
 

Watermann

Starmada Splash of the Year 2014
Joined
Jan 12, 2013
Messages
13,753
Rusto SE primer is all I've ever used for the bare AL. On the Chief I used poly alkyd primer after the SE primer and then poly alkyd paint with catalyst hardener. Even though some guys use rusto topside, professional or tractor paint, it's all the same poly alkyd paint formula at less than 40 - 50 bucks a gallon.

Then there's the guys who use the $200 a gal paints. :eek:
 

dozerII

Admiral
Joined
Oct 25, 2009
Messages
6,527
My self the same, Rusto Professional with hardener and acetone to thin.
 

Buckeye72

Cadet
Joined
Nov 14, 2014
Messages
20
Guys, thanks for all the help. Little delay in resto, need to move boat from my grandparents 4 car to my small garage, don't ask, family rented it out from under me. Any how, I am definitely going to put in supports from bottom to walls and include all rivets in the seam. But question for you........ Should I just put supports between the ribs or would there be any benefit to putting them under rib ends then up the walls? I've already made the decision to do it, just want to do it "all they way"
 

classiccat

"Captain" + Starmada Splash Of The Year 2020
Joined
Dec 20, 2010
Messages
3,405
Guys, thanks for all the help. Little delay in resto, need to move boat from my grandparents 4 car to my small garage, don't ask, family rented it out from under me. Any how, I am definitely going to put in supports from bottom to walls and include all rivets in the seam. But question for you........ Should I just put supports between the ribs or would there be any benefit to putting them under rib ends then up the walls? I've already made the decision to do it, just want to do it "all they way"

It stinks that you lost your massive hanger!

The only value of those tabs that attach to the seam is to lock the spray rail; It does little for outer-chine support. Putting those tabs behind the rib-ends pose an additional challenge of riveting since the rib will impede you placing the bucking bar properly...those seams are already tricky enough. So, I think it's OK to put them between the ribs.

In addition, I wouldn't even bother adding the angle piece that gets attached to the bottom hull skin (and the 4+ additional rivets you'll be adding) since you plan to put in vertical supports & tab those to the ribs; that in and of itself will lock the outer chine & lock the spray rail. :thumb: Heck, those vertical risers are all that are really needed as long as they get solid connections to the ribs & risers.
 

Watermann

Starmada Splash of the Year 2014
Joined
Jan 12, 2013
Messages
13,753
^^^ what the man said, I'm in 100% agreement.
 

Buckeye72

Cadet
Joined
Nov 14, 2014
Messages
20

New bling came in the mail!!!!!!!

Boat work still stalled til I get it back to my house........still waiting on buddy to weld up the trailer, only bad thing about asking friends for favors!!!!!!!!
 
Top