1961 Starcraft Jetstar Rebuild

Emursed

Cadet
Joined
Jul 3, 2014
Messages
15
Been lurking on the web site and gathering lots of information for the rebuild of my newly acquired 1961 Starcraft Jetstar. I have looked over a couple of other member rebuilds and restores and can't tell you how valuable the information and tips I have gained from their experiences has helped me in my journey so far. My Jetstar is in really good condition considering it's age, but I want to rebuild it in order to increase it's functionality and to show off how great these little tin beauties really are.

The following is my list of sub-projects I have lined up for this summer related to this rebuild.

* Replace the cable and pulley steering system
* Repaint the interior
* Install new interior seating
* Modify trailer for one person launch and recovery

I have all of my materials for the paint, interior and the trailer and I am in the laborious process of sanding and stripping the interior for sealing and paint. As of now the interior is gutted and I will begin stripping the remaining paint next.

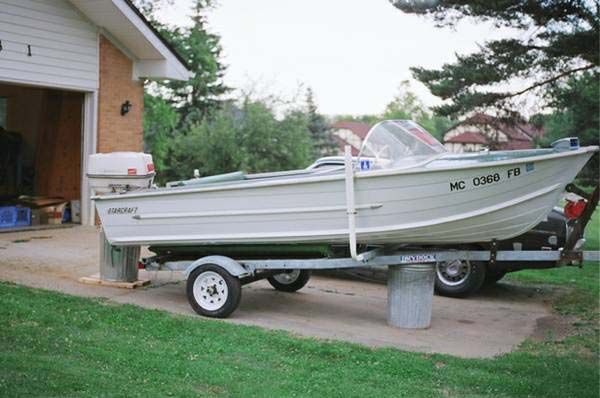
Here is a pic of my labor of love from the Craigslist ad that I bought her from...


My goal is to have her ready for a trip up to Mullett Lake in September in order to make up for a bad boat experience that plagued our Memorial Day weekend.

I will start posting pics of the rebuild starting this Tuesday and document my progress along the way.

I am looking forward to sailing with the Starcraft Armada soon.
 

Watermann

Starmada Splash of the Year 2014
Joined
Jan 12, 2013
Messages
13,753
:welcome: to the iboats dry dock SC tin division. Lot's of work already done with the tear down it sounds like.

Try again with a pic, it didn't come through.
 

GA_Boater

Honorary Moderator Emeritus
Joined
May 24, 2011
Messages
49,038
Welcome to TinHalla, Emursed. Photobucket or another photo hosting site works best for your pics. In PB just copy the IMG code and paste into your message. And the pics are larger for easier viewing for the old guys. :rolleyes::D
 

classiccat

"Captain" + Starmada Splash Of The Year 2020
Joined
Dec 20, 2010
Messages
3,405
Welcome! :welcome: Lookin forward to the tin pics :photo: :hungry: :madgrin:
 

Emursed

Cadet
Joined
Jul 3, 2014
Messages
15
I work as an RN on midnights so I have to plan the work I want to do in advance.
Today is going to be a transition day where I move from my night shift work life back over to my ordinary day shift life.

Goal for the next couple days off is to strip the interior paint, get the Gluvit down, and lay down some primer.
I will post some pics of the boat before I get started and try to snap some pics through out the process.

Re-posted the second pic attempt earlier so you can have an idea of what I am working with.
 

Emursed

Cadet
Joined
Jul 3, 2014
Messages
15
Here are some pics of the interior before I started with the Aircraft Stripper....

EDIT - I fixed the pics, E. I think you grabbed the HTML code instead of the IMG code. Or the Bud Light case is empties. ::rolleyes: I hated rotating shifts. :grumpy:


I had prepped most of the bottom surface prior to stripper application.

 
Last edited by a moderator:

Emursed

Cadet
Joined
Jul 3, 2014
Messages
15
Here are some pics of the interior before I started with the Aircraft Stripper....


I had prepped most of the bottom surface prior to stripper application.
 

GA_Boater

Honorary Moderator Emeritus
Joined
May 24, 2011
Messages
49,038
Looks like the outside is in good shape. You can get the inside to match up is short order. Watch out Mullet Lake, the JetStar is coming back on a mission.
 

Emursed

Cadet
Joined
Jul 3, 2014
Messages
15
Hopefully these pics will come thru without issue - I am copying the IMG code from the bucket.


I used a quart of stripper and will probably need another gallon to get through this paint. I don't believe that black was an original color for the interior and this stuff is really tough to get through without the stripper to help. The rivets are where the greatest share of the additional stripper will go to. There are just so many of them and I would love to have them all clean before apply the Gluvit.
 

GA_Boater

Honorary Moderator Emeritus
Joined
May 24, 2011
Messages
49,038
You got pics showing now. I looked at the pic code and it was HTML code. Not important, it's working now.
Is that paint or thinned bed liner? SC never painted under the floor, so it has to be PO induced.
 

Emursed

Cadet
Joined
Jul 3, 2014
Messages
15
The base coat is gray and has a white splatter to it. Looks like some of the deck coating you would see in a lot of tin boats - a base with some raised paint to act as an non-slip element. The black paint on top is some really tough stuff and it seems to have many years of gasoline and oil mixed into it. I think it is possibly some tar coating, cheap lining paint or some epoxy based paint cause the stuff is pretty darn tough and it gets thicker the higher up the shoulder of the hull you go.. The aircraft stripper makes easy work of it. but it needs a little time to work and even then I am having to scrape a lot.
 

64osby

Admiral
Joined
Jul 28, 2009
Messages
6,799
Welcome to the site. Looks like a great project.

So we will assume your from The Great Lakes State somewhere. I can see Mullet Lake from the hill top at deer camp. Need to get the boat up there someday.
 

Watermann

Starmada Splash of the Year 2014
Joined
Jan 12, 2013
Messages
13,753
Youch black smeg! You should think about picking up a fine wire wheel for your drill to get that stuff off from around the rivets and a 3M abrasive pad with the plastic handle. Those 2 items will make your life a whole bunch easier getting that crud off the hull. Just remember to be safe, wear eye protection, use a drill with a side handle and use the wheel lastly when the stripper is pretty much removed. When your done pressure wash well. Any oily areas use acetone to clean and then a vinegar cleaning solution wipe down.

I feel your pain when it comes to this chore of paint removal, my tally so far is an 18 footer and a 16 footer. Add both sides up leaving out the transoms and bottoms and theres 68 feet of paint stripping. The average semi trailer is only 53 feet! :eek:
 

Emursed

Cadet
Joined
Jul 3, 2014
Messages
15
Yeah...the black smeg is terrible. It is some highly impenetrable stuff and is really slowing down my effort to strip the interior paint.

Bought another gallon of stripper and this stuff looks to be a different formula. The first batch was butterscotch colored and this new stuff is milky clear. It takes a little longer to work and the residue is slimy whereas the original stuff flaked up nicely and was much easier to collect from the hull. This new stuff could be reacting to the smegma and causing it to slime up for all I know, but it is making it a lot harder to work with.

Anyway, I have a small part of the starboard and all of the port side to finish along with the bow and then at least a whole day of sanding after that.

I'll update after all that is done and I am ready to clean and paint.
 

Emursed

Cadet
Joined
Jul 3, 2014
Messages
15
The interior has been sanded and I removed about 90% of the black paint/coating from it. I applied Gluvit to the rivets and it has had a chance to cure for two days. Tomorrow morning I will be washing down the bare aluminum with some degreaser it prep for the first coat of etching primer. I plan on putting on two coats Thursday and Friday - and then putting down the first coats of primer on Monday and Tuesday.

Bottom of the hull looks like the majority of rivets were hit with a sealer in the past. There is some paint loss around some of these rivets, but I don't have plans to address that issue until next season. Bottom line is that it appears that one of the PO's had tried to address leaks in the past and I am hoping that they did a fair job of it and that I won't have to re-address their work. Murphy's Law says that I probably will, but again, that is a job for another time. Six weeks until Vacation 2.0 and I think I can get the work I have scheduled before then done in time.
 

Watermann

Starmada Splash of the Year 2014
Joined
Jan 12, 2013
Messages
13,753
Yeah it sucks though to do all that work and have a boat that leaks, to me it's in the process of sinking when taking on water and drives me nuts... even the few ounces my Chief takes on makes me a bit upset.
 

Emursed

Cadet
Joined
Jul 3, 2014
Messages
15
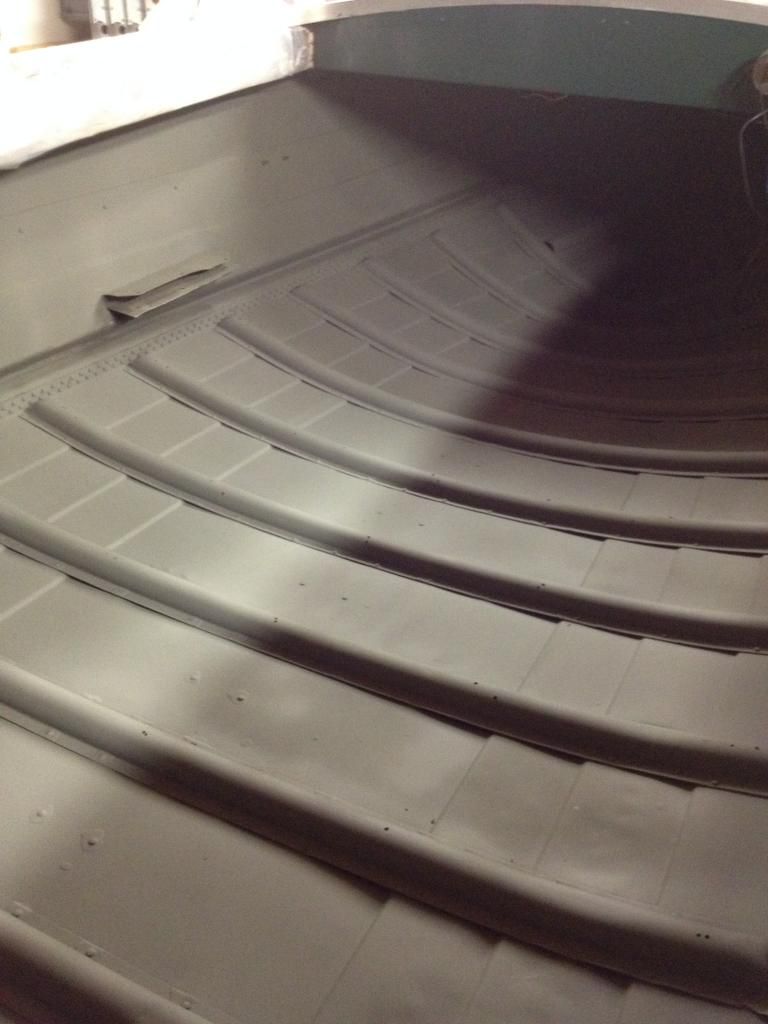
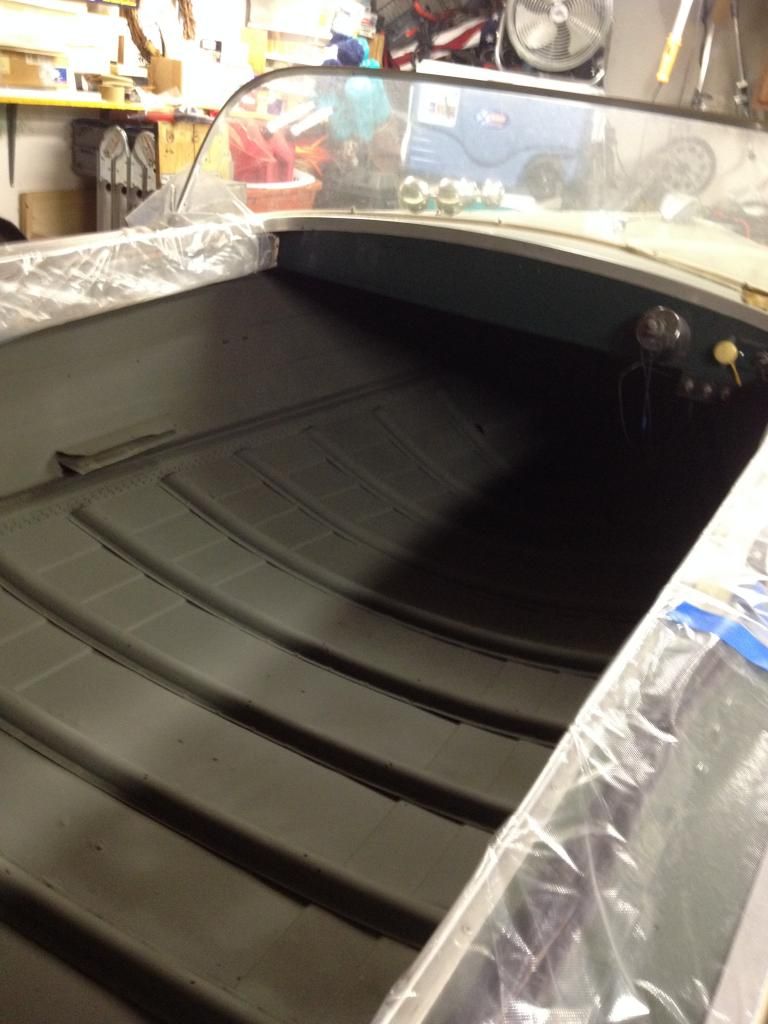
Here are some pics of the interior primed with etch primer...


The primer coat is going on Tuesday and I am keeping on my schedule so far.

Emursed
 

Watermann

Starmada Splash of the Year 2014
Joined
Jan 12, 2013
Messages
13,753
Oh yeah, now doesn't that feel good to get to the paint stage. :thumb:
 
Top