16' Starcraft SS (79) Rebuild

DrWiffel

Petty Officer 2nd Class
Joined
Mar 8, 2010
Messages
102
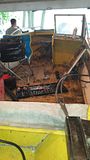
After years of checking out the all the rebuilds here I've decided to do one myself. I've always planed on doing a rebuild project, and bought the boat knowing that I would need to do one in the near future. Bought the boat with some soft spots in the rear decking, so I knew it was a matter of time. Well folks, it's time. I apologize for not taking more before pictures as for some reason it didn't really cross my mind at the time.

So here's the deal, I've already started the project but I have to do this on a budget. I've seen some really really nice rebuilds here, and I have to say, I just don't think that I'm going to be able to do everything that I would like to do.

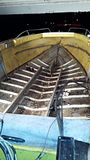
I know everyone likes pictures, so here's the progress that I've made thus far.


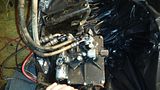
Hydraulic pump - Marked the hoses so I could get them back in the right spot


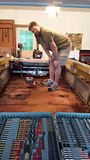
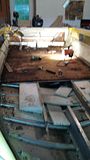
This is where I'm currently at


Thanks in advance for all your comments and suggestions

DrWiffel
 

SigSaurP229

Commander
Joined
Oct 1, 2008
Messages
2,123
Congrats on the start of another successful project, I like the 16SS and think they are a great hull. If you play your cards right you can actually do the rebuild for less than 2k

I HIGHLY suggest you save the flooring for templates.
 

hayko1971

Starmada Splash of the Year 2015
Joined
May 24, 2013
Messages
448
Looks great! I just got the same model boat that I plan to do a restore on. Just got it running nice today. I look forward to your progress!
 

Watermann

Starmada Splash of the Year 2014
Joined
Jan 12, 2013
Messages
13,753
Welcome to the iboats tin division! :welcome:

The forum update has caused some problems, glad you got your thread in. Looking good so far on the tear down. :thumb:
 

jbcurt00

Moderator
Staff member
Joined
Oct 25, 2011
Messages
24,871
Welcome to the Tin-Sanity.. As the forum gets more sorted out, more of the tin hat fellas :tinfoil3: will drop by to harass & help you along the way....
 

DrWiffel

Petty Officer 2nd Class
Joined
Mar 8, 2010
Messages
102
I was wondering why I was having trouble posting any replies… iBoats must be going through some growing pains.

I was able to save the front 3 for templates, however the rear was too far gone to pull up in one piece. I did take some measurements down before I pulled it up.

As far as the boat goes, it has been my favorite of them all.

I’m currently on a work hold do to my shop-vac needing a filter. I had to pull the old one out because it was crumbling to the touch. I tried to work without it and got a face full of foam to the face.

My budget for this project is to be around $500-$800. So unfortunately I’m going to have to skip on the paint job, although I would like to do something like that in the future, I just can’t eat the cost of that at this time. The admiral would not approve.

I do have some questions for you guys:


The old floor had the edges cut at an angle, when you replaced your floor were you able to keep this angle or did you square it off? I’m not sure how I’d even get that angle in there with a jigsaw.

What kind of epoxy would you recommend for sealing the floor? Would just a standard fiberglass epoxy work?

When you start to fasten the new flooring down, do you drill new holes in the aluminum running boards? I’m not sure how you’d line the new with the old holes.


Thanks for your support!
 

GA_Boater

Honorary Moderator Emeritus
Joined
May 24, 2011
Messages
49,038
Harass - Now why would we harass a new Starmadian with pics in his first post? :smile: Because the pics are small? :eek: Welcome to the TinHouse, Doc. We do have some fun here, but the goal is to get these old gals back to a useful state or to restore and improve on what Starcraft made.

Nice progress and 5-800 will get you new floors +. How is the transom? Often if the floors rot, the transom is right behind. In my opinion, spar varnish will protect the wood almost as well as epoxy - It's a money thing. Have some fun while you're here. :D
 

GA_Boater

Honorary Moderator Emeritus
Joined
May 24, 2011
Messages
49,038
Couple other things. My floor only had a bevel on the bow pieces with notches . I did use a circular saw set at 45° to cut. Just went slowly and it worked. I then used a jigsaw set at 45 for the notches.

Don't try to align the floor to the old holes in the ribs. First, you can't do it and second, it can't be done. Just drill new ones.
 

DrWiffel

Petty Officer 2nd Class
Joined
Mar 8, 2010
Messages
102
The transom is on the list. I’m just having some trouble getting the motor off… I have no idea how to disconnect the control cables. I’m waiting on a friend who’s a little more versed than I to help with that portion of the project. The part that I’m troubled with is the electrical cord that runs up to the starter. Do I disconnect it all the way up top where the starter is to where it splits at the base or is there a better way to go at it? The transom was iffy last year and definitely wouldn’t trust it now just driving down the road. I’ll get some pictures up tonight of the transom/motor.

I’ll have to see if my circular saw/jigsaw has a 45 angle on it. I’m not sure that it does. I was actually going to cut the whole thing with the jig because I’m horrible with a circular but can follow a line pretty well. I couldn’t cut a straight line to save my life.

@GA_Boater “Don't try to align the floor to the old holes in the ribs. First, you can't do it and second, it can't be done. Just drill new ones”
~HAHAHA thanks for the laugh. I think I’ll just drill new ones.

Harassment welcome! Lol. Thanks for the help!

On a side note, do you prefer the larger pictures or the thumb tabs you can click on?
 

GA_Boater

Honorary Moderator Emeritus
Joined
May 24, 2011
Messages
49,038
We like (or I like) the big IMG pics from Photobucket. A couple of reasons - They don't get lost with the changes going on in the forum upgrsde that's ongoing and the pics don't need to be clicked to see the detail. Often when I am replying to questions, I refer back to pics. The large ones let me scroll up to see what I need and go pack to the reply. Thumbs need to clicked on and pop up a viewing window. On occasion everything goes to hell in a handbasket during the popup viewing.


I clamp 2X4s to my work for straight lines. :smile: I'll post a pic how I prep the wood before cutting in a little bit.

I didn't see what motor you have.
 

DrWiffel

Petty Officer 2nd Class
Joined
Mar 8, 2010
Messages
102
I can't remember the year for sure, I believe it's a 86-70hp merc
 

Watermann

Starmada Splash of the Year 2014
Joined
Jan 12, 2013
Messages
13,753
Doc you just need to tear into that sucker after taking pics and disconnect, unplug, unscrew and remove everything. That's how you learn. I started off like you, not really knowing what to do. Now I'm doing one of the most challenging boat restos I think possible with motor upgrades needing completely new mounts and keyhole for the stern drive.
 

GA_Boater

Honorary Moderator Emeritus
Joined
May 24, 2011
Messages
49,038
Don't you have a big plug on the side of the motor? Gently pry that off. Lord, I'm always using the word gently when talking about tearing into an old Merc. Twist and unhook the fuel line. The control cables have some variation over the years, but they probably pass through some adjustment barrels which have a spring loaded cross-pin arrangement to be undone and then undo the cable end. The last thing is the steering, the worst part. Disconnect the end from the link arm and remove the big nut on the tilt tube. If you're lucky you can pull the cable to starboard and out of the tilt tube. In many cases the cable can held in place by corrosion and the motor must be moved to port for the cable to clear the tilt tube,

Give us a jingle if you get stuck, many of us have been there.
 

classiccat

"Captain" + Starmada Splash Of The Year 2020
Joined
Dec 20, 2010
Messages
3,405
Welcome! :welcome: please dont crash ...please dont crash... ...please dont crash! :p
 

DrWiffel

Petty Officer 2nd Class
Joined
Mar 8, 2010
Messages
102
Thank you for the responces.

I think you’re right. I have to just dig into it and start disconnecting taking pictures along the way so I don’t forget where the parts go when I’m piecing it back together.

I tried to post a reply last night, however my attempts were futile.

Here’s the back of the motor (noting really special here)


Here’s the area I was concerned with, but will just dig into it. Steering cable has been removed, but I’m pretty sure it will need to replaced. It was pretty stiff. Unless you guys know of a way of rehabbing it?


I know there’s a place here where I can figure out the year. I’ll take a look while I’m on break and see what I can find.


DrWiffle
 

DrWiffel

Petty Officer 2nd Class
Joined
Mar 8, 2010
Messages
102
Found it... it's a 79. Must have came with the boat. Good to know.
 

GA_Boater

Honorary Moderator Emeritus
Joined
May 24, 2011
Messages
49,038
That's a 3 cylinder, isn't it? The Merc harness part # is 84-73204. CDI offers a repair service only, they don't have a new replacement harness. I would be leery of getting a NOS harness if you found one because it is just as old as what you have and could fall apart in short order. Your best bet would be to replace the bad wires yourself. I repaired mine because I'm cheap, even though CDI makes a new one.

From the pictures I saw, it looks like the boat-side harness has a couple of screws that attach the plug to the inside harness plug. Appears that way in the poor pics I saw.
 

DrWiffel

Petty Officer 2nd Class
Joined
Mar 8, 2010
Messages
102
Thank you GA and Watermann

I was able to pull the motor off last night. Getting the wires off was actually easier than I thought it was going to be and to be honest, I think I’ve already taken harder things that that off.

I also got a good start on pulling the transom last night I pulled most of the screws out from the splash well (noticed one that I missed as I was putting it away for the night :facepalm: ), all the bolts are out, splash well drains are out. Now all I have left is one screw and the transom cap.

Getting the splash well drain tubes out did not go so well. I ended up completely destroying one of them. Would you guys know where I might be able to find maybe 2 replacements for it, or have other replacement ideas?

Here’s the progress:


Top