1972 15' Nova rebuild

Status
Not open for further replies.

dozerII

Admiral
Joined
Oct 25, 2009
Messages
6,527
Selling a house is sooo much fun :rolleyes: hope it sells quick and you find the perfect replacement.
 

MNhunter1

Ensign
Joined
May 12, 2014
Messages
979


Got the Nova out of storage today. Let's see how much work I can squeeze out before the admiral sends me to the brig!
 

MNhunter1

Ensign
Joined
May 12, 2014
Messages
979
Slow forward progress...

New side panels are cut from some 1/2" ACX and awaiting a few coats of Spar.

Overcame my fear of drilling the through bolt holes in my new transom and just let her rip. Mocked everything up and she lines up perfectly! Now...do I over drill before epoxy and re-drill to correct size, or just leave it as is and liberally coat each bolt with some 5200 (which will be done regardless). Waiting for the temps to warm a bit before laying down the epoxy. Figure I'll need to re-drill anyhow unless I somehow plug the holes, so leaning toward the oversize option. How big do I go for a 1/4" final hole? Had a little tear out on the back side(inside) of the splashwell drain tube holes, but figure I'll smooth out whatever doesn't get filled with the epoxy with some MT or JB before covering with paint and installing the tubes. I have a set of the plastic tubes on hand, but debating ordering a set of the aluminum ones instead??

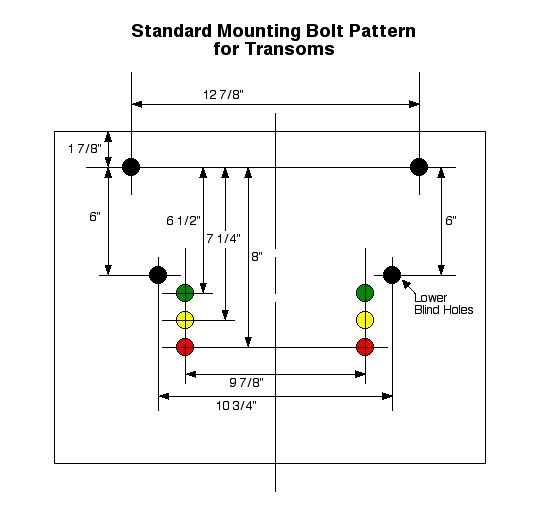
My other big fear was the motor mounting holes. Managed to wrestle one of the outboards off the stand to use as a template and transferred the mounting hole pattern to my aluminum transom pad. I'll install the transom pad with the pre-drilled 1/2" holes when I do the final installation of the transom. I'll then need to drill the through holes in the actual transom skin and transom, but everything should be all lined up accordingly with the transom pad as my template. My fabricated transom cap is made from a little larger c-channel than the original cap, so I had to account for where the transom pad will actually sit in relation to the top of the actual transom. I currently have my top motor mount holes set to be drilled 2" from the top of the actual transom. From what I can tell, this should be accurate, so please correct me if I'm down the wrong path and before I do the actual drilling. It's just holes in a transom pad at the moment. I do not plan to drill these until the transom is actually installed, so no over drilling and epoxy plugs. I think I'll just be asking for too much precision for the pad, skin, and transom to all line up perfectly.

Got a Five Oceans 6 gallon tank and fuel line on order, but unsure of what fittings to order. All the information I find for an '87 Mercury doesn't seem to line up with what I'm actually seeing at the motor. Can someone please point me in the right direction for the correct fuel line fitting for the included picture? 1987 Mercury Outboard.


I'll try to do better with my picture posting...my current work hasn't really been much to photograph :sleeping:
 

Watermann

Starmada Splash of the Year 2014
Joined
Jan 12, 2013
Messages
13,753
I had a BIA standard bolt pattern for outboards but can't find it right now. I did find this one though.

Mounting_Bolt_Pattern.jpg

Does this fuel line connector look right to you? To see a better pic of it just highlight the part numbers and do a google image search.

Replaces OEM part #
  • MERCURY MARINE 22-13563T 7
  • MERCURY MARINE 22-13563Q7
http://www.iboats.com/Fuel-Connector...view_id.174958
 
Last edited:

MNhunter1

Ensign
Joined
May 12, 2014
Messages
979
I used this template and came out really close, but just off enough to need some modification when I mated it up to the actual motor:


I think you're correct on the fuel connector WM! Not much of a description for what year it fits anywhere I could find online, but judging from the photos, it should be the one. I'll just have to order it and see.

There's a guy here locally with a Mercury Quicksilver 6 gallon tank for sale. I have a Five Oceans on the way, but could use a second tank for the 16SS. If cost was a wash between a used Quicksilver or a new Five Oceans, which way would you lean? Is one superior than the other?
 

Watermann

Starmada Splash of the Year 2014
Joined
Jan 12, 2013
Messages
13,753
The thing I like best about the 5 - O's over any other tank is there's a 'moat' for the lack of a better word all the way around the filler so if any fuel is spilled it collects there rather than running down the sides of the tank. Also the plastic is very rigid and the cap seals up good with no leaks un- like the Crapwood tanks.
 
Last edited:

MNhunter1

Ensign
Joined
May 12, 2014
Messages
979
Got a break in the weather and the temps look like they are going to rise enough here for me to finally get some epoxy on this transom. I'm going to try to time the additional coats for a chemical adhesion rather than wait for the cure and sand needed for the mechanical. I'll be using US Composites 3:1 epoxy. We've got rain in the forecast, but I'll be working inside an attached garage. Any concerns with the additional moisture in the air from the precipitation? Will a topcoat of paint over the epoxy need a coat of primer too?
 

MNhunter1

Ensign
Joined
May 12, 2014
Messages
979
Slow progress...makes me wonder what I did with all that free time before a wife and kids??

Anyway, transom is all sealed up with 2 coats of epoxy on each side and 4 coats on all the edges. Topped with a couple coats of Krylon Fusion which should play well with the epoxy as far as I can tell. Not sure yet if I'll hit it again with the Duralux to blend it all together when I lay down the paint for the splashwell and topsides. It's currently a satin grey.


Also took advantage of a few of the 100 pool noodles I had originally intended to use for flotation. Hoping I can soften the blows from the admirals car doors and prevent a few paint chips down the road. She tends to forget that there are other items in the garage at times...although she was quick to notice the aluminum hull that is no longer nestled along the side of the house and has found a nice dry covered home in a much more convenient work space :D


MNhunter1

Ensign
Joined
May 12, 2014
Messages
979
Attempting to layout the location of the pedestal seats for the doublers and T-nuts I'll be using to mount. It seems my ideal location may interfere with the aluminum floor supports/stringers. Anyone have a measurement for the ideal distance for the pedestals in relation to the side boards, i.e. how far away, or an opinion on passing a mounting screw or two through the aluminum supports? The remainder of the mounting bolts would be through the doubled floors. Just worried about cramping too close to the side/controls at the helm.
 

Watermann

Starmada Splash of the Year 2014
Joined
Jan 12, 2013
Messages
13,753
About all you can do is mock up the seating and plop yer can in the seat to get it just right for you. :D
 

MNhunter1

Ensign
Joined
May 12, 2014
Messages
979
Transom paint and inside transom skin have had sufficient time to reach a full cure and the transom is getting installed this weekend. I've got the stainless hardware, 5200, mineral spirits, gloves, and paper towels standing by.

Question of the day...washers, or no washers underneath the truss heads of the through bolts slathered in 5200?? :confused:
 

Watermann

Starmada Splash of the Year 2014
Joined
Jan 12, 2013
Messages
13,753
If you're taking about the machine screw heads going through the transom, no washers on the outside just 5200 under the head and on shaft. Then nylocs with washers on the inside. Hold the head solid on the outside and only turn the nyloc so as to not grind through your paint and spin the 5200 out.
 

MNhunter1

Ensign
Joined
May 12, 2014
Messages
979
If you're taking about the machine screw heads going through the transom, no washers on the outside just 5200 under the head and on shaft. Then nylocs with washers on the inside. Hold the head solid on the outside and only turn the nyloc so as to not grind through your paint and spin the 5200 out.

Yep, those the ones. No paint yet as I wanted to cover the screw heads too, but I'm with you on the turn the nut and not the bolt to maintain the integrity of the 5200. Just didn't know if throwing a washer under the screw head on the outside transom skin would provide for a better seal/bigger footprint for the 5200.
 

g0nef1sshn

Lieutenant
Joined
Feb 24, 2015
Messages
1,291
I put washers on the outside of the transom goobered in 5200, probably too much, then doubled up the nylocks on the 6 outside bolts and the 6 on the knee brace. They shouldnt go anywhere. All with out gloves (not recommended). It takes 1-2 weeks to wear off completely from the hands for me. But I dont really try to hard to get it off after the first day.

Its not by any means a professional job, but after paint it looks pretty good.
 

Watermann

Starmada Splash of the Year 2014
Joined
Jan 12, 2013
Messages
13,753
Ok, I mistook your post and thought you had the transom painted and cured, just not the outside skin yet. I hope you have better luck than me when painting stainless and having it stick long term. I've left mine to shine and the transom is so busy with stuff all over it nobody has ever noticed or asked me about why they aren't painted.
 

MNhunter1

Ensign
Joined
May 12, 2014
Messages
979
Yeah, just to clarify...transom wood is painted/cured over the epoxy seal, as is the inside of the transom skin where I buttered it up with Marine Tex for my patch from the short shaft hack job of the PO. Thought a little prime and paint might give it a little added corrosion protection. I had planned to paint the hull after installing the transom wood and aluminum transom plate to the outside skin. Thought it might be better to have the bolt/screw heads painted and the 5200 directly to the aluminum rather than the paint, but if I may run into issues with the paint sticking to the stainless hardware, or the 5200, I'm not opposed to laying down the paint first and then installing the transom. I already have a 2x brace to support the area during the flip, just want to get over the hurdle of getting this thing painted and turning the corner towards completion. Haven't had a lot of time with work, family, and looking for a new home. At the point of waiting for 5200 to cure before paint, or paint to cure before proceeding. Probably overthinking things, but it's my hobby and I don't really have a pressing timeline for completion.

Maybe the paint should come first and I'll use the cure period to seal up my dash and flooring in preparation for the reassemble. The stainless hardware might actually add a nice contrast😄...with or without the washers...lol
 

Watermann

Starmada Splash of the Year 2014
Joined
Jan 12, 2013
Messages
13,753
Yeah the transom AL is the thickest part of the boat at .10 (bottom .09 and sides .080) so it doesn't need washers. Besides they never fit right and it seems they always they go off center just as they get tight. If you paint over the SS bolt heads just hope you never have to remove or tighten them, it will take more paint than you want off around them. Not to mention be another source of potential runs when painting.
 

hayko1971

Starmada Splash of the Year 2015
Joined
May 24, 2013
Messages
448
I did not use washers on my transom hardware. There were none when I disassembled.
 
Status
Not open for further replies.
Top