Here we go - Starcraft Mr 180 CC

Status
Not open for further replies.

scstar

Cadet
Joined
Jul 6, 2011
Messages
23
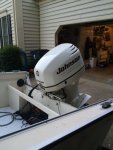
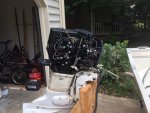
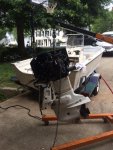
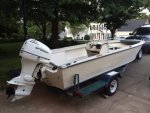
Re: Here we go - Starcraft Mr 180 CC

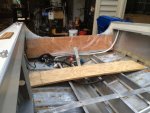
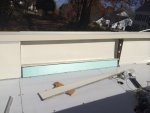
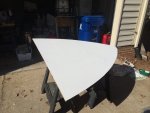
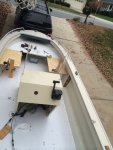
The original windshield was 1/4 in I used .220 (7/32) for the replacement. Cut the shape out with a circular saw with it flat. Spent a lot of time making sure it was laid out right. It sits back at an 8 degree angle. Used a plywood blade and cut slower than normal. Clamped the sheet against a piece if metal along the bend line in the Workmate and heated it real slow with the heat gun seem like forever prolly 6 - 7 min. Make sure you do all the cutting before you bend the plexiglas.
 

scstar

Cadet
Joined
Jul 6, 2011
Messages
23
No Title

Got a chance to fill er up with water and leak test and found this under the transom directly under the knee brace.
At first I thought it was a rivet because the water was running over and dripping off a rivel and not straight out from the hole.
Don't have any closed end rivets and it does not look like enough clearance for a rivet head any way - any suggestions on fixing ? Could I seal it with JB weld ?
 

Attachments

  • photo200791.jpg
    photo200791.jpg
    38.3 KB · Views: 7
  • photo200792.jpg
    photo200792.jpg
    28.3 KB · Views: 7

64osby

Admiral
Joined
Jul 28, 2009
Messages
6,799
JB would be great for that. I added a small piece of backer alum. on mine where the skin was worn thin.
 

scstar

Cadet
Joined
Jul 6, 2011
Messages
23
No Title

Been chipping away at this a litte at a time, and realized I had not posted anything in a while.

Got the transom, foam, and floor installed. I went with 3/4" plywood on the floor, but with the three stringers I would stick with the factory 1/2" if I had to do it again.

Everything is 1/4" higher with the 3/4" in so I had to modify some of the panels going back under the motor well, and the side panels did not fit back exactly right.

The front casting deck is cut out, and I am making some additional seats on the side, with storage underneath.

The console top looked like swiss cheese so I took some of the left over wood from the floor and made a new top - looks pretty good.

Just bought a piece of mahogany ($4.50) from Greenville Lumber for the edge trim.

Getting excited about getting back on the water, but still a lot more to do
 

Attachments

  • photo212557.JPG
    photo212557.JPG
    136.3 KB · Views: 11
  • photo212558.JPG
    photo212558.JPG
    136.6 KB · Views: 11
  • photo212559.JPG
    photo212559.JPG
    136.3 KB · Views: 11
  • photo212560.JPG
    photo212560.JPG
    132.3 KB · Views: 11
  • photo212561.JPG
    photo212561.JPG
    99.9 KB · Views: 11
  • photo212562.JPG
    photo212562.JPG
    116.1 KB · Views: 11
  • photo212563.JPG
    photo212563.JPG
    136.4 KB · Views: 11
  • photo212564.JPG
    photo212564.JPG
    124.8 KB · Views: 11
  • photo212565.JPG
    photo212565.JPG
    109.3 KB · Views: 11

GA_Boater

Honorary Moderator Emeritus
Joined
May 24, 2011
Messages
49,038
Progress is progress, SC. The 1/4" can make things a bear fitting back together. She's gonna be great!
 

astor

2018's Starmada Splash Of The Year.
Joined
Jul 31, 2011
Messages
425
Great progress, she's looking good. The thicker plywood is tough on reassembly, but I still think its a good idea,after I used the 1/2" and it flexed too much, so I put alot of work into stiffening it up.
 

Watermann

Starmada Splash of the Year 2014
Joined
Jan 12, 2013
Messages
13,753
That much closer to hitting the waves! Lookin good :thumb:
 

Weep'n Willy

Master Chief Petty Officer
Joined
Jun 12, 2012
Messages
831
Nice progress on the MR. Looks like she is coming together well. Console is looking good too.
 

dozerII

Admiral
Joined
Oct 25, 2009
Messages
6,527
Great progress so far. 5/8" ply is a good comprimize, everything still fits together real well but the extra 1/8" makes a huge difference in stiffness in the deck.
 

scstar

Cadet
Joined
Jul 6, 2011
Messages
23
No Title

Finally got the front deck put in. It took a while to get the sides done since they are new and I did not have an original peice to copy. The console is done and ready to put in with the new upholstrey. I waited to put in the console until the front deck was done so I would have more space to work.
 

Attachments

  • photo217216.JPG
    photo217216.JPG
    136.6 KB · Views: 8
  • photo217217.JPG
    photo217217.JPG
    162.1 KB · Views: 13
  • photo217218.JPG
    photo217218.JPG
    172.3 KB · Views: 8

Watermann

Starmada Splash of the Year 2014
Joined
Jan 12, 2013
Messages
13,753
Looking good :thumb:

It won't be long now, after the decking goes in things seem to progress a lot faster.
 

classiccat

"Captain" + Starmada Splash Of The Year 2020
Joined
Dec 20, 2010
Messages
3,405
That's really sharp!

fetch


you'll be fishin' in this thing in no-time!
 

scstar

Cadet
Joined
Jul 6, 2011
Messages
23
No Title

Been working slow and steady and finished the front deck, and the motor back on, and back in the lake.
Motor started up on the first try. Needs some sea foam - stalled a couple times warm.

Biggest problem is the steering is hooked up backwards - turn left and it goes right.
I think it can be changed by moving the cable to the top of the rack.

Still need to finish painting the floor, and install the fishfinder, and lots of miscellaneous small things.
 

Attachments

  • photo223349.jpg
    photo223349.jpg
    33.4 KB · Views: 10
  • photo223350.jpg
    photo223350.jpg
    38.7 KB · Views: 9
  • photo223351.jpg
    photo223351.jpg
    44.6 KB · Views: 10
  • photo223352.jpg
    photo223352.jpg
    40 KB · Views: 10
  • photo223353.jpg
    photo223353.jpg
    37.6 KB · Views: 10

64osby

Admiral
Joined
Jul 28, 2009
Messages
6,799
Mariner on the water. :thumb:

Don't worry about the steering, you just have to imagine you are going in reverse . :eek: It is only tricky at the dock. :faint2:

Flipping the rack should cure that as you said.
 
Status
Not open for further replies.
Top